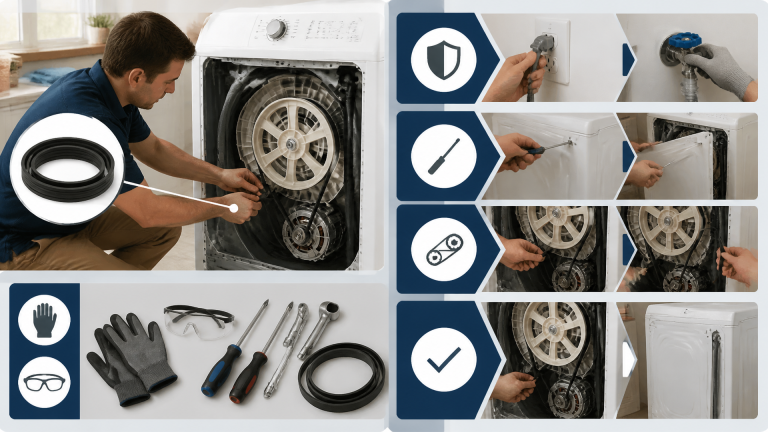
A Complete Guide to Understanding Your Dryer Heating Element
The dryer heating element is like the superhero of laundry day, generating heat to dry clothes evenly. When it’s working well, it warms everything up and prevents damp spots. But sometimes, it can become faulty, leading to damp laundry and unusual noises. Testing it is easy with a multimeter, and you can replace it, too. A little maintenance goes a long way! Stick around, and you’ll find even more helpful tips and tricks for your dryer needs.
Key Takeaways
- The heating element generates heat essential for drying clothes evenly and efficiently to prevent damp spots.
- Signs of a faulty element include inadequate drying, unusual noises, and visible damage like coil deformation or oxidation.
- Testing the heating element requires safety precautions, including unplugging the dryer and using a multimeter to check resistance.
- Choose a replacement element that matches the wattage and connector type of the old one to ensure compatibility and effective performance.
- Regular maintenance, such as cleaning vents and filters, helps prolong the life of your dryer and enhances its efficiency.
The Role of the Heating Element in Your Dryer
When it comes to drying clothes, the heating element plays a key role, much like the sun warming up a day at the beach. This component is responsible for generating heat, guaranteeing that clothes come out fresh and dry. Proper heat distribution is essential, as it allows every fabric to get the warmth it needs. If the heat is uneven, certain areas may remain damp, defeating the purpose of using a dryer.
Moreover, energy efficiency is another benefit of a well-functioning heating element. When it works effectively, it uses less energy, saving money on electricity bills. Imagine wearing a cozy sweater on a chilly day; it’s all about that snug warmth! By understanding how the heating element operates, users can maintain efficient performance and prolong the life of their dryer. A little care goes a long way, making drying clothes a breeze!
Signs of a Faulty Heating Element
When a dryer starts to misbehave, it can be frustrating for anyone trying to keep their clothes fresh and dry. Signs like inadequate drying performance, unusual noises during operation, or frequent blowing fuses can indicate a faulty heating element. Recognizing these clues can help avoid bigger problems down the road and get laundry back on track!
Inadequate Drying Performance
Inadequate drying performance can be a puzzling problem for many, especially when it seems like the dryer is just spinning its wheels without getting the job done. When clothes come out damp, it may signal a need for attention. One common culprit is vent blockage, which can prevent hot air from circulating effectively. A blocked vent can make even the best dryer feel like a lazy sloth! Another issue might be an overloaded drum. Stuffing in too many clothes at once can stop the heat from reaching everything. To solve these problems, be sure to clean out the vent and pack the dryer more snugly next time. With these adjustments, a dryer can return to working properly, leaving clothes warm and fresh.
Unusual Noises During Operation
Have you ever stopped to wonder what those unusual noises coming from the dryer could mean? These sounds might indicate a problem, especially if the heating element is faulty. It’s essential to listen closely; tumbling noises can hint at foreign objects rattling around, while floor vibrations may signal an imbalance or a worn-out component.
Here’s a quick reference for understanding those sounds:
| Sound Type | Possible Cause | Action Needed |
|---|---|---|
| Rattling | Foreign objects | Check and remove items |
| Loud thumping | Floor vibrations | Level the dryer |
| High-pitched squeal | Faulty heating element | Inspect and replace |
| Soft humming | Normal operation | No action needed |
| Whirring | Motor or belt issues | Consult a professional |
Pay attention, and take action to keep your dryer healthy!
Frequent Blowing Fuses
Frequent blowing fuses can be a common yet frustrating issue for many homeowners, often signaling an underlying problem with the dryer’s heating element. When a dryer is connected to shared circuits, it can lead to a panel overload. This happens because the heating element pulls too much power, causing the fuse to blow. Imagine trying to share a small snack with friends—there just isn’t enough to go around! If fuses blow often, it’s important to check for this issue. Homeowners should inspect their wiring and make sure their dryer isn’t overloading the electrical system. If unsure, seeking professional help can be a good idea. Remember, understanding your appliance can empower you to tackle these challenges head-on!
Common Problems Associated With Heating Elements
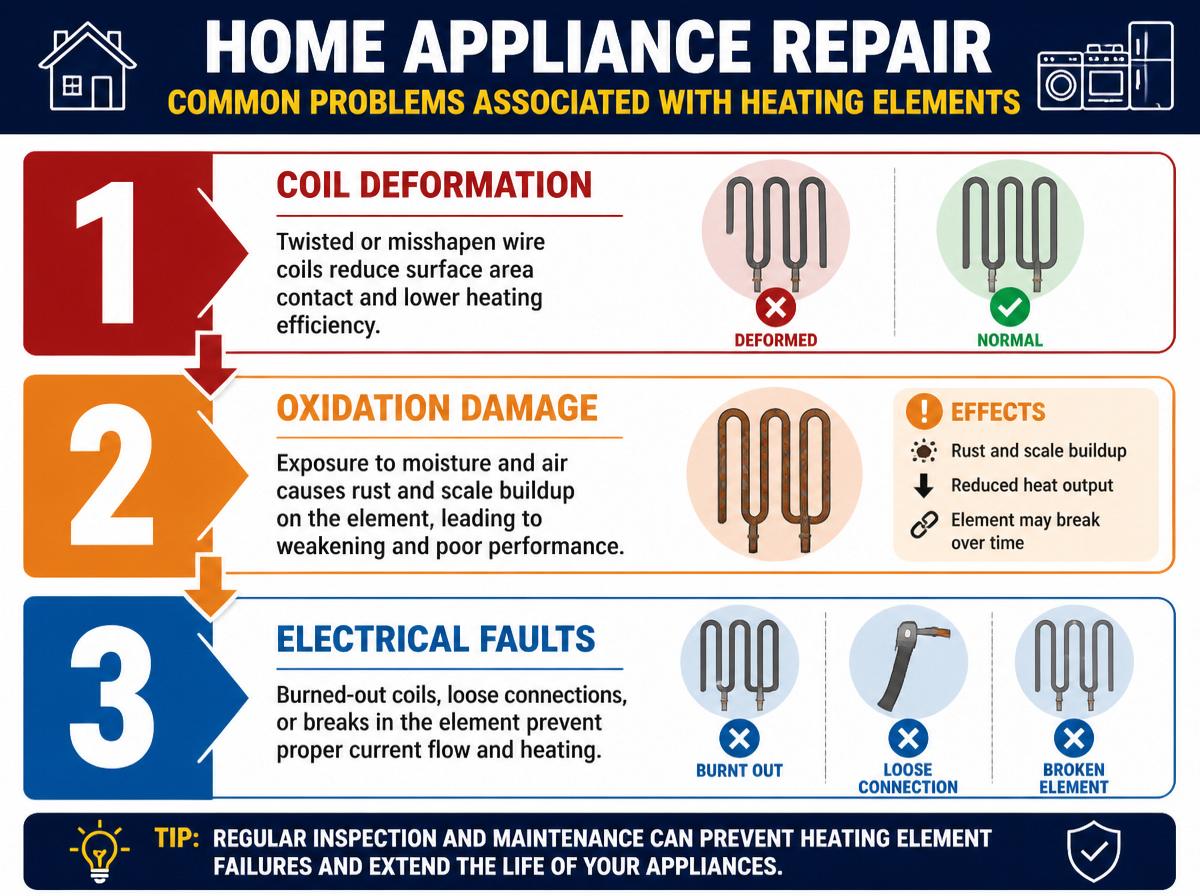
Here’s a quick reference table to clarify these issues:
| Problem | Description |
|---|---|
| Coil Deformation | Twisted wire coils reduce heating |
| Oxidation Damage | Rusty coils hinder heating function |
| Resulting Effects | Clothes stay wet; dryer works harder |
How to Test Your Dryer’s Heating Element
Before starting to test a dryer’s heating element, safety should always come first. It’s important to unplug the dryer to avoid any accidental shocks while checking the element’s connections and functionality. Once safety is guaranteed, following the step-by-step testing procedure will help anyone feel confident in diagnosing the issue, turning a formidable task into a manageable challenge.
Safety Precautions First
When someone decides to test their dryer’s heating element, it’s essential to prioritize safety first. Ensuring the area is safe can prevent accidents. One smart step is to keep a fire extinguisher nearby, known as Extinguisher Placement. This way, you’re prepared for any surprises! Childproofing laundry areas also helps keep little ones safe while you work. Here’s a quick guide to essential safety tips before testing:
| Safety Tip | Description | Importance |
|---|---|---|
| Turn Off the Power | Unplug the dryer | Prevents electric shock |
| Wear Protective Gear | Gloves and glasses | Protects from debris |
| Keep a Fire Extinguisher | Accessible nearby | Safeguards against fires |
| Secure the Area | Clear any clutter | Reduces trip hazards |
| Childproofing Laundry | Use child locks | Keeps kids out of danger |
Stay safe and confident!
Testing Procedure Steps
Testing a dryer’s heating element can feel like an intimidating task, but with the right steps, anyone can tackle it confidently! Follow these straightforward procedures to guarantee success.
- Unplug the Dryer: Safety first! Always disconnect the power before beginning.
- Access the Heating Element: Remove the back panel to reach the heating element.
- Check for Damage: Inspect the element for any visible signs of wear or burnout, noting any findings in your documentation protocol.
- Use a Multimeter: Set it to the ohms setting to test the element’s resistance, keeping an eye on sequence timing to verify accuracy.
Step-by-Step Guide to Replacing a Heating Element
Replacing a heating element in a dryer may sound tricky, but with the right guidance, it can be a fun and rewarding project! First, gather the required tools: a screwdriver, pliers, and a multimeter. Most replacements will take about 1 to 2 hours, depending on your skills.
Here is a quick overview to keep in mind:
| Step | Description | Time Estimate |
|---|---|---|
| 1. Safety First | Unplug the dryer and wear gloves. | 5 minutes |
| 2. Remove Cover | Use a screwdriver to remove screws. | 15 minutes |
| 3. Replace Element | Carefully swap the old element. | 20 minutes |
| 4. Reassemble | Put everything back together. | 20 minutes |
Maintenance Tips for Your Dryer
Keeping a dryer in good shape is not just about repairs; it’s also about regular maintenance. Taking care of your dryer helps it last longer and work more efficiently. Here are some easy maintenance tips anyone can follow:
- Vent Cleaning: Make sure to clean the vent regularly. Lint buildup can cause fires and make your dryer work harder.
- Filter Maintenance: Check and clean the lint filter after every use. A clean filter helps improve airflow.
- Inspect the Drum: Look for wear and tear inside the drum, which can affect performance.
- Schedule Professional Check-ups: A yearly professional inspection can catch any issues early and keep things running smoothly.
Choosing the Right Replacement Heating Element
When it comes to choosing the right replacement heating element for a dryer, how can one be sure they’re making the best decision? First, it’s essential to check wattage compatibility. The new heating element must match the wattage of your old one, or it might not heat effectively. Imagine expecting warm, cozy clothes and ending up with damp socks instead—yikes!
Next, pay attention to connector types. Different dryers have different connections, so choosing one that fits perfectly is essential. It’s like matching puzzle pieces; if they don’t fit, the puzzle stays incomplete.
Taking a moment to double-check both wattage and connectors can save time and frustration. Remember, you’ve got this! With a little research and care, replacing the heating element can be a rewarding project. Soon enough, you’ll enjoy fresh, warm laundry again, and that’s something to smile about!
When to Call a Professional for Repairs
Have you ever wondered if it’s time to bring in a professional for dryer repairs? Knowing when to call for help is essential for a safe and effective solution. Here are four key signs that professional assistance may be needed:
- Repeated Issues: If the same problem keeps happening, it’s time to consult an expert.
- Warranty Considerations: If your dryer is still under warranty, professional repairs might be your best option to avoid voiding it.
- Complex Repairs: Problems involving electrical components require a trained technician for safe repairs.
- Service Contracts: If your service contract covers repairs, it’s wise to take advantage of it for assistance.
Frequently Asked Questions
How Long Does a Dryer Heating Element Typically Last?
A dryer heating element typically lasts between 5 to 10 years. Lifespan factors include usage frequency, moisture exposure, and maintenance tips, such as regular cleaning and inspection, which can extend its functionality and efficiency.
Can I Use My Dryer Without a Heating Element?
In a world where clothes flapped like sails, it is possible to use a dryer without a heating element. The air only mode allows for ventless tumbling, efficiently drying clothes without heat, albeit slowly.
Is It Safe to Repair a Heating Element Myself?
Repairing a heating element can be risky. It is essential for individuals to be aware of potential electrical hazards. Using appropriate protective equipment greatly enhances safety during the repair process, mitigating risks associated with handling electrical components.
What Are the Costs to Replace a Heating Element?
Replacing a heating element typically costs between $100 and $300. This includes labor estimates ranging from $50 to $150, with part prices usually between $50 and $200, depending on the dryer model and heating element type.
Do Different Dryer Brands Have Unique Heating Elements?
Yes, different dryer brands often have unique heating elements. Approximately 70% of brands use proprietary connectors, which can limit brand compatibility. Understanding these nuances is essential when considering replacements for ideal functionality and safety.
Conclusion
Understanding your dryer’s heating element is like tending to a garden. Just as flowers bloom brightly with care, a well-maintained heating element helps your clothes dry quickly and efficiently. If you notice signs of trouble, remember you have the power to diagnose and fix many issues yourself. With the right tools and a little patience, you can bring your dryer back to life. So, roll up your sleeves and give your dryer the love it deserves!
Explore This Topic
- Back to Dryer
- Back to appliance repair
Related guides in this cluster: