
Complete Guide to Understanding and Repairing a Dryer Motor
Understanding and repairing a dryer motor can be simple with the right help! Watch for signs like strange noises or a burning smell. Start with proper tools such as screwdrivers and a multimeter. Always prioritize safety by unplugging the power first. Diagnosing issues is key, followed by removing the motor if necessary. Consider whether to repair or replace it. With a little maintenance afterward, your dryer will be in great shape again. There’s much more to explore, so keep going!
Key Takeaways
- Recognize early signs of motor failure, including strange noises, burning smells, and performance decline to prevent serious issues.
- Use basic tools and diagnostic equipment, like a multimeter, to accurately assess motor health and diagnose problems.
- Prioritize safety by isolating power before repairs and wearing proper PPE like gloves and safety glasses.
- Weigh the cost of repairing versus replacing the motor, considering long-term longevity and environmental impact.
- Implement regular preventative maintenance, including lubrication and belt inspections, to extend motor life and improve efficiency.
Common Signs of a Failing Dryer Motor
When it comes to keeping clothes fresh and warm, a dryer is an essential appliance in many homes. However, sometimes it can show signs that something isn’t quite right! Common signs of a failing dryer motor include strange noises like squeaks or rattles. These sounds can indicate that parts are wearing down or struggling to function.
Another red flag is a burning smell. If your dryer emits this unpleasant odor, it’s important to turn it off immediately. This smell may mean that the motor is overheating or facing serious issues. Ignoring these signs could lead to bigger problems down the road, and no one wants to deal with a broken dryer!
If you notice these issues, stay strong. With the right steps, you can tackle the repair! Just remember, every dryer has its quirks, so paying attention to them can save you time, money, and even a few headaches!
Tools and Materials Needed for Repairs
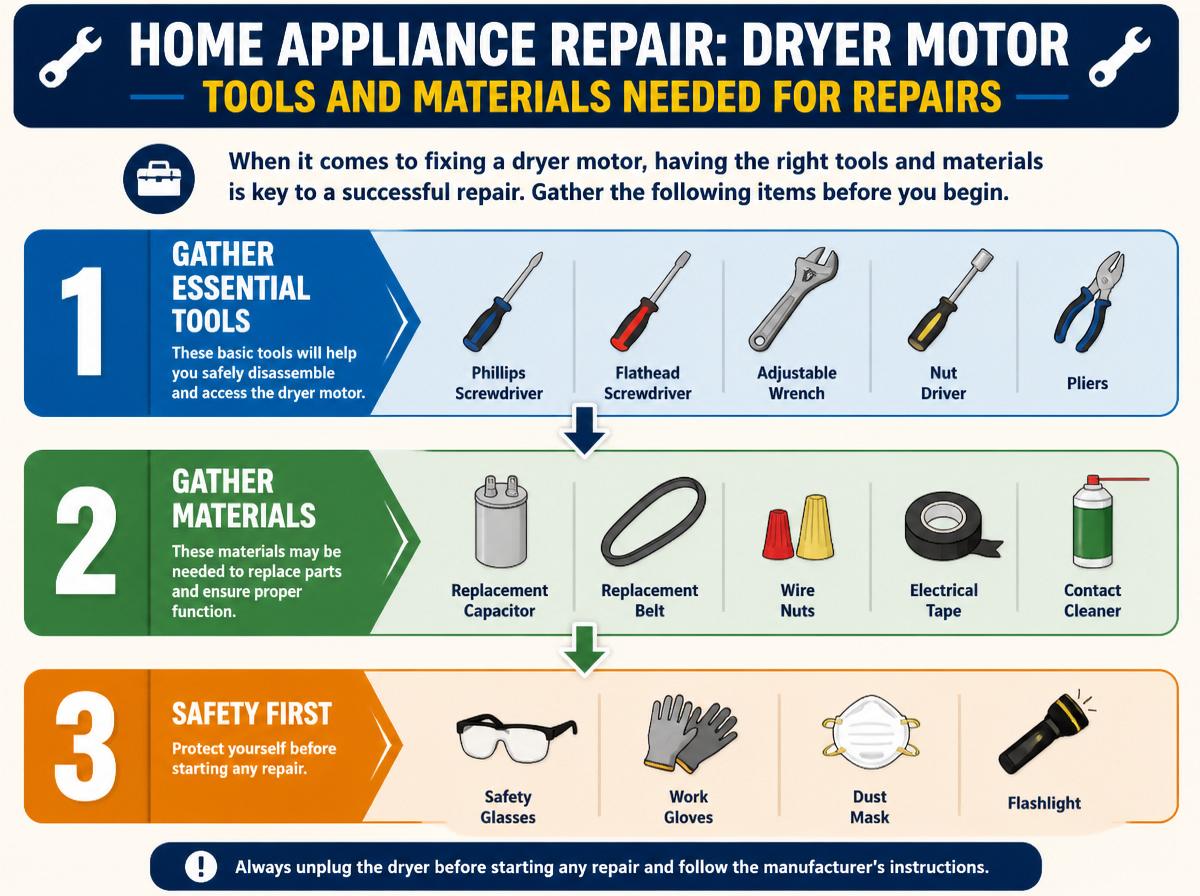
When it comes to fixing a dryer motor, having the right tools and materials is key to a successful repair. Essential tools, like screwdrivers and wrenches, can make the job easier, while necessary replacement parts help the motor runs smoothly again. With the right equipment at hand, anyone can tackle this project with confidence and a touch of humor—after all, who wouldn’t want to save a few bucks and impress their friends with DIY skills?
Essential Repair Tools
Repairing a dryer can feel like solving a puzzling mystery, but having the right tools can make all the difference! First, keep a sturdy set of screwdrivers in your toolbox—they’re essential for opening up your dryer. A multimeter is also handy; it helps check if the motor receives power. Remember, tool ergonomics matter too! Comfortably gripping your tools can make repairs smoother. A set of pliers will come in handy, offering a great grip for those tiny, stubborn screws. Finally, think about storage solutions. A well-organized toolbox not only saves time but makes the whole repair experience less stressful. With these essential tools, anyone can tackle dryer repairs like a pro!
Necessary Replacement Parts
Understanding the necessary replacement parts for a dryer repair is just as important as having the right tools. For a successful repair, make sure you check the belt compatibility before purchasing a new belt. Using the right size and type is vital for maintaining functionality, so don’t just wing it! Drum seals are another essential part. They help keep the heat in the drum while reducing wear and tear. Replacing worn seals can save you from bigger issues down the road. Before starting your project, make a list of these parts and gather them together. This will save time and keep frustration at bay—no one likes interruptions in their DIY fun! Stay positive; with the right parts, anyone can tackle dryer repairs and succeed!
Safety Precautions Before Starting Repairs
Before starting any dryer motor repairs, it’s important to keep safety in mind. Always disconnect the power source to avoid any shocking surprises, and don’t forget to wear personal protective equipment like gloves and safety goggles. Remember, being safe is the first step to becoming a repair superhero!
Disconnect Power Source
When someone decides to tackle dryer motor repairs, the importance of disconnecting the power source cannot be stressed enough. Safety should always come first! By taking this step, one can prevent unexpected shocks or serious accidents. Here are a few key steps to remember:
- Locate the main power cord, and unplug it from the wall socket.
- If applicable, use a solar disconnect for solar-powered dryers to verify no current flows.
- For battery-operated models, confirm battery isolation by removing the batteries before starting any repairs.
Personal Protective Equipment
Safety comes first, especially in the world of dryer motor repairs, where things can get a little tricky. Wearing the right Personal Protective Equipment (PPE) is essential. Technicians should start with safety glasses to protect their eyes from flying debris. Gloves can safeguard hands from sharp edges, while sturdy shoes can help prevent slips and falls. Before using a mask, it’s wise to check that it passes the Fit Testing, ensuring it fits properly and effectively blocks harmful dust. Remember the Storage Guidelines for PPE; store gear in a clean, dry place to maintain its effectiveness. When equipped with the right tools and safety gear, DIY enthusiasts can tackle dryer motor repairs confidently, knowing they’re doing so safely.
How to Diagnose Dryer Motor Issues
Diagnosing dryer motor issues can feel a bit like solving a mystery, but with the right steps, anyone can become an expert detective in their own home. A few simple methods enable you to uncover what’s wrong with your dryer motor and get it humming again.
- Listen for Unusual Noises: Is your dryer making strange sounds? This could hint at a serious issue.
- Use Current Measurement: By checking the voltage and current, you can determine if the motor is working properly or if something is amiss.
- Apply Thermal Imaging: Utilizing thermal imaging can help spot overheating parts, revealing hidden problems that are hard to see.
Taking these steps not only demystifies dryer repair but also empowers individuals. Remember, with each diagnosis, confidence grows, and soon, fixing appliances may seem as easy as pie!
Step-by-Step Guide to Removing the Dryer Motor
Ready to take on the challenge of removing a dryer motor? It may sound tricky, but with the right steps, it can be as easy as pie! First, make sure you have sufficient space requirements to work comfortably. Clear the area around your dryer to prevent any accidents. Next, gather your tools—like a screwdriver and pliers—and set aside about an hour for this task; that’s your time estimate!
Begin by unplugging the dryer and removing any panels to access the motor. Look for screws and carefully take them out. Once exposed, gently disconnect the wires while noting where they go. Now, lift the motor free from its housing—voilà! You’ve done it!
This process may test your patience, but remember, you’re one step closer to a working dryer. So, roll up those sleeves, and get to work! You’ve got this!
Repairing vs. Replacing the Dryer Motor
When considering whether to repair or replace a dryer motor, one must weigh the pros and cons carefully. Repairing the motor can save money, while replacing it might provide better performance. Here’s a quick cost comparison and some environmental impact points to ponder:
- Cost: Repairing a motor can often be less expensive than purchasing a new one. However, consider if the repair costs add up over time.
- Longevity: A new motor may last longer and come with a warranty, making it a safer long-term investment.
- Environmental Impact: Choosing to repair may reduce waste and lessen your carbon footprint, which is better for the planet.
Ultimately, the decision should align with both financial sense and personal values. Remember, taking the time to assess options can lead to a happier, more efficient laundry day—because who doesn’t enjoy clean clothes?
Tips for Reassembling Your Dryer
After deciding whether to repair or replace a dryer motor, tackling the reassembly can feel a bit intimidating. To make this process easier, creating a sequence checklist is essential. This checklist helps guarantee that no steps are missed, guiding you smoothly through reassembling your dryer. First, refer to the manual if available; following the original sequence can save a lot of headaches.
Additionally, fastener storage plays a crucial role in a successful reassembly. Keep all screws and bolts organized in labeled containers to avoid confusion. Mixing them up can be like trying to fit a puzzle with missing pieces!
Stay relaxed and take your time, celebrating small victories as you go. Remember, every time you conquer a step, you’re getting closer to having that dryer humming again. With a bit of determination, this can become a memorable learning experience!
Preventative Maintenance to Extend Motor Life
How can regular maintenance help keep a dryer motor running smoothly for years? With a little effort, anyone can extend the life of their dryer motor. Simple tasks, when done routinely, make a big difference. A few key activities contribute substantially to motor longevity and efficiency.
- Lubrication Schedule: Regularly applying the right lubricant helps reduce friction, ensuring the motor moves freely without dragging.
- Vent Cleaning: Keeping the vent free from lint and debris is essential. A clean vent not only improves airflow but also prevents overheating.
- Belt Inspection: Check the drive belt for wear and tear. A snug, well-maintained belt reduces strain on the motor.
Frequently Asked Questions
How Long Does a Dryer Motor Typically Last?
A dryer motor typically lasts between 10 to 20 years, influenced by usage patterns and maintenance schedule. Regular servicing and timely repairs can extend its lifespan, while neglect may lead to premature failure.
Can I Clean a Clogged Dryer Motor?
Yes, a clogged dryer motor can be cleaned. Lint removal and fan inspection are essential steps. This process guarantees ideal airflow and efficiency, extending the motor’s lifespan while preventing potential overheating or damage.
What Brands Have the Most Reliable Dryer Motors?
Brand comparisons indicate that Whirlpool, Bosch, and LG consistently feature in consumer surveys as having the most reliable dryer motors. Their durability and performance often lead to high satisfaction ratings among users in various markets.
Is It Safe to Run a Dryer With a Failing Motor?
Running a dryer with a failing motor poses significant risks, including potential fire hazards and electrical shock. It’s advisable to cease operation immediately and address any motor issues to maintain safety and prevent accidents.
How Much Does a New Dryer Motor Cost?
A new dryer motor typically costs between $100 and $300, reflecting various factors. Retail pricing fluctuates based on brand and model, while warranty coverage often provides additional assurance, enhancing value amidst initial expenditure.
Conclusion
By understanding and repairing your dryer motor, you’re not just fixing an appliance but giving life to your laundry routine. Remember, every challenge is a chance to learn something new—like a puzzle waiting to be solved. With the right tools, safety precautions, and a little patience, anyone can tackle this task. So, roll up your sleeves, stay positive, and embrace the adventure of DIY. Soon, you’ll be back to those fluff-dried clothes in no time!
Explore This Topic
- Back to Dryer
- Back to appliance repair
Related guides in this cluster: