
7 Steps for Deep Cleaning Your Samsung Ice Maker
To deep clean your Samsung ice maker, first, unplug it for safety. Next, gently remove the ice bin and set it aside. Use a soft cloth with mild soap to clean the exterior. After that, disassemble the components carefully by removing screws and clips, keeping them in a bowl. Wash the internal parts in soapy water, rinse thoroughly, and let everything air dry. Finally, reassemble the ice maker, plug it in, and enjoy fresh ice! Keep exploring to uncover more useful tips.
Key Takeaways
- Unplug the ice maker and confirm power is disconnected to ensure safety before starting the cleaning process.
- Gently pull out the ice bin for cleaning, taking breaks if necessary to avoid strain or spills.
- Use a mild soap solution with microfiber cloths to clean the exterior and disinfect the control panel after unplugging.
- Disassemble internal parts carefully, wash in a soapy solution, rinse thoroughly, and air dry completely before reassembly.
- Reassemble the components, ensure proper alignment, then plug in and monitor for any unusual sounds or issues during operation.
Unplug the Ice Maker
Before diving into the deep cleaning process, it’s essential to unplug the ice maker. This safety reminder is vital for anyone looking to give their appliance a thorough cleaning. By ensuring a power disconnect, potential mishaps can be avoided. Imagine trying to scrub away grime while the machine is still running—yikes! Not only would it be messy, but it could also lead to injuries.
Remove the Ice Bin
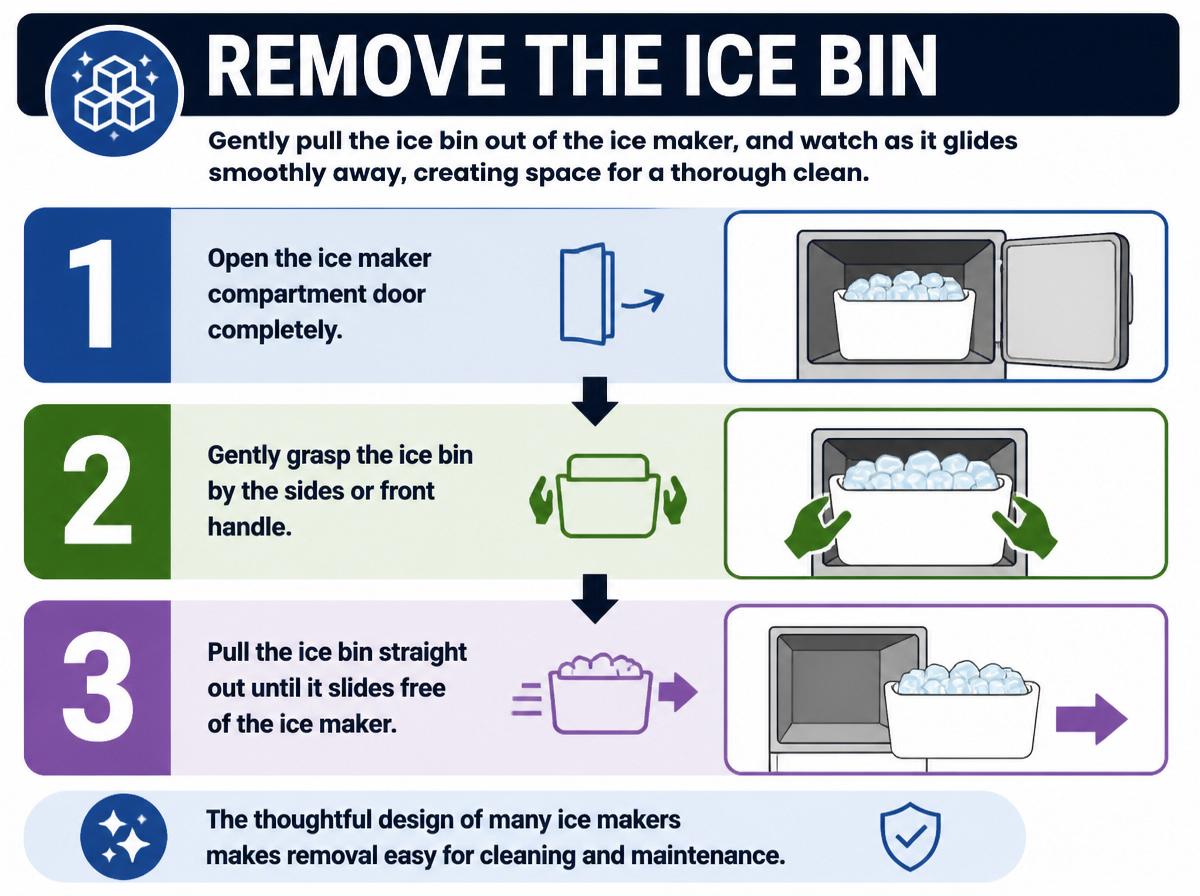
Gently pull the ice bin out of the ice maker, and watch as it glides smoothly away, creating space for a thorough clean. The thoughtful design of many Samsung ice makers showcases excellent bin ergonomics, making it easy to remove the bin without straining. It’s important to be aware of the weight limits; typically, these bins can hold a substantial amount of ice, so lifting them carefully is key to avoiding spills or accidents.
Once out, take a moment to admire your progress. You’re a cleaning superstar! Now, your ice maker is one step closer to sparkling. If the bin feels heavy, it’s perfectly okay to take a breather before moving on. Remember, deep cleaning can feel like a chore, but with each step, you are improving both your ice maker’s functionality and its longevity, setting yourself up for cool success!
Clean the Exterior
To start cleaning the exterior of the Samsung ice maker, gathering the right supplies is key. With a soft cloth and some gentle cleaner, wiping down surfaces will make a big difference—just think of it as giving your ice maker a spa day! Don’t forget to disinfect the control panel, so all those buttons are fresh and ready for action!
Gather Cleaning Supplies
While tackling the task of cleaning the exterior of a Samsung ice maker, it’s important for one to have the right supplies ready at hand. To make the job easier and more efficient, a thoughtful supply checklist can be created. Using eco alternatives not only helps the environment but also keeps the ice maker safe from harsh chemicals. Here are four essential items to gather:
- Soft microfiber cloths: Great for dust and dirt!
- Mild dish soap: Gentle and effective.
- Vinegar solution: A fantastic natural disinfectant.
- Baking soda: Perfect for tough stains.
With these supplies, anyone can make sure their ice maker shines like new. A clean ice maker is not just for looks; it can also improve ice quality. Happy cleaning!
Wipe Down Surfaces
Once the cleaning supplies are gathered, it’s time to make the ice maker sparkle by wiping down all its surfaces. Using a damp cloth, preferably one made of microfiber, is perfect for this task. The microfiber technique helps trap dust and grime effectively, preventing streaks as you clean. Start with the sides, then move to the top and finally the front. It’s like giving your ice maker a little spa day! Remember, going in straight lines helps with streak prevention, leaving a shining finish. Don’t forget the areas around the ice dispenser, too! A clean exterior not only looks good but can also improve the overall functionality of the ice maker. Let the sparkle inspire you!
Disinfect Control Panel
Disinfecting the control panel is an essential step in keeping a Samsung ice maker in tip-top shape. Maintaining touch sensitivity and hygiene promotes smooth usage and a healthier environment. Here are four simple steps to follow:
- Unplug the Ice Maker: Safety first! Always unplug to avoid any shock hazards.
- Use a Soft Cloth: Dampen a cloth with warm, soapy water to gently clean the panel.
- Apply Antimicrobial Spray: Use a safe, antimicrobial coating spray to help keep germs at bay.
- Wipe with a Dry Cloth: Finish by wiping the control panel with a dry cloth, making sure it’s free from moisture.
Disassemble the Ice Maker Components
Ready to take apart the ice maker components? First, it’s essential to do some fastener identification. Look for screws or clips that hold everything together. Use the right screwdriver to avoid stripping the screws. Once identified, carefully remove these fasteners, placing them in a small bowl so they don’t get lost.
Next, focus on gear removal. Gears are often found near the motor; these play a big role in ice production. To safely take off any gears, gently lift them while ensuring not to break any connections. If they seem stuck, a little wiggle usually helps!
Wash Internal Parts With Soapy Water
Washing the internal parts of a Samsung ice maker can feel a bit intimidating, but it’s really just about making a simple soapy solution. First, mix water with a little dish soap to create your cleaning solution, ensuring it’s not too bubbly—a frothy mess isn’t what you want! After giving the parts a nice wash, remember to rinse them thoroughly; this step is essential to keep things fresh and ready for ice-making fun.
Prepare Cleaning Solution
Creating a bubbly cleaning solution can turn the task of tidying up a Samsung ice maker into a fun adventure. As you prepare to clean, it’s important to gather the right materials. A perfect mix will help you tackle grime effectively! Here’s a simple guide:
- Warm Water: Use water at a comfortable warm temperature to kick-start the cleaning process.
- Dish Soap: Select a gentle dish soap to create those cheerful bubbles.
- Vinegar: Use a mild vinegar concentration to enhance the cleaning power and cut through stubborn stains.
- Mixing Container: Grab a bowl or bucket to combine these ingredients easily.
With this bubbly concoction, cleaning your ice maker becomes both manageable and even a little fun. Get ready to make that machine shine!
Rinse Thoroughly Afterwards
After enjoying the bubbly fun of mixing the cleaning solution, the next step is to give the internal parts of the Samsung ice maker a thorough rinse. This is essential for ensuring the taste of future ice stays fresh and delightful. Using warm, soapy water, carefully wash each part. Don’t forget to rinse away all the soap with clean water; this helps maintain water quality, which is important for delicious ice. Once rinsed, it’s a great idea to do a quick taste test after the ice maker is reassembled. If the ice tastes crisp and clean, success has been achieved! With these steps, everyone can feel confident in deep cleaning their ice maker like a pro. Happy cleaning!
Rinse and Dry Thoroughly
Once the cleaning solution has done its job, it’s important to rinse and dry the ice maker thoroughly for the best results. This step helps make sure that no cleaner residue remains, which could affect the flavor of your ice. A careful drying process also prevents mold growth or any leftover moisture. Here are some helpful tips:
- Start with a Thorough Rinse: Rinse out all compartments with clean water to remove any lingering cleaning solution.
- Use Microfiber Cloths: These cloths are great for soaking up spills and drying surfaces without leaving lint behind.
- Air Dry Timing: Allow the pieces to air dry completely for about 30 minutes before reassembling.
- Check for Moisture: Be sure to inspect surfaces for any moisture, as this can lead to unwanted odors.
Following these steps will help keep the ice maker fresh and ready for use!
Reassemble and Restart the Ice Maker
As the ice maker shines and smells fresh, it’s time to put everything back together and get it running again. First, gently position the ice maker components in their designated spots. Verify that all parts align correctly, as alignment verification is key to avoiding future issues. After reassembling, plug it back in, and turn it on.
Next, conduct operational diagnostics by observing how the ice maker functions. Listen for unusual sounds and watch for any signs of malfunction. This can help catch problems early. To keep track of the key steps, refer to the table below:
| Step | Action Required |
|---|---|
| Check Alignment | Make sure parts are fitting well. |
| Power Up | Plug in and turn on the unit. |
| Monitor Function | Listen for sounds and watch ice production. |
With everything in place, it’s time to enjoy the excellent ice your clean ice maker will produce!
Frequently Asked Questions
How Often Should I Deep Clean My Ice Maker?
It is recommended to deep clean the ice maker at least twice a year, aligning with a maintenance schedule. Seasonal timing, such as before summer and winter holidays, can enhance performance and hygiene substantially.
Can I Use Vinegar Instead of Soap for Cleaning?
Yes, vinegar can be used instead of soap for cleaning. Its natural acidity provides a moderate vinegar concentration that can enhance sanitary effectiveness, though it may not remove heavy grime like traditional cleaners.
Is It Safe to Use a Pressure Washer on the Ice Maker?
Using a pressure washer on the ice maker is a risky gamble; the potential for water damage could compromise seal integrity, leading to costly repairs. It’s wiser to choose gentler cleaning methods for sensitive appliances.
What Should I Do if the Ice Maker Won’T Restart?
If the ice maker won’t restart, power cycling the appliance may help. If issues persist, checking for diagnostic codes could identify underlying problems, guiding the owner toward the necessary repairs for proper operation.
Are There Specific Cleaning Solutions Recommended for Ice Makers?
While harsh chemicals can damage ice makers, food safe disinfectants provide a gentle option. Conversely, commercial descalers effectively remove mineral buildup, ensuring efficient operation without compromising safety or functionality throughout the cleaning process.
Conclusion
In the end, deep cleaning your Samsung ice maker is more than just a task; it’s a way to keep your drinks cool and crisp, especially during those hot summer days. Imagine pouring a glass of lemonade and hearing those delightful ice cubes clink, reminding you of happy gatherings with friends. So, take a moment to celebrate your hard work! With just a bit of effort, you’ll enjoy sparkling clean ice! Remember, every little cleaning step adds up to a big win!
Explore This Topic
- Back to ice maker cleaning
- Back to appliance maintenance
Related guides in this cluster: