Essential Pro Tips for Kitchenaid Ice Maker Cleaning
Keeping a KitchenAid ice maker sparkling is easier than you think! First, unplug the unit for safety, then remove and wash the ice bin with mild soap. Use a soft brush to clean the tight spots inside, especially the evaporator coil and auger motor where gunk loves to hide. Vinegar or citric acid help dissolve scale, while a thorough drying prevents sneaky mold. Regular cleaning every few months keeps ice fresh and machines happy. Curious about avoiding jams or boosting airflow? The next tips have you covered!
Key Takeaways
- Always unplug your Kitchenaid ice maker before cleaning to ensure safety and protect electrical components.
- Remove and rinse the ice bin with warm soapy water, using a baking soda paste for stubborn stains.
- Use a soft brush and mild detergent to clean internal surfaces, crevices, and the evaporator coil carefully.
- Descale with vinegar or a Kitchenaid-approved solution to remove hard water mineral buildup without damaging parts.
- Thoroughly dry all surfaces with a microfiber cloth and improve airflow to prevent mold and corrosion after cleaning.
Understanding Your KitchenAid Ice Maker Components
Before diving into the cleaning process, it helps to know what makes your KitchenAid ice maker tick. At the heart of it all is the evaporator coil, a chilly metal surface where water freezes into ice. This coil must stay clean to keep making ice efficiently—think of it as the ice maker’s frosty engine. Another key player is the auger motor, a small but mighty component that pushes the ice cubes out through the chute. If the auger motor gets gummed up or dirty, ice won’t flow smoothly, turning a simple task into a chilly hassle. Understanding these parts, along with others, can turn what seems like a scary maintenance job into a manageable, even satisfying, routine. With a bit of care, your ice maker will keep producing clear, fresh cubes without trouble. So, knowing these parts is the first step towards a sparkling clean and smoothly working ice maker!
Gathering Necessary Cleaning Supplies
Gathering the right cleaning supplies can turn what feels like an overwhelming chore into a straightforward, even enjoyable, task. Having a clear supply checklist helps avoid last-minute dashes to the store, keeping the process smooth and stress-free. Tool organization matters here; when supplies are well arranged, each step flows naturally, and confidence grows. Essentials typically include gentle cleaners safe for ice makers, soft brushes, microfiber cloths, and gloves to protect hands. Here’s a handy breakdown to guide anyone starting this task:
| Supply Item | Purpose | Special Tips |
|---|---|---|
| Mild detergent | Removes grime without damage | Avoid harsh chemicals |
| Soft brush | Reaches tight spots | Prevents scratching surfaces |
| Microfiber cloth | Polishes and dries surfaces | Absorbs moisture effectively |
| Rubber gloves | Protects skin | Promotes hygiene and safety |
This supply checklist supports smoother tool organization and encourages a steady pace, making cleaning less a chore and more a personal achievement.
Preparing Your Ice Maker for Cleaning
While the idea of cleaning an ice maker might seem tricky at first, a little preparation can make the process much smoother and even enjoyable. First, doing a quick warranty check is smart—this guarantees that cleaning won’t accidentally void any coverage. Some models have specific instructions or require professional help, so knowing this upfront saves surprises later. Next, the all-important power shutdown comes into play. Unplugging the ice maker or switching off its power at the circuit breaker prevents electrical mishaps and keeps hands safe. This simple step also stops the machine from suddenly turning on during cleaning, which could lead to a frosty, unexpected shower. Once the power is off, it’s easier to focus on the task ahead without distractions or worries. With these essential preparations done, the cleaning adventure begins confidently and safely, turning what might feel like a chore into a manageable, maybe even fun, home project.
Removing and Cleaning the Ice Bin
Lifting out the ice bin might seem like a small step, but it’s a big part of keeping the ice fresh and tasting great. To start, gently pull the ice bin straight up to avoid any spills—think of it like carrying a tray of drinks; Transport Safety matters to prevent messes and accidents. Once removed, give the bin a quick rinse with warm, soapy water to wash away any leftover ice nuggets or debris. For stubborn marks or discoloration, applying mild Stain Treatments such as a baking soda paste can work wonders—just scrub gently and rinse well. Dry the bin completely before placing it back into the ice maker to prevent trapped moisture, which can cause odor or mold. Remember, a clean ice bin not only improves ice quality but also keeps your appliance happy. Don’t rush; this small effort makes a big difference in the everyday freshness of your ice.
How to Clean the Ice Maker’s Interior
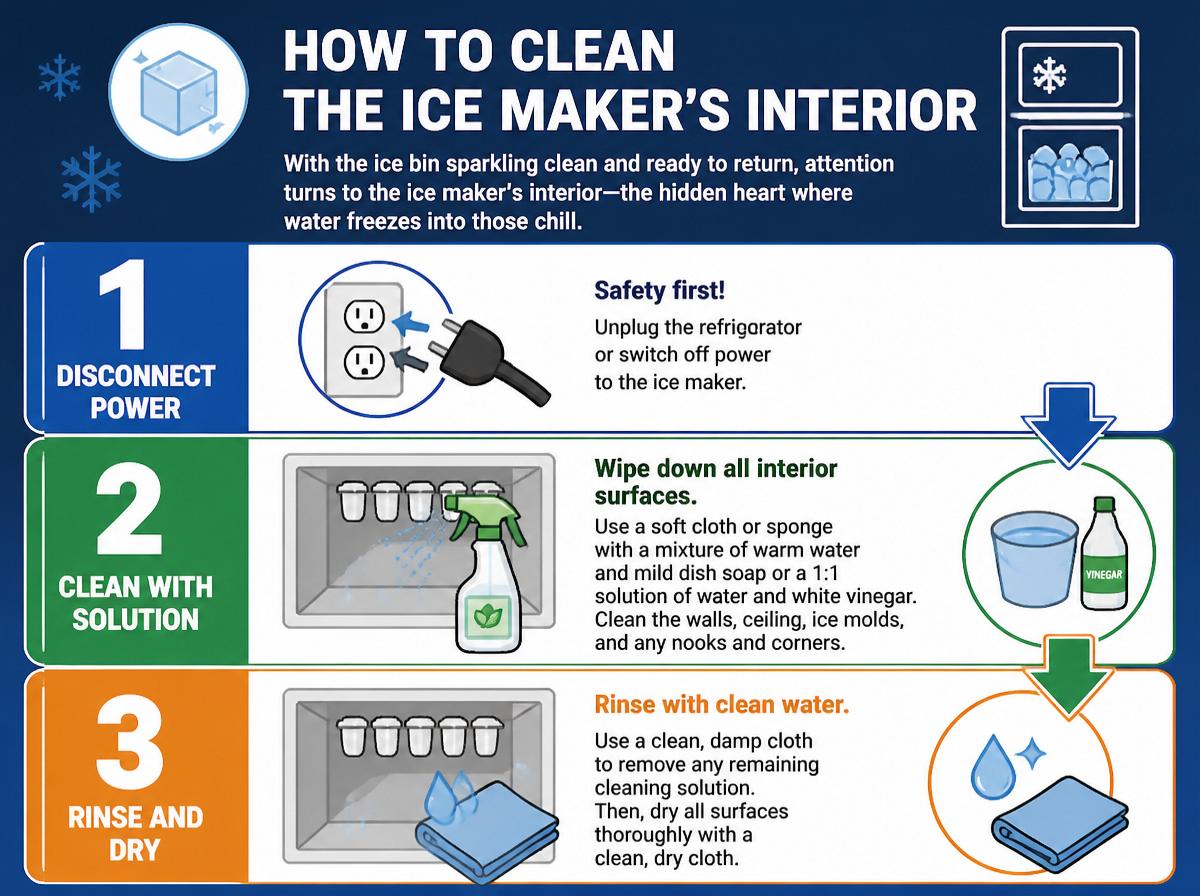
With the ice bin sparkling clean and ready to return, attention turns to the ice maker’s interior—the hidden heart where water freezes into those chilly cubes. First, a thorough visual inspection is essential. Look closely inside for any signs of mold, slime, or leftover ice chunks that could cause clogs. Next, armed with a soft cloth and a mild cleaning solution, carefully wipe down every smooth surface. Don’t forget crevice cleaning—those narrow spots often hide dirt and germs. Use a small, soft brush or cotton swab to reach into tight corners and around ice molds. Avoid harsh chemicals; gentle cleaners keep the machine safe and fresh. After cleaning, allow the interior to dry completely before reassembling. This simple process not only improves taste but helps the ice maker work better, making each fresh cube an invigorating reward. Cleaning might sound tricky, but with patience, anyone can tackle it—and enjoy ice that’s as crisp and clean as winter air!
Descaling to Remove Mineral Deposits
Even though ice makers seem like simple machines, they can quietly collect mineral deposits over time—little stubborn guests that don’t belong. These deposits form from hard water minerals, mainly calcium and magnesium, which build up inside the machine. Descaling is the friendly process of removing these unwelcome guests using cleaners designed with scale chemistry in mind. Choosing the right descaler is essential because it must be compatible with the materials inside the ice maker to avoid damage.
Here’s a quick look at common descaling factors:
| Descaler Type | Scale Chemistry Targeted | Material Compatibility |
|---|---|---|
| Vinegar | Mild calcium scale | Safe for plastic, metal |
| Citric Acid | Calcium and magnesium scales | Safe for most surfaces |
| Commercial Descalers | Strong scale removal | Check label for material specifics |
| Baking Soda Mix | Light residue | Safe but less effective |
| Lemon Juice | Mild mineral deposits | Generally safe, natural |
Descaling keeps ice pure and ice makers happy!
Sanitizing to Eliminate Mold and Bacteria
Sanitizing a Kitchenaid ice maker is key to keeping mold and bacteria at bay, ensuring every ice cube is fresh and safe. Using effective solutions like diluted bleach or vinegar not only cleans but also protects against unwanted germs. With a little care and the right tools, anyone can tackle this task and keep their ice maker sparkling clean and healthy.
Effective Sanitizing Solutions
Although it might seem like a chore, using the right cleaning solutions is key to keeping a Kitchenaid ice maker fresh and mold-free. Choosing sanitized products that meet regulatory compliance guarantees safety and effectiveness. Plus, the right fragrance selection can keep your ice smelling pleasant without overwhelming scents.
Here are three effective sanitizing solutions:
- Diluted white vinegar: A natural option that’s gentle yet powerful against mold.
- Commercial ice maker sanitizers: Specifically designed to meet health regulations and remove bacteria efficiently.
- Hydrogen peroxide solution: Works well to kill germs while leaving no harsh smells.
Using these solutions properly guarantees your ice maker remains clean, safe, and inviting, turning what feels like a chore into a simple, satisfying task.
Mold and Bacteria Prevention
When mold and bacteria start to sneak into an ice maker, it can feel like an unwanted science experiment is happening right in the kitchen. Preventing this involves careful sanitizing to meet Regulatory Standards, which help keep everyone safe. Regular cleaning stops health risks like allergies and stomach bugs caused by these unwelcome guests. Using approved cleaning agents and following instructions guarantees mold and bacteria don’t stand a chance. It’s like giving the ice maker a superpower against germs! Wiping down surfaces, changing water filters, and drying moist areas are simple steps anyone can handle. Remember, prevention is easier and more pleasant than dealing with an actual mold invasion. Stay proactive, and the ice maker keeps producing fresh, safe ice every time—cheers to that!
Proper Drying Techniques After Cleaning
After cleaning, it’s important to let the ice maker dry completely to keep it working well and free from hidden moisture problems. Good air circulation helps speed this up think of it as giving the machine a little fresh breeze party! Avoid trapping water, or mold and bacteria might sneak back in, turning your shiny clean ice maker into a not-so-fun science experiment.
Air Circulation Importance
Getting air to flow freely around a KitchenAid ice maker after cleaning is a simple trick that works wonders. Good air circulation helps the ice maker dry faster, which is key for keeping its temperature stable and saving energy. When air moves well, the unit doesn’t have to work as hard, boosting energy efficiency and preventing overheating.
Here are three easy tips to improve air flow:
- Leave the ice maker door open for a while after cleaning.
- Avoid blocking vents with kitchen tools or cloths.
- Position the ice maker away from walls or tight corners for better air movement.
Following these steps not only dries the machine properly but also keeps your ice maker healthy and running smoothly longer!
Avoiding Moisture Build-up
Although cleaning an ice maker is a great start, properly drying it is just as important to avoid pesky moisture build-up that could cause trouble later. After cleaning, gently wipe all surfaces with a dry, soft cloth, paying special attention to corners where water can hide. Ambient humidity plays a big role here; high moisture in the air can slow drying, so leaving the ice maker open in a well-ventilated area helps. Avoid rushing—moisture trapped under surface coatings can encourage mold and corrosion. If possible, using a fan to boost air circulation speeds things up. Remember, a dry ice maker works better and lasts longer, so take time now to dry carefully. It’s a simple step that keeps your appliance happy and your ice tasting fresh!
Recommended Cleaning Frequency
Regularly cleaning a KitchenAid ice maker is key to keeping it running smoothly and making sure every ice cube tastes fresh. Setting up schedule reminders can help avoid forgetting this important chore, especially when life gets busy. Also, seasonal adjustments are smart—clean more often in warmer months when mold and bacteria grow faster. Here’s a helpful guideline:
- Clean the ice maker every 3 months during mild seasons to maintain peak freshness.
- Increase cleaning to every 1-2 months in summer or humid climates to prevent buildup.
- After heavy use or long periods without cleaning, a quick touch-up wash guarantees peak performance.
Keeping a fun, routine cleaning habit not only prolongs the machine’s life but also keeps ice crystal-clear and tasty. Think of it as a little self-care for your ice maker—your cold drinks will thank you! Embrace these steps with a smile; a clean ice maker means hassle-free chills all year long.
Troubleshooting Common Ice Maker Issues
While it may seem tricky at first, troubleshooting common ice maker issues is simpler than many imagine, and a little patience goes a long way. The first step in noise diagnosis involves listening carefully to identify odd sounds like grinding or clicking—these clues point toward mechanical parts needing attention. If the ice maker hums but doesn’t produce ice, electrical faults may be the culprit; checking power connections and circuit breakers often solves the issue. Sometimes, clogged water lines cause slow ice production, and gently clearing them can work wonders. When the ice maker isn’t freezing properly, inspect the temperature settings, ensuring the freezer stays cold enough. If troubleshooting feels overwhelming, don’t worry—most problems are easy fixes once understood. With a bit of care and attention, users can keep their KitchenAid ice maker running smoothly, turning their frustration into a satisfying success story, one ice cube at a time.
Frequently Asked Questions
Can I Use Bleach Instead of Commercial Sanitizers for Cleaning?
Bleach efficacy for cleaning is recognized, but its use in Kitchenaid ice makers requires caution due to potential material compatibility issues. Commercial sanitizers are preferred to avoid damage and guarantee safe, effective sanitation of internal components.
How Do I Prevent My Ice Maker From Freezing Up?
To prevent ice maker freezing, one should perform thermostat calibration regularly and consider insulation upgrades to maintain consistent temperatures. These measures reduce frost buildup and guarantee efficient operation without ice blockage or mechanical strain on the unit.
Is It Safe to Clean the Ice Maker With Vinegar?
When it comes to cleaning, vinegar can be a double-edged sword. Its acetic benefits effectively remove buildup, but users should verify seal compatibility to avoid damage. Proper dilution safeguards the ice maker’s components from harm.
Can I Clean the Ice Maker While It’s Running?
Cleaning the ice maker while it’s running is not recommended due to safety precautions and potential warranty concerns. Powering off the unit before maintenance prevents injury and voiding the warranty, ensuring proper, safe cleaning procedures.
What Should I Do if My Ice Tastes Strange After Cleaning?
If ice tastes strange after cleaning, the user should flush the system thoroughly with water to remove residue. Additionally, replacing the filter can improve taste by eliminating lingering odors or contaminants affecting the ice quality.
Conclusion
Regular cleaning keeps the KitchenAid ice maker fresh, safe, and working smoothly. Removing dirt, scrubbing parts, and sanitizing stops mold, bacteria, and bad odors before they start. Drying thoroughly prevents damage, while consistent care avoids frustrating breakdowns. Following simple steps, using the right tools, and sticking to a routine turns cleaning from chore to confidence booster. With patience and a smile, anyone can master ice maker maintenance, making cold, clear ice a worry-free everyday delight.
Explore This Topic
- Back to ice maker cleaning
- Back to appliance maintenance
Related guides in this cluster: