
Quick Diagnostics for Your Dryer Before Calling Service
Before calling for dryer help, check the power source first. Is it plugged in? Next, test the door switch; listen for a click when pressed. Inspect the dryer belt for damage or misalignment. Don’t forget to clean the lint filter and check that the drum spins freely. Look at the venting system for blockages too. If your dryer still acts up, there’s more to uncover to get it back in shape!
Key Takeaways
- Ensure the dryer is plugged in securely and check the circuit breaker for any tripped switches.
- Test the door switch for continuity and look for any visible damage to ensure proper operation.
- Inspect the dryer belt for fraying or cracks and listen for unusual noises during drying.
- Clean the lint filter and check the venting system for blockages to improve performance and safety.
- Evaluate the timer’s responsiveness by rotating it through settings and observing for any signs of failure.
Check the Power Source
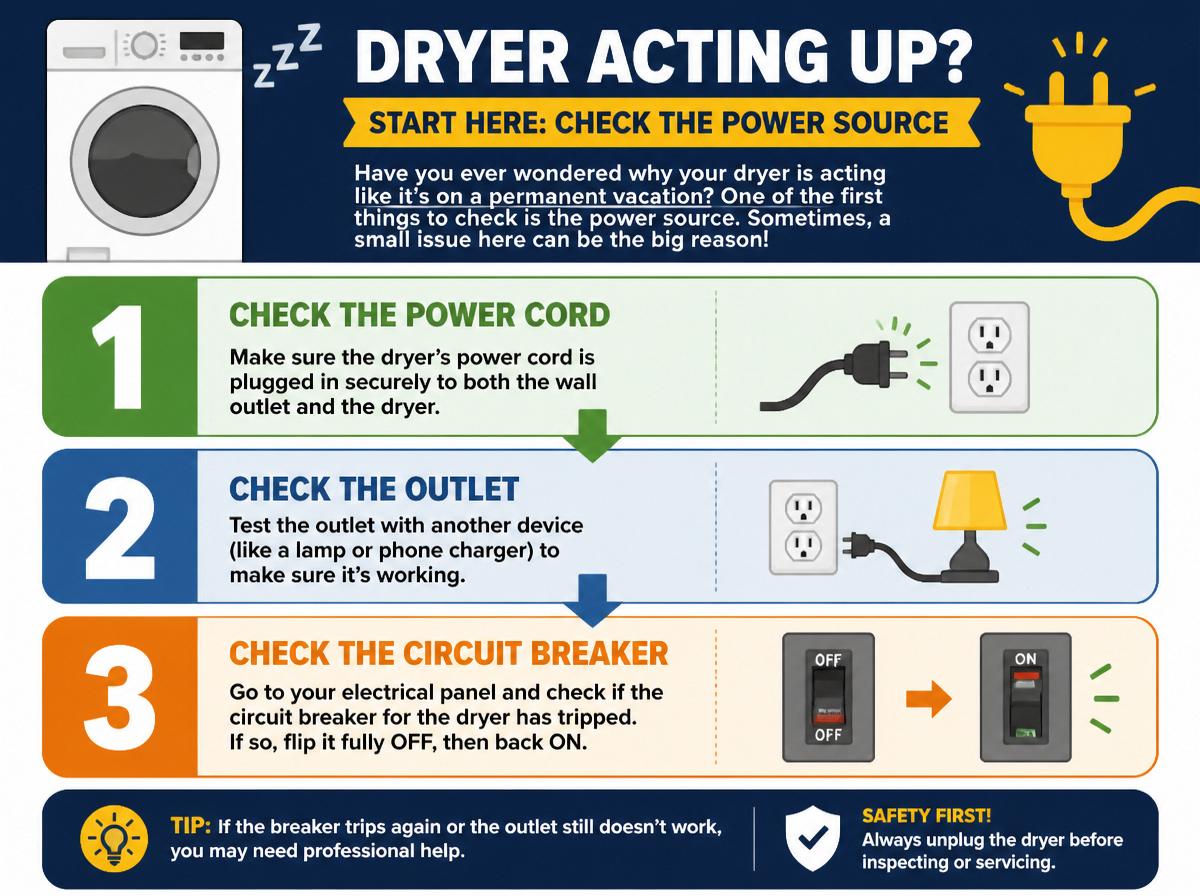
Have you ever wondered why your dryer is acting like it’s on a permanent vacation? One of the first things to check is the power source. Sometimes, a sneaky power outage can leave your dryer powerless, making it assume the role of a couch potato. Start by inspecting the electrical connections. Is the dryer plugged in securely? Loose connections might be the culprit.
Next, look at the circuit breaker. It can trip unexpectedly, halting your dryer’s cycle. If everything seems fine but it still won’t start, give the outlet a little love. A faulty outlet may need replacing.
Lastly, if you’re feeling brave, you can test the voltage with a multimeter. It’s easy! Remember, doing these small checks first can save you from unnecessary expenses. With a little patience and effort, your dryer might just get back to work, tumbling those clothes in no time!
Examine the Door Switch
What’s that? The dryer isn’t working, and you suspect something is off with the door switch. This little component plays a big role because it tells the dryer when the door is closed. If it’s broken, your dryer won’t start—talk about a bummer! Here are some troubleshooting techniques to check:
- Test the Switch: Press the door switch several times. If it doesn’t click, it may be defective.
- Inspect for Damage: Look for any visible cracks or wear. A damaged switch can cause issues.
- Multimeter Check: If you’re feeling brave, use a multimeter to check for continuity. No continuity means it’s time to replace it.
Inspect the Dryer Belt
When it comes to keeping a dryer running smoothly, inspecting the dryer belt is essential. One should look for any signs of wear, like cracks or fraying, which can make a belt as useful as a wet noodle! Additionally, testing the belt tension guarantees it’s snug enough to do its job, helping your washer move with ease and keeping laundry days stress-free.
Check for Signs of Wear
Many people don’t realize how important the dryer belt is to keeping a dryer running smoothly. This small yet mighty part can wear out over time, affecting performance. To check for signs of wear, consumers should look for specific wear indicators. Here are some maintenance tips to contemplate:
- Visual Inspection: Look for fraying or cracking on the belt surface.
- Check Alignment: Verify the belt is aligned properly; misalignment can cause premature wear.
- Listen for Noises: Unusual sounds during the drying cycle may indicate a problem with the belt.
Being proactive can save frustrating repairs later. If any signs of wear are evident, it may be time to replace the belt, guaranteeing the dryer continues functioning effectively!
Test Belt Tension
Testing the belt tension on a dryer is a crucial step in ensuring it works efficiently. If the belt is too loose, it may slip, causing poor drying performance. To check the tension, gently grasp the belt and try twisting it. If it turns easily, it may need a tension adjustment. Regular belt maintenance is essential; worn belts can lead to bigger problems down the line. If the belt seems too tight, it could damage other parts. So, be careful! Remember, a happy dryer means cleaner clothes! If everything feels okay, pat yourself on the back—you’ve just taken an important step in dryer care. Keep up the great work, and your dryer will thank you with dry laundry!
Clean the Lint Filter
Cleaning the lint filter is a simple yet essential task that can make a big difference in how well a dryer operates. When neglecting filter maintenance, lint accumulation can occur, reducing efficiency and creating fire hazards. Regularly cleaning this filter keeps clothes fresh and helps the dryer work its best.
Here are three easy steps to follow:
- Remove the filter: Locate the lint filter, usually found in the door or top of the dryer. Gently pull it out.
- Clean the filter: Use your hands to brush off the lint. For stubborn debris, a soft brush or vacuum nozzle can help.
- Replace the filter: After cleaning, slide the lint filter back into its slot securely.
Verify the Drum Spinning
When checking if the dryer drum is spinning, it’s important to first confirm that there is power going to the machine. A simple look at the power cord and plug can help; if everything seems fine there, the next step is to inspect the drive belt, which is responsible for making the drum turn. With a little patience and attention, anyone can troubleshoot these common issues and get their dryer back to work!
Check Power Supply
One quick way to check if your dryer’s power supply is working right is to see if the drum is spinning. If it’s not moving, there could be issues ahead. Here’s what to do:
- Check the Circuit Breakers – Make sure none have tripped. Reset them if needed, but be careful—safety first!
- Look for Voltage Fluctuations – If the power supply is inconsistent, your dryer might struggle. Consider using a multimeter to check voltage levels.
- Test Other Appliances – Is anything else in your house acting strange? This might mean the issue is with your home’s power supply, not just the dryer.
Inspect Drive Belt
Checking the drive belt can be a game changer when troubleshooting a dryer that’s not spinning. This essential part connects the motor to the drum, allowing it to turn smoothly. First, inspect the belt for any signs of wear or damage. If it looks worn or broken, a belt replacement might be necessary. Handle it carefully during belt installation to guarantee it fits snugly around the drum and motor. A loose or damaged belt can be the reason your dryer is sitting idle. After checking, give the drum a gentle spin. If it turns freely, the problem may lie elsewhere. Remember, tackling the drive belt issue is a great step toward getting that dryer back in action! You’ve got this!
Assess the Venting System
Although it may seem like a small detail, evaluating the venting system of a dryer is crucial for its performance and safety. A blocked vent can lead to airflow issues, making your dryer work harder than it should. That’s not a great way to treat your appliance!
Here are three steps to check the venting system:
- Inspect the Vent Tube: Look for any obvious signs of vent blockage, like lint or debris.
- Check the Outside Vent: Verify that the external vent flap opens freely when the dryer runs—this allows hot air to escape!
- Measure Airflow: Hold a piece of paper near the vent; if it doesn’t flutter, there might be an airflow issue that needs addressing.
Test the Thermal Fuse
Testing the thermal fuse can feel like a mini adventure in diagnosing dryer troubles! This small but mighty part plays an essential role: it prevents the dryer from overheating. When things get too hot, the thermal fuse jumps into action, breaking the circuit and stopping the dryer. So, if your dryer won’t start, it’s time to investigate the thermal fuse function.
To test it, first, unplug the dryer for safety. Then, locate the fuse, often found near the heating element. A multimeter helps here! Set it to the ohm setting. If the reading shows continuity, the fuse is good. If not, it’s time for the fuse replacement process. Swapping out a thermal fuse is usually straightforward. Just remember to turn the power back on afterward! With a bit of care and patience, your dryer could be back in business, ready to tackle laundry loads once again!
Evaluate the Timer and Controls
What happens when the dryer seems to ignore all your commands? This frustrating situation might just stem from issues with the timer functionality or the control panel. Before making that expensive service call, here are a few quick checks to perform.
- Inspect the Control Panel: Look for any visible signs of damage or wear. Sometimes, buttons can get stuck or malfunction.
- Test the Timer: Try rotating the timer to different settings. If it doesn’t click or respond, it might need replacing.
- Check Connections: Verify all wires are securely attached and look for any frayed connections that could disrupt power.
Listen for Unusual Noises
Have you ever wondered why your dryer sounds like it’s trying out for a band? Unusual noises can be a clear sign that something is amiss. If your dryer is making strange clunking sounds, it could indicate that something is stuck in the drum or that the drum rollers are worn out. These noises, accompanied by unusual vibrations, should not be ignored.
To investigate, first, pause the dryer and check for any small items lost during laundry. Next, give the drum a gentle spin—if it feels uneven or bumpy, the rollers may need replacement. Funny sounds may seem harmless, but they could signal bigger problems. By listening closely and acting promptly, a simple fix can save time and money. Remember, your dryer deserves a little attention, just like any rock star! Stay proactive, and your laundry days will remain hassle-free.
Frequently Asked Questions
How Often Should I Clean My Dryer Vent System?
The recommended vent cleaning frequency is at least once a year. Regular maintenance tips suggest checking the vent every few months to guarantee peak airflow, preventing lint buildup, and enhancing dryer efficiency and safety.
What Does It Mean if the Dryer Smells Burnt?
A startling 2,900 dryer fires occur annually, often due to overheating issues. A burnt smell from the dryer typically indicates lint buildup or mechanical failure, both of which can lead to serious safety hazards.
Can Fabric Types Affect Dryer Performance?
Fabric types can considerably affect dryer performance. Lighter fabrics require lower temperature settings and may dry faster, while heavier fabrics demand higher heats and longer cycles, potentially impacting efficiency and drying quality overall.
Is It Safe to Use a Dryer Without a Lint Filter?
Using a dryer without a lint filter poses significant risks; lint accumulation can ignite, creating a fire hazard. Dryer safety is paramount, and neglecting the filter compromises both appliance efficiency and household safety. Proceed with caution.
What Should I Do if My Dryer Makes a Grinding Noise?
When a dryer makes a grinding noise, inspecting the drum roller and bearings is essential. Following dryer repair tips, one should also perform noise troubleshooting by checking the drive belt and motor for wear or damage.
Conclusion
In the grand twist of laundry fate, discovering a simple fix for your dryer can feel like winning a small victory! By checking these quick tips, you might just save yourself the hassle of a repair service. Remember, every little step counts, and troubleshooting can often lead to surprising solutions. So, roll up your sleeves and tackle those dryer quirks with confidence. With a bit of patience and a pinch of humor, you’ll have fresh, fluffy laundry in no time!
Explore This Topic
- Back to Dryer
- Back to appliance repair
Related guides in this cluster: