Solutions for Common Dryer Heating Element Problems
If a dryer is giving trouble, check the heating element first! Signs like damp clothes or strange smells might mean it’s time for a closer look. Make sure it’s cool before inspecting for cracks or burns. Next, use a multimeter to test its resistance—ideal readings are between 10-50 ohms. Keep the dryer clean by emptying the lint filter after each use. With a little care, the dryer can work better, and there’s more to discover about keeping it running smoothly!
Key Takeaways
- Inspect the heating element visually for cracks, breaks, or burnt spots to identify any visible damage.
- Use a multimeter to test the heating element’s resistance; readings outside 10-50 ohms indicate a possible fault.
- Clean the lint filter regularly and check the vent hose monthly to ensure proper airflow and efficiency.
- Replace a damaged heating element promptly to prevent inadequate drying and overheating issues.
- Schedule routine maintenance, including deep cleaning, every six months to sustain dryer performance and efficiency.
Understanding the Role of the Heating Element
The heart of a dryer is often considered to be its heating element, a little part that plays a big role. This small but mighty component is crafted from special heating element materials, designed to guarantee clothes dry quickly and efficiently. It’s like the sun on a lazy day, helping to make those wet garments warm and fluffy again! Efficiency ratings for heating elements are important, as they tell you how well the dryer operates while saving energy. A high rating means your machine is not just effective but also kinder to your wallet. When the heating element works well, it brings comfort and convenience to laundry day. So, next time you toss in a wet load, remember that tiny element doing all the heavy lifting. Keep it in good shape, and it will repay you with cozy, dry clothes and a happy, satisfied vibe in your home!
Common Signs of Heating Element Failure
When clothes come out of the dryer still damp, it can feel like a rainy day that just won’t end. This could be a sign that the heating element is not working properly. Identifying the problem early can save time and keep frustration at bay. Here are some common signs of heating element failure:
- Inconsistent Drying: Clothes may come out dryer one time, and damp the next, affecting drying efficiency.
- Low Heat: The dryer runs, but the heat isn’t adequate to dry clothes, indicating poor heat distribution.
- Burnt Smell: An unusual burnt odor suggests that the heating element might be overheating.
- Tripped Breaker: If the circuit breaker trips frequently, this could signal electrical issues with the element.
Recognizing these signs can help prevent bigger issues, allowing for timely action and continued use of the trusty dryer!
Inspecting the Heating Element for Damage
Inspecting the heating element for damage is an important step in fixing a dryer that’s not drying clothes efficiently. A quick visual inspection can reveal cracks, breaks, or burnt spots on the element. These signs often indicate that the element is struggling with its endurance. When a heating element is damaged, it fails to produce the necessary heat to dry clothes properly, leaving them damp and unhappy.
To perform this inspection, one should carefully examine the element for any obvious signs of wear or shabbiness. It may help to clean around the area first to get a better view. Remember, dryer elements can get pretty hot, so let it cool down before touching! If damage is found, it’s time to contemplate a replacement. Taking this step not only improves dryer performance but also brings a little cheer back to laundry day. Happy inspecting!
Testing the Heating Element With a Multimeter
To guarantee the heating element is functioning properly, testing it with a multimeter can be a valuable step in the troubleshooting process. A multimeter usage not only helps ascertain testing accuracy but is also simple to do. Here’s how to do it:
- Turn Off Power: Always turn off the dryer and unplug it for safety.
- Set Multimeter: Adjust the multimeter to the resistance setting (ohms).
- Test Connections: Touch the multimeter probes to the ends of the heating element.
- Read Results: Look for a reading between 10-50 ohms. If it’s outside this range, the element may be faulty.
Cleaning the Dryer to Improve Heating Efficiency
Cleaning the dryer is like giving it a rejuvenating spa day, and it can work wonders for heating efficiency. A common culprit that can hinder performance is dryer lint. Regularly removing lint from the lint trap is essential, as it can block airflow, causing the dryer to work harder. One of the simplest cleaning tips is to vacuum around the dryer and its vents to eliminate any accumulated dust and debris. This helps keep the dryer in tip-top shape! Another helpful task is to inspect the flexible duct that connects to the exterior. If it’s kinked or clogged, warm air won’t escape effectively. Giving it a good clean could improve drying time. Finally, don’t forget to wipe down the drum with a damp cloth to remove any residue. A clean dryer works more efficiently, saving time and energy—so treat your dryer right and let it shine!
Troubleshooting Electrical Issues
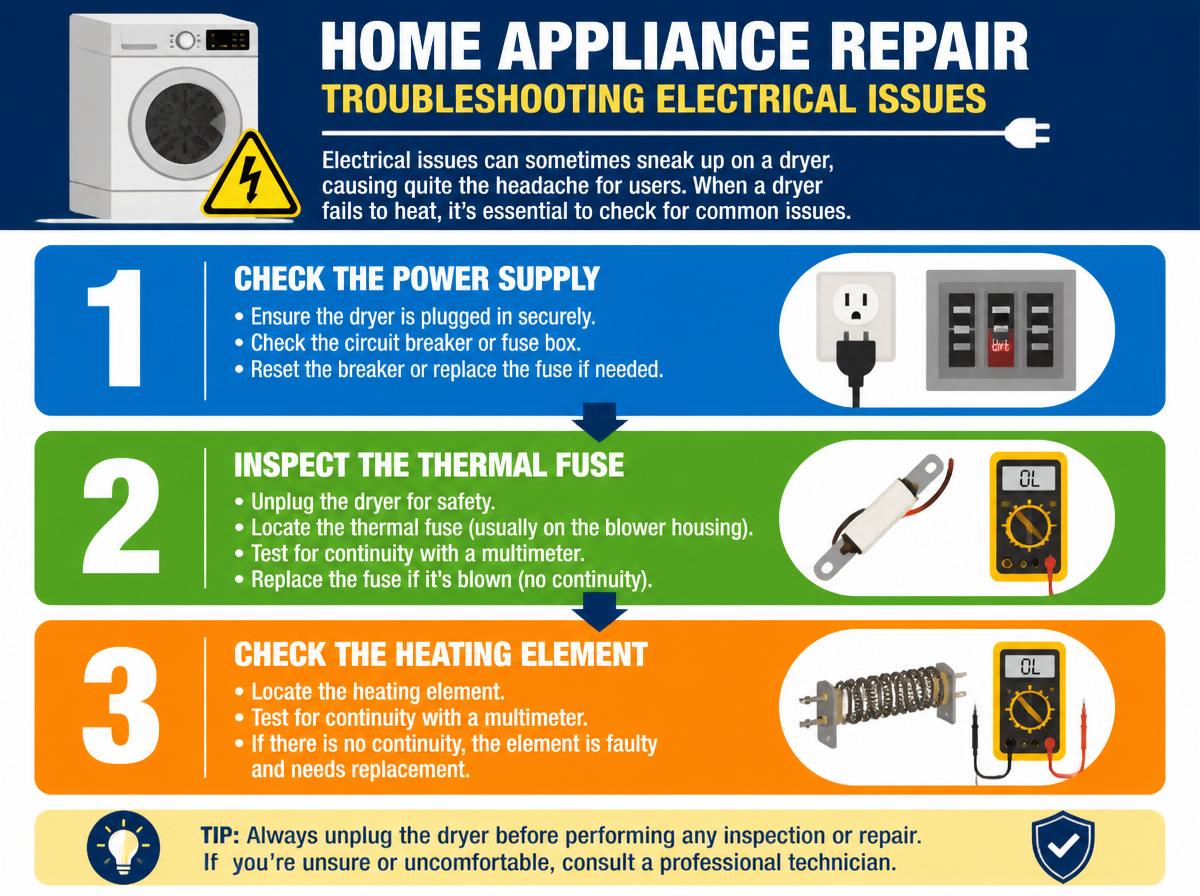
Electrical issues can sometimes sneak up on a dryer, causing quite the headache for users. When a dryer fails to heat, it’s essential to check for common electrical problems. Here are some helpful steps to troubleshoot:
- Check the Circuit Breaker: Sometimes, a simple trip occurs. Resetting it might solve the heating problem.
- Inspect the Thermal Fuse: This safety device can blow if the dryer overheats. A blown fuse needs replacing for the dryer to operate correctly.
- Examine Wiring Connections: Loose wires can disrupt the flow of electricity. Tighten any loose connections to restore power.
- Test the Power Outlet: Plug in another appliance to see if the outlet is functioning. No power means it’s time to call an electrician.
Staying calm and methodical while following these steps can make the troubleshooting process smoother. With patience, users can often resolve these issues themselves!
Replacing a Defective Heating Element
When a dryer still refuses to heat after checking electrical issues, it’s likely time to look at the heating element. Replacing a defective heating element can feel like a big challenge, but it’s a straightforward process. First, identify the heating element types, as they can vary by dryer model. Some are coil types, while others might be ceramic.
Before starting, gather necessary tools like a screwdriver and a multimeter to check if the heating element is defective. To install the new element, disconnect the dryer from the power source. Carefully remove the old element and replace it with the new one, following the manufacturer’s installation tips. Secure everything back in place, and then plug the dryer in.
Voila! A little patience can lead to a happy, heating dryer. Remember, every step counts, and it’s okay to ask for help if needed. You’re doing great!
Regular Maintenance Tips for Your Dryer
A little bit of regular maintenance can go a long way in keeping a dryer running smoothly. Neglecting a dryer can lead to problems, but with a few simple steps, anyone can help keep their appliance in tip-top shape. Here are four easy maintenance tips:
- Clean the lint filter after every use. Removing dryer lint prevents fires and allows for better airflow.
- Check the vent hose monthly. Verify there are no kinks or clogs to promote ideal drying.
- Schedule a deep clean every six months. Dust and lint can build up inside, impacting efficiency.
- Inspect the drum seal regularly. A worn seal can allow heat to escape, leading to longer drying times.
Frequently Asked Questions
Can a Faulty Heating Element Cause Dryer to Smell Burnt?
A faulty heating element can indeed cause a burnt smell. Regular dryer maintenance tips, such as inspecting the heating element and ensuring proper airflow, help prevent such issues and maintain peak dryer performance and safety.
What Safety Precautions Should I Take When Replacing the Heating Element?
When replacing the heating element, one should wear safety gear, including gloves and goggles, and guarantee electrical precautions are followed, such as unplugging the dryer and verifying no voltage is present before proceeding with the replacement.
How Often Should I Replace My Dryer’s Heating Element?
How often should one consider replacing a dryer’s heating element? Typically, it lasts about 10 years. Regular dryer maintenance tips can extend its lifespan, ensuring efficient performance and reducing the need for premature replacements.
Are There Specific Brands Known for Heating Element Durability?
Certain brands stand out for heating element durability, with Bosch known for its overall durability and Samsung recognized for reliability. These characteristics contribute to longer-lasting performance and reduce the frequency of necessary replacements for users.
What Tools Do I Need to Replace the Heating Element?
Over 15% of homeowners experience dryer issues annually. To replace a heating element, one needs various screwdriver types and wire cutters, ensuring they possess the right tools for safe and efficient repairs on their appliances.
Conclusion
In the world of laundry, a well-functioning heating element is like the sun shining down on a bright summer day. If your dryer isn’t warming up as it should, don’t fret! By inspecting, testing, and possibly replacing that tricky part, you can restore the cozy warmth that wraps your clothes in softness. With a bit of care and regular maintenance, your dryer will be back to spinning fresh, warm towels, creating smiles all around!
Explore This Topic
- Back to dryer issues
- Back to Dryer
Related guides in this cluster: