7 Simple Steps for Quick Fix to Reset Your Whirlpool Ice Maker
To reset a Whirlpool ice maker, start by locating the reset button, usually inside the freezer door. Next, unplug the refrigerator and wait for about 5-10 minutes for a cool-down. Plug it back in and press the reset button gently. Make sure the water supply is clear, and check that the valve is fully open. Finally, keep an eye on ice production—about every 90 minutes. Stick around for more tips and tricks to keep your ice maker working smoothly!
Key Takeaways
- Locate and gently press the reset button on the ice maker; listen for an audible beep indicating a response.
- Unplug the refrigerator and inspect the power cord before servicing to prevent electric shock.
- Wait 50 minutes after unplugging to allow for reset and cooldown before reconnecting the power.
- After plugging in, press the reset button again and check for indicator feedback such as lights.
- Inspect the water supply for kinks, ensure the water valve is open, and check for filter clogs.
Locate the Ice Maker Reset Button
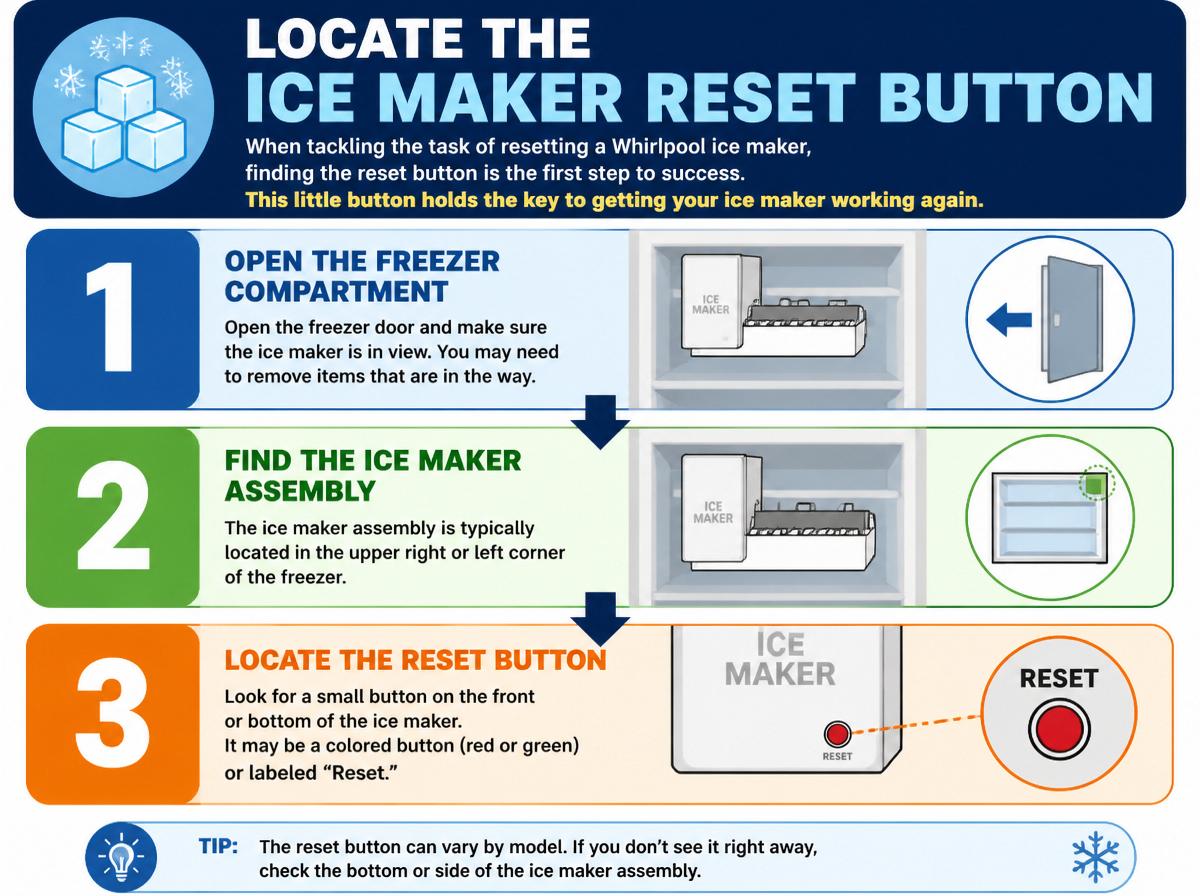
When tackling the task of resetting a Whirlpool ice maker, finding the reset button is the first step to success. This little button holds the key to ice-making miracles! To locate it, start by checking the Control Panel, which is usually found inside the freezer door. The User Manual may provide helpful illustrations, guiding the way. Don’t worry if you can’t find it right away; it can sometimes be tricky to spot! Once you find that reset button, give it a gentle press and listen—often, you’ll hear a little beep that signals it’s ready to go. Imagine the joy of ice cubes clinking in your glass again! If it feels intimidating, remember that everyone faces hurdles while fixing things. With a bit of patience and this handy guide, you’re well on your way to enjoying ice-cold refreshments in no time! Keep up the great work!
Unplug the Refrigerator
Before diving into the reset process, it’s essential to unplug the refrigerator, ensuring a safe environment for both the appliance and the person working on it. Unplugging is a critical power safety step that helps prevent electric shocks and accidents. Here’s a simple guide on how to do it safely:
- Locate the refrigerator’s power cord, usually at the back or underneath.
- Carefully pull the plug out of the wall outlet, avoiding any excessive force.
- Take a moment for a quick cord inspection; make sure the cord is not damaged.
Doing this not only protects the person working but also allows the ice maker to reset effectively. Remember, safety first! Being cautious helps avoid mishaps, making the task much more enjoyable. After unplugging, take a deep breath, smile, and get ready to continue with confidence. You’ve got this!
Wait for 5-10 Minutes
After unplugging the refrigerator, a little patience goes a long way. This is the perfect time for a mindful pause. Waiting for 5-10 minutes allows the ice maker to reset properly, making sure everything has a chance to cool down safely. During this safety cooldown, it’s important to resist the urge to rush. Just think of it as giving your appliance a mini vacation. While you wait, you could do a quick kitchen check, perhaps tidy up or even grab a cool drink!
This short break is essential because it helps clear any electronic hiccups that might have occurred. The ice maker deserves this chance to reset and recharge fully. So, embrace the wait. Remember, good things come to those who are patient, and soon enough, you’ll be enjoying fresh ice again!
Plug the Refrigerator Back In
Now it’s time to plug the refrigerator back in and get things rolling! This essential step will help your Whirlpool ice maker start working again. Before plugging it back in, double-check a few important things to avoid any surprises, like a power surge or a tripped circuit breaker. Here’s what to do:
- Ensure the outlet is working: Make sure that the outlet is functional by checking other appliances.
- Check the circuit breaker: If your refrigerator isn’t turning on, a circuit breaker may have tripped, so verify that it’s correctly set.
- Connect the fridge: Firmly plug the refrigerator back into the power outlet.
After taking these steps, your ice maker should be primed and ready. Now, patience is key! Give it some time to churn out those ice cubes while you sit back and relax. You’ve got this!
Press the Reset Button
Pressing the reset button on a Whirlpool ice maker is a key step to getting it back in action. This small but mighty button plays a significant role in restoring functionality. First, locate the reset button—usually found on the front or side of the ice maker. Once found, give it a gentle press. This action can reboot the system, leading to a happy ice-making process.
After pressing, watch for indicator feedback, which tells you whether the ice maker is starting up again. If the light turns on or blinks, that’s a good sign! It means the machine is responding. Remember, this simple step can solve many issues before diving deeper into troubleshooting. Stay patient, a little ice will be on its way soon! With just a press, you’re taking control, and isn’t that a cool feeling? Keep it up—you’ve got this!
Check the Water Supply
What could be more frustrating than an ice maker that just won’t produce ice? Before getting worried, it’s essential to check the water supply! Without water, there’s no ice, after all. Here are some quick steps to make sure everything’s flowing smoothly:
- Inspect the Water Line: Look for kinks or blockages in the line that connects to your ice maker. A problem here could mean no water gets through!
- Check the Water Filter: If your ice maker has a water filter, verify it isn’t clogged. Line filtration systems can be great, but they can also lead to sediment buildup, which blocks water flow.
- Confirm the Valve is Open: Sometimes, the valve may get closed accidentally. Make sure it’s fully open to allow water to rush in, creating chilly cubes!
Monitor Ice Production
Monitoring ice production is essential to confirm the Whirlpool ice maker is working properly. Checking ice levels and observing the timing of the ice-making cycles can help catch any issues before they turn into bigger problems. By staying on top of these details, users can enjoy a consistent supply of ice, making their drinks cooler and gatherings even more fun!
Check Ice Levels
How can one make sure that their Whirlpool ice maker is working efficiently? A great way to start is by checking the ice levels. Keeping an eye on the bin capacity guarantees that the ice maker fills properly and helps maintain ice clarity. Here are three simple steps to follow:
- Inspect the Ice Bin: Check if it’s full. If not, this might cause problems for ice production.
- Clear Out Old Ice: If ice looks cloudy or older, remove it. Fresh ice is tastier and clearer!
- Monitor Production: Watch how much ice is being made over a few hours to see if there are any issues.
Observe Cycle Timing
Ice production can sometimes seem like magic, but it actually follows a specific cycle that anyone can learn to observe. Understanding the cycle duration is essential for monitoring how much ice is made. Typically, the ice maker runs for about 90 minutes to complete one cycle, but this can vary due to temperature fluctuations. When the freezer is colder, ice forms faster. If the temperature rises, it may take longer to fill those trays. Keeping an eye on these timings helps guarantee there’s always ice available. Plus, if something seems off, you’ll notice! Remember, being patient and attentive makes all the difference. With a little observation, anyone can master the ice-making process and enjoy cooling drinks year-round!
Frequently Asked Questions
How Often Should I Reset My Whirlpool Ice Maker?
Experts recommend resetting a Whirlpool ice maker as part of routine maintenance, ideally following a seasonal schedule. This practice guarantees peak performance and can help prevent potential issues with ice production over time.
Can a Clogged Water Line Cause Ice Maker Issues?
Ironically, the very source of thirst-quenching ice can become a villain. A clogged water line, often plagued by mineral buildup, leads to flow restriction, ultimately sabotaging the ice maker’s functionality and frustrating avid ice enthusiasts.
What Are Common Signs My Ice Maker Needs Resetting?
Common signs that an ice maker needs resetting include unusual noises during operation and the production of small cubes instead of the standard size. These indicators suggest a malfunction requiring attention to restore normal function.
Is the Reset Process the Same for All Whirlpool Models?
The reset process can vary among Whirlpool models due to model differences and control interfaces. Users should consult their specific model’s manual to verify proper reset procedures are followed for best ice maker performance.
Should I Contact a Technician if Resetting Doesn’t Work?
If resetting the ice maker fails, contacting a technician may be necessary. They can provide cost estimates for repairs. It’s also wise to check warranty coverage to mitigate potential expenses related to the service.
Conclusion
With a few simple steps, you can bring your Whirlpool ice maker back to life, just like a superhero swooping in to save the day. Remember to take your time—it’s all about patience and care. Checking the water supply is like ensuring your garden has enough rain. Now that you’re equipped with this knowledge, go ahead and tackle that ice maker! You’ll have perfectly chilled drinks in no time, impressing everyone with your DIY skills.
Explore This Topic
- Back to Icemaker
- Back to ice maker troubleshooting
Related guides in this cluster: