Quick Fix for Resetting Your Washing Machine Float Switch in 10 Easy Steps
Resetting a washing machine float switch is easier than it sounds! First, make sure the machine is unplugged. Next, locate the float switch, usually a buoy-like part inside the tub. Check it for dirt or blockages, and clean it gently. Now, manually lift the float to see if it moves smoothly. If it’s stuck, press it gently to release it. Finally, plug in the machine and run a test cycle! There’s more helpful advice coming your way!
Key Takeaways
- Safety First: Always unplug the washing machine and wear safety gear before attempting any repairs.
- Locate the Float Switch: Identify the float switch inside the tub or on the side for easy access during inspection.
- Inspect for Obstructions: Check the float switch for debris or blockages that could hinder its movement, ensuring proper function.
- Test for Smooth Movement: Manually lift the float and check if it moves freely, indicating it’s working correctly.
- Reset and Monitor: After resetting, run a test cycle while observing water levels to ensure the float switch functions as intended.
Understanding the Float Switch Function
The float switch is like the unsung hero of every washing machine, quietly ensuring that the water level is just right. This little device keeps everything running smoothly. When you start a wash cycle, the float switch monitors the water. If it gets too high, the switch tells the machine to stop filling. Isn’t that clever? The float switch not only prevents overflowing but also helps save water.
Just imagine washing clothes without it; you might end up with a soaked laundry room! Troubles can arise if the float switch gets stuck or malfunctions, but don’t worry—fixing it is usually straightforward. Understanding how this essential part works makes maintenance easier. So, if your washing machine starts acting up, remember that the float switch is there, doing its job quietly. With a little care and attention, you can keep it functioning well. Happy washing!
Safety First: Preparing to Work on Your Washer
Before diving into the mechanical world of a washing machine, it’s important to remember that safety should always come first. A little preparation can go a long way in preventing accidents and ensuring a smooth repair process. Here are a few essential steps to take before starting:
- Always wear safety gear: Gloves and safety glasses can protect you from unexpected mishaps.
- Ensure power disconnection: Unplug the washing machine or turn off the circuit breaker to avoid any electrical accidents.
- Clear the workspace: Make sure the area around the washer is free of clutter, so you can move around safely and easily.
- Keep tools ready: Gather all necessary tools beforehand to avoid rushing or searching mid-repair.
Locate the Float Switch in Your Washing Machine
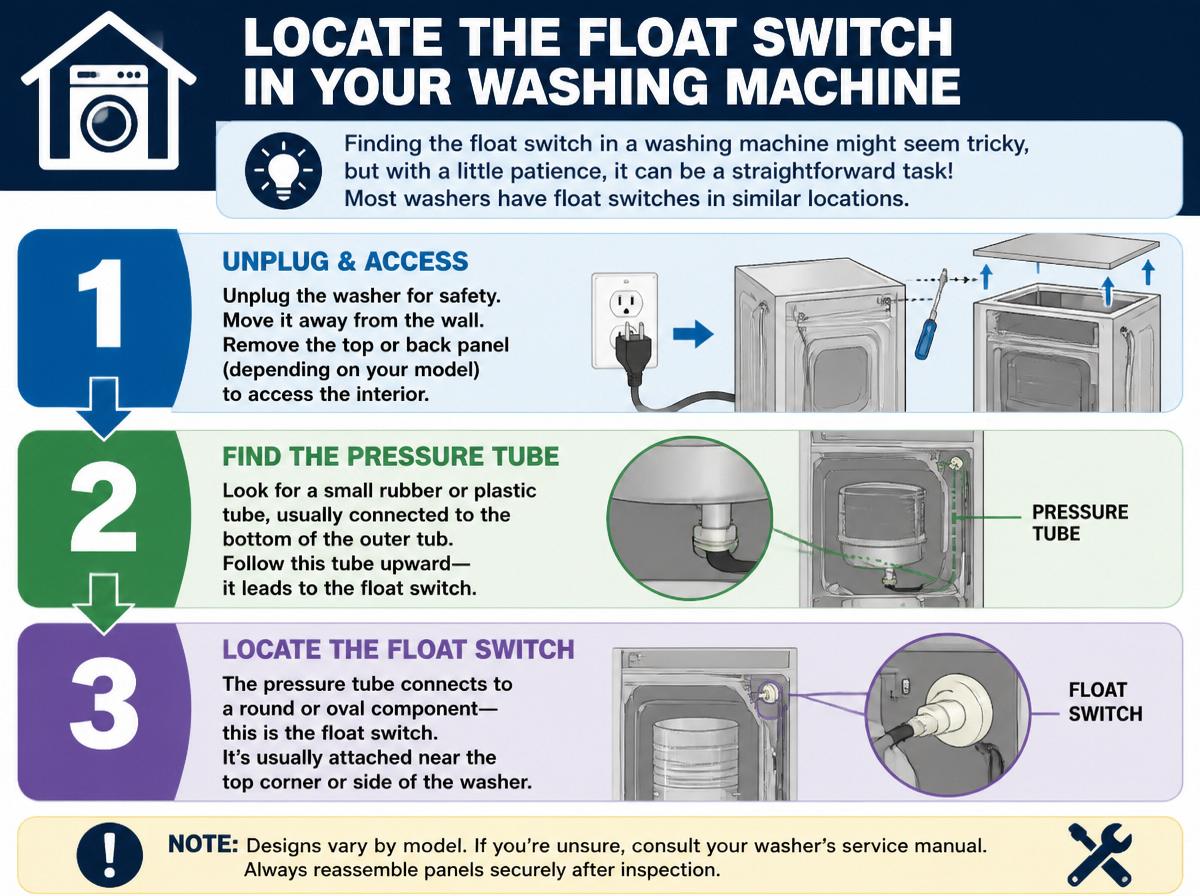
Finding the float switch in a washing machine might seem tricky, but with a little patience, it can be a straightforward task! Most washers have float switch types, including mechanical and electronic options, each serving the same purpose: to help regulate water levels. Typically, the float switch is found inside the machine’s tub or attached to the side, sometimes hidden behind a panel.
Look for a round plastic piece, resembling a buoy, that moves up and down with the water. In top-loaders, it’s often positioned beneath the lid, while front-loaders usually have it located at the bottom near the drain. Don’t be discouraged if you don’t see it right away; just take your time! With your trusty flashlight and a bit of exploration, you’ll be on your way to identifying it in no time. Happy searching; you’ve got this!
Inspecting the Float Switch for Obstructions
When the float switch in a washing machine doesn’t work right, it might be blocked by something sneaky. Common culprits include lint, dirt, or even small clumps of fabric that get lodged and can cause big problems. By inspecting the switch carefully and using simple cleaning techniques, anyone can keep their washing machine running smoothly and efficiently—like a superhero for their laundry!
Common Float Switch Issues
While it might seem frustrating when a washing machine isn’t working properly, understanding common float switch issues can make the troubleshooting process less intimidating. Float switch maintenance is essential to guarantee the machine runs smoothly. Here are some common troubleshooting points to check:
- Dirt and Debris: Sometimes, the float switch can get clogged with lint or dirt that keeps it from moving freely.
- Hinge Problems: The float may become stuck due to a broken hinge, which affects its ability to rise and fall.
- Corrosion: Rust can build up, affecting the float switch’s functionality.
- Incorrect Alignment: If the float is not properly aligned, it can cause incorrect water level readings.
Identifying Blockages Effectively
To identify blockages effectively in the float switch, it’s important to approach the task with curiosity and a little patience. First, verify the washing machine is unplugged for safety. Then, visually inspect the float switch for any debris or foreign objects. This careful blockage detection helps in understanding what might be causing issues. Using simple troubleshooting techniques, one can gently wiggle the float to see if it moves freely. Sometimes, even small items can create big problems! If blocked, the float won’t rise or fall properly. Remember, everyone faces hiccups with their machines. With a little persistence, this discovery process becomes easier. Take it step by step, and before long, you’ll have your washing machine back in tip-top shape!
Cleaning Techniques for Switch
The float switch is a simple yet vital part of a washing machine, and keeping it clean is necessary for smooth operation. Regular maintenance helps guarantee that it functions properly, preventing any washing mishaps. Here are some maintenance tips for cleaning the float switch:
- Inspect for debris: Look for any dirt or grime that may block the float’s movement.
- Use gentle cleaning solutions: A mix of water and vinegar can effectively remove any buildup.
- Wipe carefully: Use a soft cloth or sponge to avoid scratching the surface.
- Check connections: Confirm that all wires and components are secure and free of rust.
Testing the Float Switch for Proper Functionality
Testing the float switch for proper functionality can feel like a little adventure, and that’s a good thing! It’s essential to check this part of your washing machine because it keeps your water levels just right. Different float switch types may work in your machine, so knowing which one you have can help. First, try some simple troubleshooting techniques. You can manually lift the float to see if it moves freely. If it’s stuck, that might be your issue! Also, use a multimeter to test for continuity, ensuring the switch is working as it should. If the multimeter beeps, you’re in good shape! Imagine the sense of accomplishment when everything works smoothly again. Don’t worry if it feels tricky; most repairs just take a few tries. Keep your spirits high, and remember, you’re on a DIY journey. Your washing machine will thank you!
Resetting the Float Switch: Step-by-Step
Ready to bring the washing machine back to life? Resetting the float switch can often resolve issues and is easier than one might think. Here’s a simple step-by-step guide using some effective troubleshooting techniques:
- Unplug the washer to guarantee safety. No one wants a shocking surprise!
- Locate the float switch. It’s usually found in the washing machine’s tub, often on the side.
- Gently press and release the float. Sometimes it just needs a nudge to get back into place.
- Plug the washer back in and test it. Watch this old friend whirl back into action!
Reassembling Your Washing Machine
Reassembling a washing machine might seem challenging, yet with a little patience and a positive attitude, it can be both manageable and rewarding. After completing the float switch reset, it’s time to put everything back together. Begin by recalling the machine disassembly techniques used during the initial breakdown. It helps to have washing machine tools such as screwdrivers and pliers handy, as they’ll aid in securing all components.
Start with the lowest parts, like the base panel, and work your way up. Gently align each piece, ensuring all wires and hoses are tucked neatly away. Screws should be tightened firmly, but not overly so—nobody likes a cranky washing machine! Taking the time to double-check connections can prevent future headaches. Remember, following a methodical approach turns what could feel like a puzzle into a rewarding experience, making your appliance one step closer to being operational once more!
Running a Test Cycle to Ensure Proper Operation
After putting the washing machine back together, it’s time to prepare it for a test cycle. This step is essential, as it helps to monitor the water levels and see if everything is working as it should. Keeping an eye on how the cycle runs not only guarantees everything is in tip-top shape but also gives peace of mind that the laundry will be a splash-free success!
Preparing the Machine
Once everything is properly connected and in place, it’s time to run a test cycle to see if the washing machine is ready for action. This step is essential in washing machine maintenance, guaranteeing everything is functioning smoothly. Here are a few troubleshooting tips to help out during the test:
- Select a Regular Cycle: Choose a simple wash cycle to monitor the machine’s performance.
- Check for Leaks: Watch for any signs of water leaking that might indicate a problem.
- Listen for Unusual Noises: Pay attention to any strange sounds; they can signal issues.
- Verify Water Drainage: Make sure the water drains correctly at the end of the cycle.
These steps encourage confidence in your abilities and help guarantee a smoothly functioning machine!
Monitoring Water Levels
As the washing machine hums to life, monitoring the water levels during the test cycle is essential for ensuring everything works properly. The water sensor plays a vital role in detecting how high the water should rise, while the float mechanism moves up and down as the water fills. If the float doesn’t rise correctly, it can lead to overflows or underfilling—neither of which is fun! To check everything, watch carefully as the washer fills. If it stops at the right level, that’s a great sign! If not, the float mechanism may need another adjustment. Remember, it’s okay; you’ve got this! Keep a close eye, and soon you’ll be back to clean laundry in no time.
Analyzing Cycle Outcomes
Monitoring the water levels is just the beginning of guaranteeing a washing machine operates smoothly. To complete a thorough cycle analysis, running a test cycle is essential for proper performance assessment. This helps identify any issues before laundry day surprises happen. Here are four key steps to follow:
- Set the machine to a short cycle – This allows for a quicker check on functionality.
- Observe the filling phase – Verify the water reaches ideal levels without overflowing.
- Listen for odd noises – Unusual sounds can indicate a problem needing attention.
- Check the draining – After the cycle, confirm that water is removed completely.
Tips for Preventing Future Float Switch Issues
Preventing future float switch issues can save time and frustration, especially when a washing machine suddenly stops working properly. A little float switch maintenance can go a long way! One can start by regularly checking the hoses for any kinks or blockages. Clean the float switch at least once every few months to keep it working smoothly; a damp cloth usually does the trick. Additionally, following washer care tips, like not overloading the machine, helps prevent excessive strain on components. It’s also wise to use the right detergent, as excess suds can confuse the float switch. Finally, remember to listen for strange noises—if something seems off, it’s better to check sooner rather than later! By being attentive, anyone can keep their washing machine happy and running efficiently. After all, a well-maintained washer is a happy washer!
When to Call a Professional for Help
Knowing when to call a professional can save time and frustration. If a washing machine shows signs of serious problems, like water leaks or strange noises, it may be best to seek help. Also, for those who feel unsure about fixing things or have tried multiple times to repair the machine without success, getting expert assistance is a wise choice.
Signs of Serious Issues
When a washing machine begins to show unusual signs, it’s essential to pay attention, as these could hint at serious issues. Ignoring early warnings can lead to more significant problems later. Here are some signs that it’s time to call a professional:
- Unexplained water overflow warnings appearing regularly.
- Strange noises during cycles, like clunking or grinding sounds.
- A float switch malfunction, causing erratic filling or emptying.
- Visible leaks or pooling water around the washer.
If any of these occur, don’t hesitate. Calling in an expert can save time and money, preventing potential water damage or a complete breakdown. Remember, it’s okay to ask for help—it’s a sign of being smart, not weak!
Lack of DIY Experience
It can be tempting to tackle washing machine repairs on one’s own, especially after spotting those early warning signs. With a little beginner confidence and simple tools, many feel ready to jump in. However, DIY enthusiasts should remember that not every situation is suitable for a home repair. If things become confusing or a little too complex, reaching out to a professional might be the best option. Calling for help does not mean defeat; rather, it shows a commitment to getting the job done right. After all, no one wants to turn a small issue into a larger disaster. Sometimes, it’s smarter to play it safe and let the experts take charge, ensuring your washing machine gets the care it needs.
Multiple Repair Attempts Needed
Sometimes, despite the best efforts, a washing machine may not respond to repairs as expected. When faced with multiple diagnosis methods yielding little success, it might be time to call a professional. Here are four indicators that help make that decision:
- Multiple Repair Attempts: If the float switch continues to malfunction after several tries, it’s a sign.
- Repeated Installation Challenges: Struggling each time you install the part? Experts can streamline this.
- Inconsistent Performance: If the machine works sometimes, it’s even trickier to fix.
- Safety Concerns: If there are any sparks or strange noises, safety first!
Frequently Asked Questions
What Are Common Symptoms of a Faulty Float Switch?
Common symptoms of a faulty float switch include overflowing water, continuous filling without stopping, and erratic cycle behavior. These float switch malfunctions often lead to various washing machine issues, compromising its overall functionality and efficiency.
Can I Reset the Float Switch Without Disassembling My Washing Machine?
Yes, it is possible to reset the float switch without disassembling the washing machine. Employing various resetting techniques and following troubleshooting tips can effectively restore the float switch’s functionality and improve the machine’s performance.
How Often Should I Clean the Float Switch?
Cleaning the float switch is recommended every six months as part of float switch maintenance. Regular cleaning frequency helps prevent clogs and malfunctions, ensuring the washing machine operates efficiently and prolonging its overall lifespan.
What Types of Washing Machines Use Float Switches?
Float switches are commonly found in top loading washers, where they regulate water levels. While front loading washers typically use pressure switches instead, some models may incorporate float switches for specific functionalities or water level detection.
Are Float Switches Interchangeable Between Different Washing Machine Models?
Float switches, like puzzle pieces, are not universally interchangeable. Compatibility varies considerably among washing machine brands, requiring users to carefully examine model specifications to ascertain a proper fit and ideal performance in their appliances.
Conclusion
In summary, resetting your washing machine’s float switch can seem intimidating, but with a little patience and a handy guide, you can tackle it like a pro! Remember, every great adventure begins with a single step—so don’t let a pesky float switch trip you up. By following these easy steps, you’ll not only fix the problem but also gain confidence in your DIY skills. Keep smiling, and happy washing!
Explore This Topic
- Back to home repair
- Back to float switch
Related guides in this cluster: