Oven Turns On But No Heat? Common Causes and How to Fix Them
If the oven lights up, the control panel shows the correct time and temperature, and the fan runs—yet the cavity stays cold after five minutes—the problem is almost always a failed heating element, a faulty temperature sensor, or a stuck relay on the control board. The most common failure mode on electric ovens is a broken bake element, often with visible damage like a blister or crack near the terminals. You can test that element yourself with a $10 multimeter in about 20 minutes. For gas ovens, the usual culprit is a weak igniter that glows but can’t open the gas valve.

First Checks That Don’t Require Tools
Run through these six quick checks before opening any panels. Each is a clear yes/no or pass/fail decision.
- Is the oven set to bake, not self-clean? Self-clean mode locks the door and disables the heating elements. If the door won’t open or the display shows a lock icon, cancel the cycle and let it cool before retesting.
- Is the gas supply on (gas ovens)? Confirm the gas valve is fully open and that other gas appliances (like stove burners) light normally. A partially closed valve or an empty propane tank can let the igniter spark without lighting.
- Are the elements visibly damaged (electric ovens)? Open the door and inspect the bake element (bottom) and broil element (top). Look for blisters, cracks, or separated metal. If you see any, that element is dead and needs replacement.
- Does the igniter glow and click (gas ovens)? Turn on the oven and listen. A steady clicking should stop after the flame lights. If it clicks forever, the igniter is glowing but not opening the gas valve—a classic weak igniter.
- Was the circuit breaker tripped? A tripped breaker can still power lights and fans but not the heating element. Flip the oven’s dedicated breaker fully off, wait 30 seconds, and flip it back on. Test after five minutes.
- Does the oven have an error code? Some models display codes like F11, F12, or E013 that point directly to a sensor or board problem. Look up the code in your owner’s manual or on the manufacturer’s website.

If all checks pass, move to deeper diagnostics. But if the oven is set to bake, elements look fine, and you hear a relay click inside the control panel but the oven stays cold, you’re likely dealing with a stuck relay—skip the element test and go straight to the escalation section.
Common Causes at a Glance
| Cause | Symptoms | How to Test | Typical Repair Cost |
|---|---|---|---|
| Broken bake or broil element | No heat from that element; visible damage (blister, crack, or discoloration) | Visual inspection + continuity test with multimeter | $20–$80 for part; $150–$300 with labor |
| Defective oven temperature sensor (thermistor) | Oven heats but wildly off temp, or fails to heat at all; error codes like F11 or F12 | Measure resistance: room temp should read ~1090 ohms; value should change with heat | $10–$40 for sensor; $100–$200 with labor |
| Failed igniter (gas oven) | Clicking sound but no flame; igniter glows dull orange instead of bright white-orange | Visual check + amperage test (draw should be 3.2–3.6 amps for most models) | $30–$100 for igniter; $150–$350 with labor |
| Stuck relay on control board | Oven clicks but gets no power to element; may heat intermittently | Multimeter test at element terminals while oven should be heating | $100–$300 for board; $250–$500 with labor |
| Gas valve not opening | No flame even with bright igniter; igniter glows strong but valve stays closed | Requires professional pressure testing and safety checks | $150–$400 for valve; $250–$500 with labor |
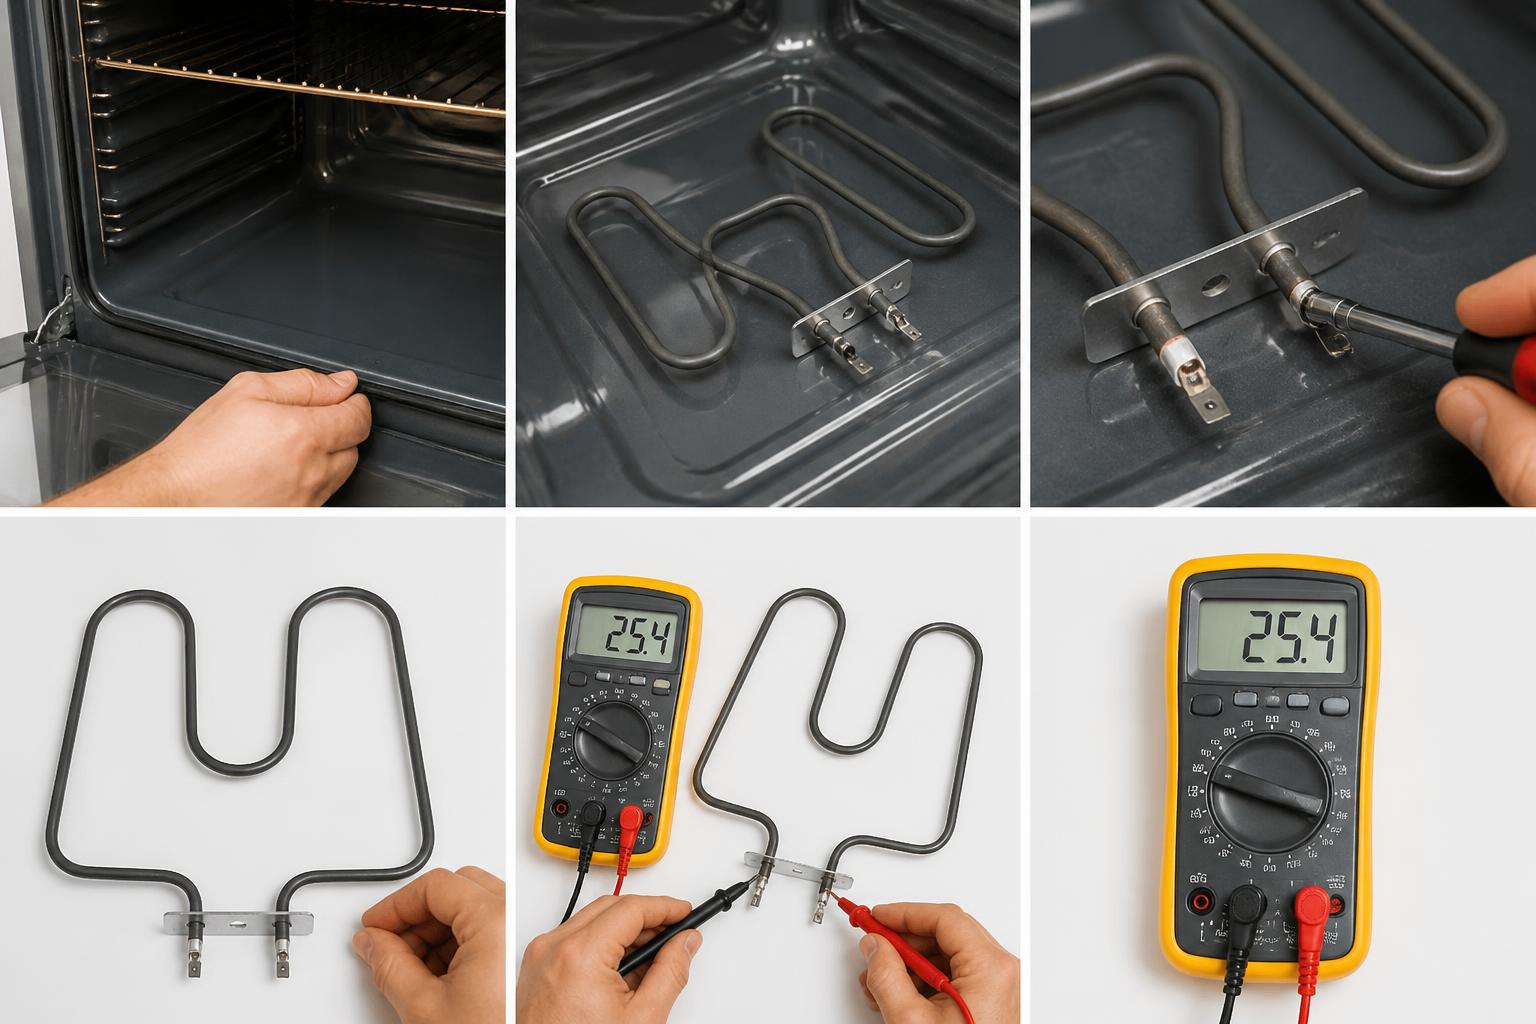
How to Test the Bake Element Step by Step
This is the single most common fix on electric ovens. You need a multimeter set to continuity (Ω) or resistance.
Step 1: Disconnect power. Unplug the oven or flip the circuit breaker off. Confirm with a non-contact voltage tester.
Step 2: Remove the element. Take off the rear access panel (if the element connects from behind) or unscrew the element from inside the oven cavity. Most bake elements are held by two screws inside the oven. Gently pull the element forward far enough to access the wire terminals. For example, on a GE JBP68 electric range, the bake element sits under a steel guard that swings down after removing two screws.
Step 3: Mark the wires. Take a photo or label which wire goes to which terminal. A marker flag or a piece of tape works well.
Step 4: Set the multimeter to the lowest resistance setting. Touch one probe to each terminal.
– A good element shows near 0 ohms (a continuous path).
– If the reading is infinite (OL), the element is broken internally.
Step 5: Inspect for visible damage. Even if continuity passes, a small crack can open up when hot. Replace if you see any blistering, bulging, or discoloration. If continuity passes and the element looks pristine, the problem is almost certainly not the element—move on to testing the sensor or checking for a stuck relay.
Step 6: Install a replacement. Buy the exact part number from the oven’s model tag (usually inside the door or behind the lower drawer). Install by reversing the removal steps. Make sure the new element’s prongs seat fully into the terminal block to avoid a loose connection that can cause intermittent heat.
Always disconnect power before servicing any appliance to avoid electric shock. — U.S. Consumer Product Safety Commission safety guideline.
Step 7: Verify the fix worked. After installation, set the oven to 350°F. Place an oven thermometer in the center of the rack. After 10 minutes, the thermometer should read between 325°F and 375°F. If it holds steady for another 10 minutes, the repair is successful. If it never reaches temperature or overshoots wildly (e.g., hits 425°F and keeps climbing), the sensor may also need replacement.
A quick note on tools: before starting a heating element replacement, have a screwdriver set, a multimeter, and safety gloves on hand. Cleaning built-up debris inside the oven cabinet and around the element area is also a smart step, since restricted airflow can cause elements to fail prematurely. For a deeper look at all possible element failure modes, see the guide on troubleshooting common oven heating element problems.
When to Call a Professional
These signs mean it’s time to step back and bring in a qualified technician.
The control board clicks repeatedly but the oven never heats. This points to a stuck relay or a shorted board—testing and replacing boards safely requires isolating high-voltage circuits. If you’re unsure about the diagnostics, follow a guide to troubleshoot your oven in easy steps to confirm your suspicions before calling.
The gas igniter glows bright but the oven stays cold. The igniter may be drawing proper amperage, but the gas valve is stuck shut. That repair involves working with gas lines and requires a licensed pro.
The oven error code points to a sensor or communication problem. Most sensors (thermistor) are easy to replace, but if the error returns after swapping the sensor, the main control board may need software reflashing or replacement.
The circuit breaker trips immediately when you turn on the oven. This usually means a shorted element or wiring—do not keep resetting the breaker; fire risk is real. A shorted element will often show burn marks or a melted area near the terminal. Stop testing and call a pro.
You replaced the element but the oven still doesn’t heat. This is the most frustrating branch. The new element may be defective (it happens), or you’re dealing with a failed control board or a bad connection at the terminal block. Test the new element with a multimeter while the oven is unplugged. If it passes continuity but the oven stays cold, the issue is upstream—likely the relay or wiring harness.
Frequently Asked Questions
Why does my oven turn on but not heat?
The most common reason is a broken bake or broil element in electric ovens, or a failed igniter in gas ovens. The oven’s lights and fans use a separate circuit from the heating elements, so a partial failure is possible.
Can a bad oven sensor cause no heat?
Yes. A defective temperature sensor (thermistor) can send an incorrect reading that makes the control board think the oven is already hot, so it never energizes the heating element. Symptoms include erratic temperature or a no-heat condition with no visible damage to elements.
How much does it cost to replace an oven heating element?
The element itself costs $20–$80 for most models. If you hire a repair technician, expect $150–$300 total including labor. DIY replacement is straightforward if you follow the steps above.
My oven heats but only on one side—does that mean the element is broken?
Yes. A bake or broil element that heats only at one end has an internal break. Replace it even if you can’t see visible damage. The broken section will feel cool to the touch (after the oven is off and cooled), while the working half stays warm.