Step-by-Step Guide to Replace Frigidaire Water Filter FPPWFU01
If you’re looking to improve the quality of your drinking water, you’ve come to the right place. In this step-by-step guide, you’ll learn how to replace Frigidaire water filter FPPWFU01 with ease. You’ll find that maintaining your refrigerator’s water filtration system is not as complicated as it seems. With just a few simple tools and some handy tips, you can ensure your water tastes fresh and clean. Let’s dive in and get started on your water filter replacement journey!
Preparing for Replacement
You’ll need to gather the necessary tools and supplies before starting the replacement process. First, make sure you have a new Frigidaire water filter on hand. You’ll also need a towel to catch any spills that might occur. Having a pair of gloves is a good idea to keep your hands clean. A small bowl can help hold any small components you might need to remove. Make sure the refrigerator is unplugged for safety. Double-check that the new filter is compatible with your model. You should also review any manufacturer instructions available for your specific refrigerator. Once you’ve got everything ready, it’s time to locate the water filter in your fridge.
Locating the Water Filter
Now that you’re ready to replace your water filter, locating its position is your first step. You’ll want to ensure you’ve got the right information at your fingertips for a smooth process. Let’s dive into the key points to find the filter efficiently.
Finding Filter Location
The filter’s location can often be found behind a removable panel or under the sink in your kitchen. You should check the user manual if you’re unsure where to look. Don’t forget to inspect both the refrigerator compartment and the freezer section. If you’ve got a side-by-side model, the filter might be on the front or side. Once you’ve pinpointed the location, you can proceed with the replacement.
Checking Appliance Manual
Checking your appliance manual can provide crucial details about the specific filter type and replacement instructions. You’ll find diagrams that show where the filter is located. It’ll also give you information on how to safely remove and install the new filter. Don’t overlook any tips regarding maintenance or troubleshooting related to the water filter. Next, you’ll want to focus on inspecting the refrigerator interior to ensure everything’s in proper working order.
Inspecting Refrigerator Interior
Inspecting your refrigerator’s interior helps ensure everything is clean and organized for the filter replacement process. You’ll want to take note of any expired items or spills that need cleaning. Clear out any clutter to create a more efficient workspace. Make sure you’ve got easy access to the filter compartment once you’re ready to proceed. Now, let’s move on to accessing the filter compartment.
Accessing Filter Compartment
Accessing the filter compartment requires knowing where to look and how to open it safely. You’ll typically find it in the upper right corner of the refrigerator interior. Once you’ve located it, check for any latches or covers that need to be released. After opening the compartment, make sure to handle everything gently to avoid any damage. Now that you’ve got access, you’re ready to move on to removing the old filter.
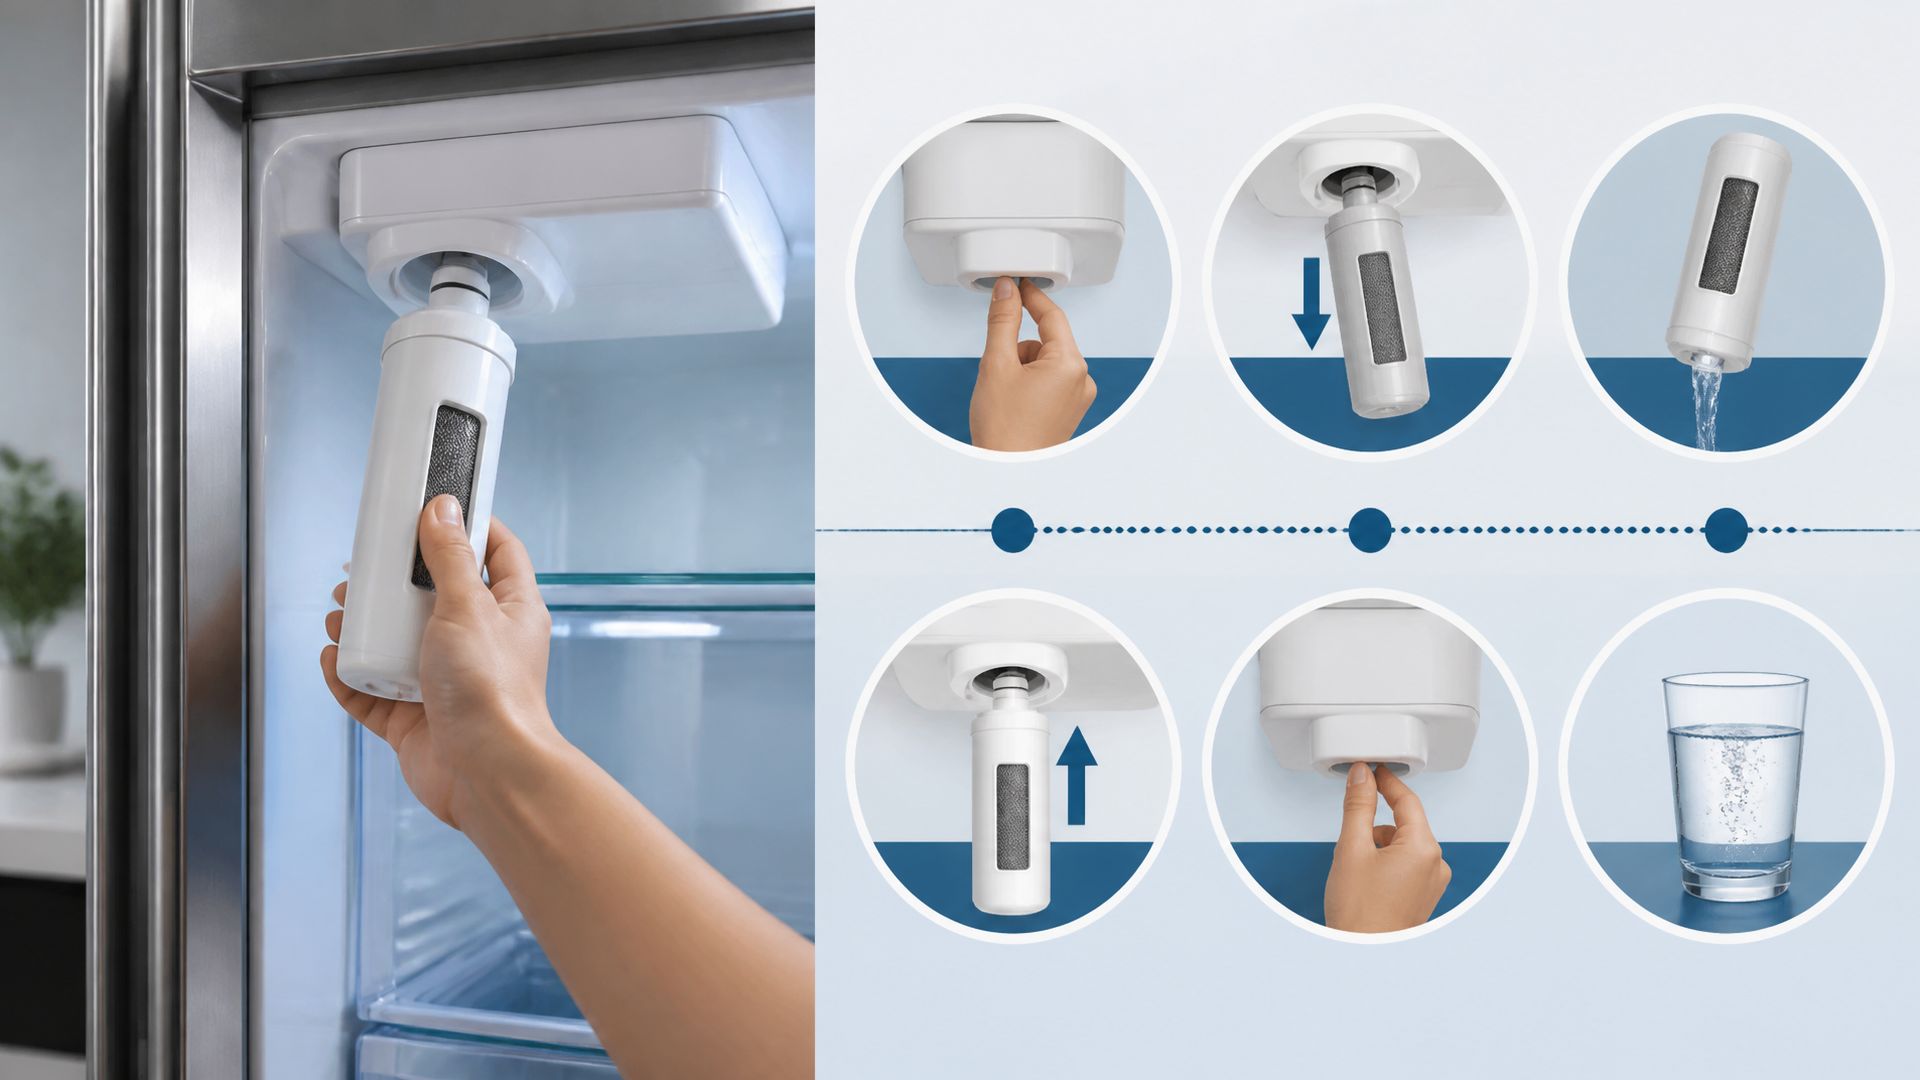
Removing the Old Filter
Removing the old filter is essential before you can install the new one. First, you’ll need to locate the filter compartment, usually found in the refrigerator’s upper right corner. Next, you should twist the old filter counterclockwise until it releases from its slot. Once it’s loose, pull it straight out gently to avoid any spills. Don’t forget to check for any water that may have dripped out during the process. After that, you might want to wipe down the compartment for cleanliness. It’s also a good idea to inspect the old filter for any signs of damage or wear. If everything looks good, you’re now ready to proceed. Now, let’s move on to installing the new filter.
Installing the New Filter
Now that you’ve removed the old filter, it’s time to focus on installing the new one. You’ll want to make sure you’re prepared for the installation process. Let’s go over the key steps to ensure a smooth replacement.
Preparing for Installation
Having all the necessary tools and materials ready will make your installation process much easier. You’ll need to gather the new water filter, a towel, and possibly a screwdriver. Make sure you’ve turned off the water supply to prevent any leaks during the process. It’s also helpful to read the manufacturer’s instructions before starting. Once you’re all set, you can move on to replacing the old filter.
Replacing the Old Filter
Replacing the old filter is crucial for maintaining optimal performance in your system. You’ll need to align the new filter properly with the slots. Once it’s in place, you should push until you hear a click. Make sure you’re not forcing it as that can cause damage. After that, you’ll want to run some water through to check for leaks.
Testing Water Quality
Now that you’ve installed your new filter, it’s crucial to ensure your water quality meets safety standards. You’ll want to test the water to confirm its cleanliness and purity. Understanding the importance of water testing and the various methods available will help you make informed decisions about your water supply.
Importance of Water Testing
The importance of water testing can’t be overstated, as it ensures you’re consuming safe and healthy water. Regular testing helps you identify any contaminants or harmful substances that could be present. It gives you peace of mind knowing your water meets safety standards. By staying proactive, you can address issues before they become serious health risks. Ultimately, testing your water helps you make informed choices for you and your family.
Methods for Testing Quality
Different methods for testing water quality can help you determine the presence of contaminants and ensure your water is safe to drink. You can use test strips, which provide quick results for various contaminants. If you prefer a more detailed analysis, sending a sample to a laboratory can give you comprehensive data on your water’s composition. Another option is using a portable water quality meter for on-the-spot testing of specific parameters. Each method has its advantages, so choose one that fits your needs best.
Frequently Asked Questions
How often should i replace my frigidaire water filter?
You should replace your Frigidaire water filter every six months for optimal performance. If you notice a change in water taste or flow rate, it’s best to replace it sooner.
Can i use a non-frigidaire water filter as a replacement?
You can use a non-Frigidaire water filter as a replacement, but it’s important to ensure it’s compatible with your system. Just keep in mind that using a different brand might affect the water quality or flow rate.
What tools do i need to replace the water filter?
To replace the water filter, you typically don’t need any special tools; just your hands should do the trick. However, having a towel nearby can be helpful to catch any spills.
If you’re looking to solve issues with your Ninja Blender after tackling the Frigidaire Water Filter replacement, I highly recommend visiting this informative page on common Ninja Blender problems and solutions. You’ll find practical tips and troubleshooting advice to keep your blender running smoothly. Don’t miss out on these valuable insights!
Explore This Topic
- Back to Repair & Replacement
- Back to Repair & Replacement
Related guides in this cluster: