10 Steps to Deep Clean Your Whirlpool Oven – A Complete Guide
Cleaning your Whirlpool oven is easier than it seems! Start by gathering supplies like baking soda and vinegar. Next, remove the racks and accessories gently. Make a cleaning paste with baking soda and vinegar, and apply it to the oven walls. Don’t forget to scrub the door and clean the bottom. Wipe down the control panel, reassemble everything, and keep your oven maintained for a sparkling clean appliance. Keep following for more tips and tricks!
Key Takeaways
- Gather eco-friendly cleaning supplies like baking soda, vinegar, sponges, and a bucket for effective preparation.
- Ensure safety by disconnecting gas or unplugging the oven before removing racks and accessories.
- Soak and scrub oven racks in hot, soapy water; rinse and dry thoroughly to prevent rust.
- Apply a baking soda and vinegar paste to the oven’s interior, allowing it to sit for 15-30 minutes before scrubbing.
- Clean the control panel gently with a damp cloth, and regularly maintain oven seals and gaskets for optimal performance.
Gather Your Cleaning Supplies
Before diving into the deep clean of a Whirlpool oven, it’s important to gather all the necessary cleaning supplies. First, a few eco alternatives, such as baking soda and vinegar, can work wonders and keep your home safe from harsh chemicals. These natural options are perfect for scrubbing away grease. Next, make sure to have sponges, microfiber cloths, and a spray bottle handy; these will help create a tidy cleaning space.
Also, consider your storage solutions. A handy caddy can keep your supplies organized and easy to access. This way, you won’t be running around looking for that elusive sponge!
Gathering everything beforehand not only saves time but also makes the process smoother. Remember, a clean oven can bring joy back to cooking. So, roll up those sleeves, gather your tools, and get ready for a sparkling oven that shines just like your culinary creations!
Remove Oven Racks and Accessories
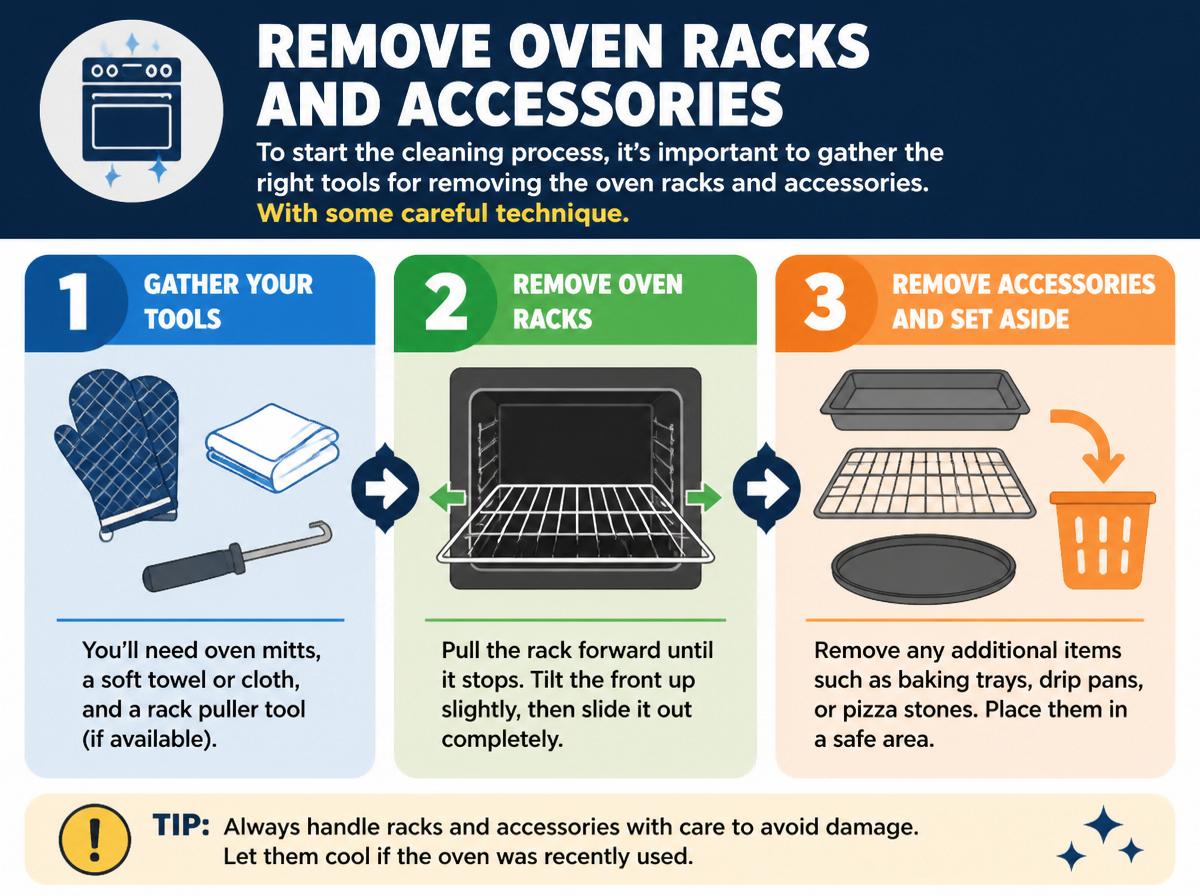
To start the cleaning process, it’s important to gather the right tools for removing the oven racks and accessories. With some careful techniques, this task can be both simple and safe, making it much easier to access those nooks and crannies. Once everything is out, the racks can be cleaned thoroughly, ensuring that they sparkle just like the rest of the oven!
Gather Necessary Tools
Starting the process of deep cleaning a Whirlpool oven means first gathering a few essential tools, and it’s a lot easier than it might sound! To start, you’ll need a sturdy cleaning sponge or cloth, a gentle oven cleaner, and a bucket for soapy water. Good tool ergonomics is important, as it makes cleaning less of a chore and more enjoyable. Also, consider having a small container for screws or other items you might remove, ensuring you have effective storage solutions. As you gather these items, remember to embrace the cleaning journey; it’s a great opportunity to refresh your oven and your spirit. Plus, you’ll feel accomplished once everything’s sparkling clean!
Safe Removal Techniques
With the necessary tools ready and waiting, it’s time to focus on safely removing the oven racks and accessories. This step is essential for a deep clean, so let’s do it right!
- Turn Off the Oven: Make sure the oven is off and cool. For gas ovens, don’t forget to perform a gas disconnect for safety.
- Unplug or Isolate: If it’s an electric oven, unplug it for electrical isolation. This keeps you safe while working.
- Remove Racks and Accessories: Gently slide out the racks, being careful not to scratch the surfaces. If any accessories seem stuck, wiggle them free slightly.
Cleaning Racks Thoroughly
Cleaning oven racks can feel like a hefty task, but it’s a rewarding journey that brings a fresh shine to the entire oven. First, remove the racks and accessories, placing them in a large sink or tub filled with hot, soapy water. Let them soak for a while; this softens the grime. Use a scrub brush or sponge to tackle stubborn spots, ensuring to reach every nook and cranny. Don’t forget to rinse them well afterward! For rust prevention, consider applying protective coatings designed for kitchen items. Once clean, dry the racks completely before placing them back in the oven. It might take some effort, but a sparkling oven awaits you—rewarding you for a job well done!
Create a Cleaning Solution
Creating a homemade cleaning solution can transform a messy Whirlpool oven into a sparkling clean appliance. Many people find that a well-balanced cleaner can tackle tough stains without harsh chemicals. Here’s how to create your cleaning potion, focusing on the right pH balance for effective results and shelf stability:
- Baking Soda: This natural cleaner helps lift grime and odors, while also being gentle on surfaces.
- Vinegar: Known for its acidic properties, vinegar cuts through grease and can neutralize odors, lending a fresh scent.
- Water: Combining vinegar and baking soda with water creates a bubbly reaction that helps dislodge stuck dirt.
Mix the ingredients to create a paste, applying it generously. This blend works wonders while ensuring household safety. It’s time to roll up those sleeves and get to scrubbing! With patience and this simple solution, the oven can shine bright once again.
Clean the Oven Walls
Cleaning the oven walls can feel like a big task, but it’s really about having the right supplies and a little bit of elbow grease. First, gather your cleaning supplies, including baking soda for a natural scrub. With some scrubbing, rinsing, and drying, those walls will shine like new, making your oven a happier cooking space!
Gather Cleaning Supplies
Before diving into the task of cleaning the oven walls, it’s essential to gather all the necessary supplies to make the job easier and more enjoyable. With some proper storage organization, one can locate cleaning items quickly, making the process smoother. It’s also wise to check for expiration dates on products; using expired cleaners might turn the job into a real mess. Taking a moment to prepare guarantees everything is in order.
Here are three must-have supplies:
- Baking soda
- White vinegar
- A soft cloth
Having these on hand will transform the challenging task of oven cleaning into a breeze. So, roll up those sleeves! A sparkling oven is just around the corner.
Scrub With Baking Soda
With a sprinkle of baking soda, the transformation of the oven walls begins! Baking soda not only acts as a mild abrasive mechanism but also helps in the essential job of odor neutralization. This gentle scrubber works wonders, lifting away grime and baked-on stains.
To truly understand its magic, consider the following:
| Step | Action | Outcome |
|---|---|---|
| Sprinkle | Apply baking soda | Soaks up odors |
| Scrub | Gently rub the surface | Dirt loosens and lifts away |
| Let sit | Allow for 15-30 minutes | Enhanced cleaning power |
| Wipe down | Clean with a damp cloth | Shiny, fresh oven walls |
| Enjoy | Relish the clean smells | A happy kitchen |
Rinse and Dry
Rinsing and drying the oven walls can feel like the final step in a fun cleaning journey. Once the scrubbing is done, it’s time to wash away the residue. Here’s how to rinse effectively:
- Use clean water, making sure it’s suitable for your area’s water hardness to avoid streaks.
- Wipe the walls with a damp cloth; this helps remove any leftover baking soda and grime.
- Dry the surfaces thoroughly, considering the ambient humidity, to prevent water spots and make sure everything shines.
With a little effort, those walls will gleam! A well-rinsed and dried oven not only looks great but also feels satisfying to use. So, take a moment to enjoy your hard work—your oven will thank you!
Address the Oven Door
Addressing the oven door is an essential part of the deep cleaning process, as it often collects grease and splatters from many delicious meals. Start by checking the glass for any stubborn stains. A glass inspection helps guarantee a clear view inside the oven, making it easier to spot any baking mishaps. Use a gentle cleaner or a vinegar-water solution to wipe away grime, paying special attention to the edges and any seams.
Next, it’s time to focus on the hinges. They can get quite sticky over time, so hinge lubrication is key. A bit of cooking oil or a silicone spray can keep them moving smoothly, making opening and closing the door a breeze. By taking these simple steps, the oven door will shine bright, ready for your next cooking adventure. After all, a clean oven is a happy oven!
Scrub the Oven Racks
Scrubbing the oven racks can feel like a big task, but it’s actually quite manageable with the right approach! With a little effort, anyone can make those racks shine again. Here are three steps to help:
- Soak the Racks: Fill a tub or large sink with warm, soapy water. Let the racks soak for at least 30 minutes to loosen grime.
- Scrub with a Brush: Use a stiff brush or sponge. Focus on stubborn spots but be gentle to avoid scratches.
- Rinse and Dry: Rinse the racks thoroughly and let them dry. If they are too worn out, consider looking into replacement options. Watching brand comparisons can help find the best fit for a Whirlpool oven.
With these steps, scrubbing oven racks can turn into a simpler chore, leaving you feeling accomplished and ready for your next cooking adventure!
Clean the Oven Bottom
After taking care of those shiny oven racks, it’s time to turn attention to the oven bottom, where spills and splatters often gather. This part of the oven can collect food residue and carbon buildup, which can be tricky to clean. Start by removing any loose debris with a dry cloth or sponge. For stubborn spots, a mixture of baking soda and water works wonders. Apply it directly to the areas with buildup, let it sit for a while, and then scrub gently. This helps break down tough stains and also aids in smoke prevention during future cooking sessions. Remember, a clean oven bottom not only looks nice, it helps your oven work better! After all, nobody wants their delicious meals interrupted by smoke or bad smells. A little extra effort goes a long way, so keep it up—you’re doing a fantastic job in making your oven shine!
Wipe Down the Control Panel
Gently wiping down the control panel is an essential step in keeping a Whirlpool oven sparkling clean and fully functional. A clean control panel guarantees that the oven operates smoothly and enhances the overall cooking experience. To make this task easier, follow these simple steps:
- Use a soft, damp cloth: This protects both the touchscreen and buttons from scratches that can disrupt operation.
- Avoid harsh chemicals: Stick to gentle cleaners to maintain button protection and the quality of the display.
- Dry with a microfiber cloth: This will prevent water spots and allow you to admire that shiny finish.
Reassemble and Replace Racks
With the control panel now shining and ready for action, the focus turns to the oven racks. It’s time to put everything back together! First, check that all racks are clean, and then think about their rack positioning. Remember, the top rack is best for broiling while the bottom rack can be great for baking.
Before placing them back, don’t forget to conduct some safety checks. Make sure all parts are dry and free from any residue. This guarantees the oven works beautifully and safely.
Here’s a quick reference table to help with rack positioning:
| Rack Level | Best For |
|---|---|
| Top Rack | Broiling |
| Middle Rack | Baking |
| Bottom Rack | Roasting |
| Bottom-most Rack | Large Casseroles |
| All Levels | Variable Cookings |
With these steps, the oven is almost ready for action!
Maintain Your Clean Oven
Maintaining a clean oven is essential for everyone who loves to cook, and it should be done regularly. Not only does a clean oven make meal prep easier, but it also promotes energy efficiency and helps prevent fires. By adopting preventive habits, one can make sure their oven stays in great shape. Here are three simple steps to make oven maintenance a breeze:
- Wipe Down After Each Use: After cooking, take a moment to wipe the oven’s interior. It helps prevent food buildup and makes deep cleaning less intimidating.
- Use a Liner: Consider placing an oven liner on the bottom to catch spills, making cleanup a cinch.
- Check Seals and Gaskets: Regularly inspect the door seals to make sure they’re intact. A good seal saves energy and enhances cooking performance.
With these steps, your oven will remain welcoming and ready for your culinary adventures!
Frequently Asked Questions
How Often Should I Deep Clean My Whirlpool Oven?
Deep cleaning a Whirlpool oven should ideally occur every one to three months, depending on usage frequency. Monthly maintenance is recommended for heavy users, ensuring peak performance and longevity of the appliance. Regular cleaning prevents buildup and odor.
Can I Use Vinegar Instead of Commercial Cleaners?
Vinegar can effectively replace commercial cleaners, boasting disinfection efficacy of up to 90% against bacteria. However, individuals should consider surface compatibility to avoid potential damage, making it an interesting alternative for safe cleaning solutions.
Is It Safe to Use Steel Wool on the Oven?
Using steel wool on an oven may not be safe due to potential surface abrasion that can damage the finish. It’s important to evaluate finish compatibility before using abrasive materials to clean appliance surfaces effectively.
What Should I Avoid Cleaning Near Oven Electronics?
To protect oven electronics, one should avoid moisture exposure and abrasive cleaners, as these substances can damage sensitive components. Maintaining a safe distance from such materials promotes the longevity and functionality of the appliance.
How Do I Remove Stubborn Stains From My Oven?
To remove stubborn stains from an oven, one might create a paste of baking soda and water, apply it to the stains, then utilize lemon steam for added cleaning power, effectively loosening grime for easier removal.
Conclusion
By following these ten steps, your Whirlpool oven can shine like new! Did you know that a clean oven can save up to 20% on energy costs? That’s money back in your pocket! Remember, a little effort today leads to a happier cooking experience tomorrow. So, put on your favorite cleaning gloves and get started! You’ve got this! With a sparkling oven, every meal will feel special, and cooking will be even more fun. Happy cleaning!
Explore This Topic
- Back to Maintenance & Repair Procedures
- Back to deep cleaning
Related guides in this cluster: