
How to Troubleshoot GE Oven Issues: A Complete Guide
Troubleshooting GE oven issues can be easy and rewarding! Start by checking for common problems like strange noises or door issues. Use an oven thermometer to verify proper heating, and inspect the heating elements for damage. If control panel errors pop up, remember familiar codes and try resetting the panel. Don’t forget to check the self-cleaning settings or clean out any gunk that might be blocking it. Stick with it, and you’ll soon uncover more helpful tips!
Key Takeaways
- Check oven temperature with an oven thermometer to verify calibration; adjust as needed for accurate cooking.
- Inspect heating elements and door seals for damage to ensure even heating and heat retention.
- Familiarize yourself with common error codes, reset the control panel, or power cycle the oven for troubleshooting.
- Ensure the oven is empty and free of residue before starting a self-cleaning cycle for optimal performance.
- Document any persistent issues or changes in performance and consider seeking professional help if problems persist.
Identifying Common GE Oven Problems
When it comes to troubleshooting GE ovens, recognizing common problems can feel like piecing together a puzzle. Many might encounter issues like strange noises or a door that won’t close properly. These are often signs that something needs attention. Regular oven maintenance tips can help prevent bigger problems from developing. For instance, keeping the oven clean and checking the seals can enhance performance.
User manual guidance is invaluable when facing these concerns. It offers step-by-step instructions tailored to specific models, making it easier to understand what might be going wrong. If the oven isn’t heating at all or the light isn’t working, checking the manual can quickly point to solutions. Remember, even the smallest issue can often lead to bigger headaches if ignored! By paying attention to details and following suggested tips, anyone can successfully navigate the world of oven troubleshooting. Happy cooking!
Troubleshooting Inconsistent Heating
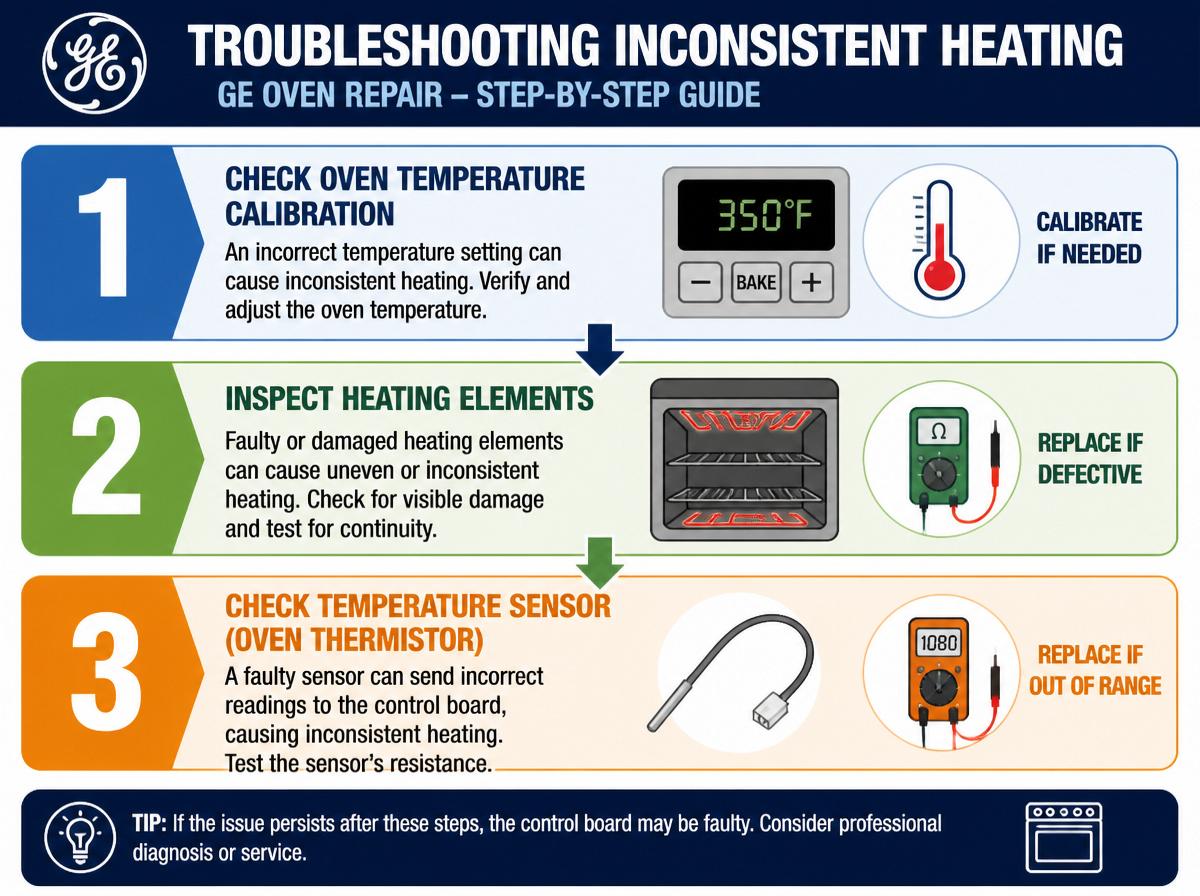
Inconsistent heating in a GE oven can be frustrating, but there are ways to solve it. First, checking the oven temperature calibration is important to guarantee it’s cooking at the right heat. Also, inspecting the heating elements and verifying the oven door seal can make a big difference, like making sure your pizza stays warm when you open the box!
Check Oven Temperature Calibration
Have you ever wondered why your delicious lasagna comes out either burnt on one side or barely cooked on the other? It could be due to improper oven temperature calibration. This is vital for even cooking. To check your oven’s calibration, follow these simple steps:
- Use an oven thermometer: Place it in the center and preheat your oven.
- Compare readings: After the oven beeps, check the thermometer’s temperature against the set temperature.
- Make adjustments: If there’s a difference, refer to oven calibration techniques or temperature adjustment methods to guarantee consistent heating in future baking adventures.
Taking these steps can improve your cooking results, making certain your meals come out just right! Remember, you’ve got this!
Inspect Heating Elements
Even with a well-calibrated oven, it’s possible for meals to cook unevenly, leading to burnt edges or cold centers. A common culprit behind this issue could be faulty heating elements. GE ovens often feature either bake or broil heating element types. Checking these elements is essential—look for any visible damage or breaks. If an element glows red but still doesn’t heat evenly, it might need replacement. Luckily, there are element replacement options available online and at local stores. Taking the time to inspect and, if needed, replace these elements can make a big difference. So, roll up those sleeves and give your oven the attention it deserves—you can do it! Your cooking will thank you later.
Verify Oven Door Seal
A well-fitting oven door can make all the difference when it comes to cooking evenly! To guarantee a perfect seal and avoid inconsistent heating, regular oven door maintenance is essential. Here are three steps to verify that seal:
- Inspect the Gasket: Look for cracks, tears, or any signs of wear on the door seal.
- Conduct a Dollar Bill Test: Close the oven door on a dollar bill. If it slides out easily, the seal may need replacement.
- Clean the Seal: Wipe the gasket with warm soap and water to remove debris that might affect the seal.
If the gasket is damaged, consider seal replacement to achieve better cooking results. Strong seals lead to happier baking adventures! 🎉
Addressing Control Panel Errors
Control panel errors can be confusing and even a little frustrating, but they are often easy to fix. Common issues might include error codes or a display that seems to have a mind of its own. By resetting the control panel and troubleshooting display problems, most users can restore order to their cooking adventures, turning that frown upside down!
Common Control Panel Errors
When tackling issues with a GE oven, understanding common control panel errors can make a world of difference. These pesky problems can be confusing, but knowing them helps reduce stress. Here are some common errors to watch for:
- “F1Error: This may indicate a need for control panel calibration.
- “F2Error: This error suggests a temperature sensor issue, which often requires checking connections.
- “F3Error: This usually means there’s a problem with the oven’s thermistor.
Recognizing these error messages is key to finding error message solutions effectively. Once identified, follow troubleshooting steps patiently, knowing every little effort leads to a working oven. With practice and courage, anyone can fix these issues and keep cooking happily!
Resetting the Control Panel
Addressing issues with the control panel can often be as simple as resetting it. A control panel reset is like a quick nap for your oven—it can wake it up and fix those pesky user interface issues. To perform this reset, first, unplug the oven or turn off the circuit breaker for a few minutes. Once the time is up, plug it back in or flip the breaker on. This little trick can clear errors and refresh the system, just like when you take a break and feel better! If problems persist, don’t panic; they may require deeper troubleshooting. Remember, you’re not alone in this, and with patience, you can get that oven back on track!
Troubleshooting Display Issues
Have you ever looked at your oven’s display and wondered why it’s acting up? Display issues can be tricky! Here are a few steps to help figure it out:
- Check the display brightness adjustment: Sometimes, it’s just too dim or too bright. Adjust the settings for better visibility.
- Inspect for a faulty display connection: Loose or damaged connections can cause problems. Make sure everything is securely connected.
- Look for error codes: If there are any strange messages or codes, consult your GE oven manual for guidance.
Taking these steps can help restore your oven’s display to normal! Remember, troubleshooting can be a fun challenge. You’ve got this!
Resolving Self-Cleaning Cycle Issues
Starting the self-cleaning cycle on a GE oven can feel a bit like being a wizard casting a spell—exciting yet sometimes, things just don’t go as planned! If the self-cleaning features don’t seem to work, there could be a few reasons behind it. First, verify the oven door is properly closed; most models won’t start if it’s even slightly ajar. Next, check if the cleaning cycle was set correctly, as sometimes buttons might not register.
If the cleaning cycle effectiveness seems low, it’s essential to verify that the oven has been emptied of any items. Cleaning residue can build up, making it harder for the self-cleaning process to function well. Finally, if it continues to sputter out, consulting the owner’s manual can provide specific guidance tailored to that model. Remember, troubleshooting is merely the first step in becoming an appliance wizard!
Fixing Door Seal and Hinge Problems
Fixing door seal and hinge problems is like solving a puzzle—each piece must fit just right to ascertain the oven operates smoothly. A well-functioning door ensures the heat stays inside, so let’s explore some practical tips.
- Check the Hinge Alignment: If the oven door isn’t closing properly, it may be time for some door hinge adjustments. Loosen the screws slightly, move the hinges, and retighten them for a snug fit.
- Inspect the Door Seal: A worn seal can cause heat loss. Look for cracks or tears and consider seal replacement tips, like choosing a high-quality material suitable for your oven model.
- Test the Door Closure: Close the door slowly and listen for any gaps. If it doesn’t shut tightly, repeat the hinge adjustments until it does.
With these steps, anyone can restore their oven’s efficiency and save on energy costs!
Understanding Error Codes and Their Meanings
Oven troubles can sometimes feel like a mysterious game of charades, especially when pesky error codes pop up on the display. Understanding these codes is key for proper error code interpretation. They act as clues, guiding users through the troubleshooting guide.
Here’s a simple table to help decode some common error codes:
| Error Code | Meaning |
|---|---|
| F1 | Open circuit in control board |
| F2 | Oven too hot |
| F3 | Temperature sensor failure |
| F4 | Shorted temperature probe |
When your oven displays an error code, don’t panic! Take a moment to consult your manual or look up the code online. These little hints can help you solve problems and get your oven back to baking delicious treats. Remember, with patience and a bit of detective work, you can tackle your oven issues like a pro!
When to Contact a Professional Technician
Have you ever felt stuck and unsure about when it’s time to call for help? Deciding when to consult a professional technician can be tricky, but recognizing the signs of malfunction can guide you. Here are three key indicators that it’s time to make that call:
- Consistent error codes: If your GE oven repeatedly shows confusing error codes, it might indicate a deeper issue.
- Unusual smells or sounds: Strange odors or noises during operation can be warning signs that shouldn’t be ignored.
- Inconsistent cooking results: If your food is consistently undercooked or burnt, it may mean your oven is not functioning properly.
Frequently Asked Questions
How Can I Maintain My GE Oven for Longevity?
To guarantee longevity, regular inspection and preventative care are essential for a GE oven. Oven maintenance tips include cleaning the interior, checking seals, monitoring temperature accuracy, and scheduling professional servicing to address potential issues promptly.
Do GE Ovens Require Special Cleaning Products?
GE ovens do not require special cleaning products; however, proper oven cleaning symbolizes effective appliance maintenance. Using gentle, non-abrasive cleaners guarantees longevity, reflecting the care invested in maintaining a reliable kitchen companion essential for culinary creations.
What Should I Do if My Oven Is Making Unusual Noises?
If the oven is making unusual sounds, one should first check for loose components or items inside. Consulting troubleshooting tips from the manufacturer’s manual may provide additional insight into resolving the noise issue effectively.
Can I Install a GE Oven Myself?
Yes, one can install a GE oven themselves. However, they must carefully consider installation requirements and observe necessary safety precautions, as improper installation might lead to potential hazards or functionality issues down the line.
Are GE Oven Parts Interchangeable With Other Brands?
GE oven parts are not typically interchangeable with other brands due to differences in design and specifications. Brand compatibility varies considerably, so it is crucial to verify compatibility before attempting to replace components in GE ovens.
Conclusion
To sum up, tackling GE oven issues can feel like climbing Mount Everest, but with this guide, you’re equipped like a seasoned explorer! Remember, every problem has a solution, whether it’s a cheeky error code or a stubborn door seal. Don’t hesitate to channel your inner DIY hero! And if the challenge seems too big, calling a professional can save the day too. Just take a deep breath, stay positive, and let your cooking adventures continue!
Explore This Topic
- Back to Cooking Appliances
- Back to appliance tips
Related guides in this cluster: