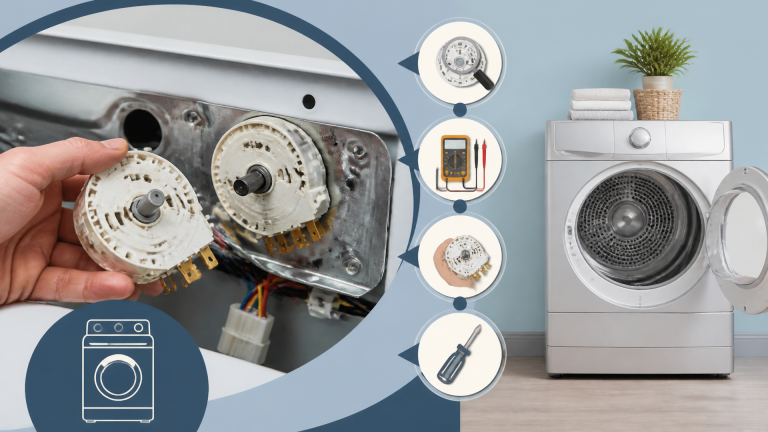
Step-by-Step Guide to Fixing a Whirlpool Washing Machine Agitator
When my whirlpool washing machine started acting up, I knew I had to take matters into my own hands. I’ve always found it satisfying to tackle home repairs, and fixing the agitator seemed like a challenge I could handle. In this guide, I’ll walk you through the step-by-step process I used to get my machine back in working order. From identifying common issues to testing the agitator after repair, I’ll share everything I learned along the way. So, if you’re ready to save some money and gain a little confidence, let’s dive into the world of DIY washing machine repairs!
Identifying Common Agitator Issues
When I notice my washing machine acting up, I often start by identifying common agitator issues. It’s crucial to pinpoint the symptoms, as they can reveal underlying problems. By paying attention to these signs, I can better understand what needs to be addressed.
No Movement Symptoms
When I see that the agitator isn’t moving at all, I know there’s an issue. I can usually tell something’s wrong when the clothes aren’t getting agitated properly. Sometimes, I notice that the agitator only moves slightly, which isn’t normal either. It’s frustrating when I have to deal with these no-movement symptoms, especially during laundry day. Next, I’ll need to listen for any unusual noises during operation to gather more clues about the problem.
Unusual Noises During Operation
When I hear unusual noises during my washing machine’s operation, it really grabs my attention. I can’t ignore the clinking or grinding sounds that seem out of place. Sometimes, it feels like the agitator’s having a tough time doing its job. I know I need to investigate further to determine the cause. Those noises often hint at something that needs fixing.
Excessive Wear and Tear
I’ve noticed that excessive wear and tear can really impact my washing machine’s performance. Sometimes, I can see visible signs of damage on the agitator itself. I’ve learned to check for frayed edges or cracks that might indicate a problem. When the agitator struggles to move properly, it’s often due to this wear and tear. I know it’s essential to address these issues before they lead to bigger problems.
Inconsistent Agitation Patterns
When I see inconsistent agitation patterns, it usually signals something’s off with the agitator. Sometimes it just doesn’t move at all, or it moves erratically. I can’t ignore those strange noises that come along with it. It often leads me to suspect a problem with the drive belt or the agitator cogs. Before I dive into fixing it, I need to gather the required tools and materials.
Required Tools and Materials
Now that I’ve identified the common agitator issues, it’s time to gather the required tools and materials for the fixing process. I’ll need to make sure I have everything on hand to ensure a smooth repair experience. Let’s go over the essential items I’ll be using.
Essential Hand Tools
I’ve found that having the right hand tools makes all the difference when fixing my whirlpool washing machine agitator. I’ll definitely need a set of screwdrivers, both flathead and Phillips, to tackle the various screws. A pair of pliers is essential for gripping and pulling parts apart without damaging them. I also keep a socket set handy for removing any stubborn bolts that may be in the way. With these tools ready, I can now focus on the recommended replacement parts I might need.
Recommended Replacement Parts
I’m planning to replace the agitator dogs since they’re often the culprits in these issues. I’ll also grab a new agitator coupling to ensure it’s functioning properly. A drive belt might come in handy, just in case mine’s worn out. I won’t forget to pick up some lubricant for smooth operation. Lastly, I’ll get a new lid switch to prevent any interruptions during the wash cycle.
Safety Equipment Needed
I’ve got to prioritize my safety before diving into the repair. I’ll make sure to wear safety goggles to protect my eyes from any debris. A pair of sturdy gloves is essential to keep my hands safe from sharp edges. I’ll also use a dust mask if there’s any dust or debris around. Lastly, I’ll ensure I’ve got a first-aid kit nearby, just in case something goes wrong.
Cleaning Supplies Required
I’ll need some cleaning supplies to prepare the washing machine for repairs. A good degreaser will help me tackle any built-up grime on the agitator. I’ll also grab a soft cloth for wiping down surfaces and a scrub brush for tougher spots. Don’t forget a bucket to catch any leftover water or debris. Now that I’ve gathered my cleaning supplies, it’s important to go over the safety precautions before I start.
Safety Precautions Before You Start
Before I start, I always make sure to unplug the washing machine. I can’t risk getting shocked while I’m working on it. It’s also important to turn off the water supply to avoid any leaks. I wear rubber gloves to protect my hands from any sharp edges or detergent residue. I keep a towel nearby in case I need to wipe up any spills. I ensure I have proper ventilation in the area to avoid inhaling any fumes. Lastly, I double-check that I have all my tools
Disassembling the Washing Machine
Now that I’ve taken all the necessary safety precautions, I’m ready to dive into disassembling the washing machine. I’ll start by gathering the tools I need for disassembly, as having everything on hand will make the process smoother. Next, I’ll remove the agitator cap and access the agitator assembly to get to the root of the problem.
Tools Needed for Disassembly
I’ve got my toolbox ready for this project. I’ll need a socket wrench set to tackle those stubborn bolts. A flathead screwdriver is essential for prying off the agitator cap. I can’t forget my pliers to grip and pull any tight parts apart. Finally, a flashlight will help me see in those dark corners of the machine.
Removing the Agitator Cap
I’m carefully prying off the agitator cap with a flathead screwdriver. Once it’s loose, I can see the inner workings of the agitator. I’m making sure not to damage any surrounding parts while I lift the cap off. After that, I’m inspecting the area for any signs of wear or debris. It feels satisfying to finally have access to the agitator assembly.
Accessing the Agitator Assembly
I’ve carefully removed the agitator cap, and now I can see the inner workings of the assembly. I’m feeling a bit excited as I prepare to tackle the next
Inspecting the Agitator Components
Now that I’ve disassembled the washing machine, it’s time to inspect the agitator components. I’ll need to check for any damage and ensure everything’s properly aligned. Let’s dive into the details to get started.
Check for Damage
I’ve got my flashlight ready to inspect the agitator components. I can see some wear and tear on the plastic fins that might be causing issues. I’m also checking the drive block for cracks or any signs of breakage. It’s important to feel for any rough edges that could indicate damage. I’ll make a note of anything that needs replacing before I reassemble everything.
Verify Component Alignment
I’m looking closely at the alignment of each agitator part. It’s crucial that everything fits snugly together without any gaps. I’ll adjust any components that seem off-kilter to ensure smooth operation. After that, I’ll double-check the positioning of the drive dogs. Once I’m satisfied with the alignment, I can move on to reassembling the agitator.
Troubleshooting Common Problems
When it comes to troubleshooting common problems, I’ve learned that a systematic approach can save a lot of time. I’ll start by identifying agitator issues, which often lead to bigger concerns. From there, I can check for common error codes and ensure all components are tested thoroughly.
Identifying Agitator Issues
I’ve noticed that if the agitator isn’t moving, it could indicate a problem. Sometimes, I hear unusual noises that signal something’s wrong. I’ll check for any visible damage or wear on the agitator itself. If I see any broken parts, I know I need to replace them. It’s crucial for me to also ensure the drive belt is functioning properly.
Common Error Codes
When I encounter error codes, I know it’s crucial to decipher what they mean. I’ve found that different codes can indicate specific issues with the washing machine. By referencing the user manual, I can pinpoint the problem more accurately. It’s pretty handy to have a list of common error codes for quick troubleshooting. Now that I’ve identified the codes, it’s time to start testing components thoroughly.
Testing Components Thoroughly
I’ve found that testing components thoroughly is crucial for pinpointing issues. I usually start with the drive belt and make sure it’s intact and properly tensioned. Then, I move on to the motor coupling to check for any signs of wear. After that, I inspect the agitator itself for any obstructions or damage. Once I’ve tested all the components, I’m ready to begin reassembling the washing machine.
Reassembling the Washing Machine
Now that I’ve tackled the troubleshooting, it’s time to put everything back together. I’ll focus on reattaching the agitator components and securing the washing machine for optimal performance. Let’s dive into the step-by-step process.
Reattaching Agitator Components
I’ve got the agitator components lined up and ready to go. I’m starting with the lower agitator and making sure it fits snugly onto the drive shaft. Once that’s in place, I’ll add the coupling and secure it tightly. Next, I’m attaching the upper agitator and aligning it properly with the lower part. Finally, I’ll fasten the retaining nut to ensure everything stays in place during operation.
Securing the Washing Machine
I’ve made sure all the components are aligned properly before tightening them down. It’s crucial to double-check that everything’s secure to avoid any issues later. I’ll also take a moment to inspect the hoses and connections for any signs of wear. Once I’m satisfied with the reassembly, I’ll close up the washing machine. With everything secured, it’s now time to test the agitator after repair.
Testing the Agitator After Repair
Now that I’ve reassembled the washing machine, it’s time to test the agitator after the repair. I want to ensure everything’s working smoothly before putting it back into regular use. Let’s dive into the key points for testing the agitator’s performance and verifying the repair’s effectiveness.
Testing Agitator Performance
I’ll start by running a short wash cycle to see how the agitator performs. I’m paying close attention to any unusual noises or vibrations during the cycle. It’s crucial to check if the clothes are getting properly agitated and cleaned. I’ll also look for any signs of leaks around the agitator area. Once I’m satisfied with the test, I’ll consider the repair successful.
Verifying Repair Effectiveness
I’ve plugged the washing machine back in and set it to a regular cycle. As it starts, I’m closely watching the agitator for any unusual movements or sounds. It feels satisfying to see it spinning smoothly, indicating the repair might’ve worked. I’m also checking for any leaks around the base, just to be sure everything’s sealed properly. With the agitator performing well, I’m now ready to share some preventative maintenance tips to keep it running smoothly in the future.
Preventative Maintenance Tips
I always make sure to clean the agitator regularly to prevent buildup. I’ll check for any loose parts or signs of wear and tear. I usually run a hot water cycle with vinegar to keep it fresh. I don’t forget to inspect the hoses for leaks or cracks either. I keep the washing machine level to avoid unnecessary vibrations. I often wipe down the exterior to prevent dirt accumulation. I make it a habit to unplug the machine when I’m not using it for safety.
Frequently Asked Questions
What warranty options are available for replacement parts?
When it comes to warranty options for replacement parts, I usually find that most manufacturers offer a limited warranty that covers defects in materials and workmanship. Typically, these warranties can range from 90 days to a year, depending on the specific part and brand. I’ve learned it’s important to check the details, as some parts might have extended warranties if purchased from authorized dealers. If I’m unsure, I always reach out to customer service to clarify the coverage before making a purchase.
How long does a typical agitator repair take?
When I think about how long a typical agitator repair takes, I usually estimate it to be around one to two hours. It really depends on the specific issues and whether I’ve got all the necessary tools ready. If I’m experienced with repairs, I can often get it done quicker, but I always make sure to take my time to avoid mistakes. Overall, it’s a manageable process that I can usually fit into my schedule without too much hassle.
Are there any specific brands or models that are more prone to agitator issues?
I’ve noticed that some brands, like Whirlpool and Kenmore, tend to have more reported agitator issues compared to others. In my experience, certain older models seem to struggle more, especially if they’ve been used heavily over the years. I think it often comes down to the design and the materials used in those specific models. So, if you’re considering a new washing machine, it might be worth researching the reliability of the agitator for that brand.
Conclusion
In summary, tackling agitator issues in a Whirlpool washing machine can be quite straightforward with the right approach. By following the step-by-step guide, I’ve seen how effective systematic troubleshooting can be in identifying and resolving problems. Keeping safety precautions in mind while disassembling and reassembling is crucial to ensure a smooth repair process. Regular maintenance not only aids in preventing future issues but also enhances the longevity of the appliance. Overall, I’m confident that anyone can successfully fix their washing machine with a little patience and the proper tools.
If you’re looking to tackle more home appliance maintenance, I highly recommend checking out this fantastic read on how to clean a Maytag dishwashing machine. It provides valuable tips and insights that can help keep your appliances running smoothly. You can find it here.
Explore This Topic
- Back to Repair & Replacement
- Back to Repair & Replacement
Related guides in this cluster: