
7 Essential Tips for Your Oven Inspection Checklist
To make sure your oven runs well, check the door seal for any cracks, so it can keep heat in and save energy. Look at the heating elements for burns or damage. Don’t forget to clean both inside and outside to prevent smoke! Test the temperature accuracy with a thermometer; it’s like giving your oven a check-up. Make sure the light and control panel are working properly too. These steps help keep your oven happy, and there’s more to discover!
Key Takeaways
- Inspect door seals to ensure proper integrity, preventing heat loss and improving cooking consistency.
- Check heating elements for signs of damage, ensuring safe and even heating during use.
- Clean the interior and exterior regularly to maintain performance and prevent smoke buildup.
- Test temperature calibration with an oven-safe probe to confirm accuracy and reliability in cooking.
- Ensure all control panel buttons and safety features function effectively, including child locks and indicator lights.
Check the Door Seal Integrity
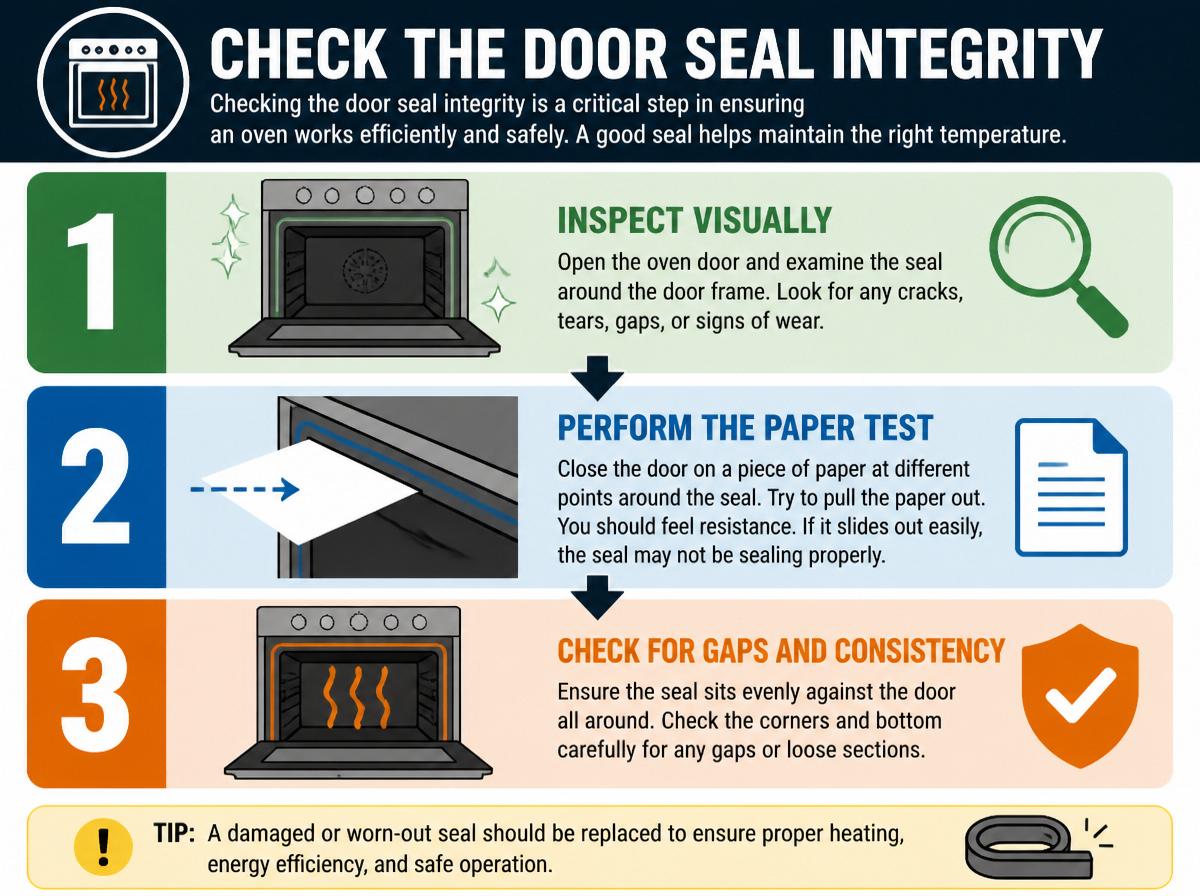
Checking the door seal integrity is a critical step in ensuring an oven works efficiently and safely. A good seal helps maintain the right temperature while cooking, saving energy and keeping food delicious. To check the seal, simply examine the door gasket for any signs of wear, like cracks or tears. If the rubber feels flattened, it may be a sign of poor gasket compression. A properly sealed oven prevents heat from escaping, making every meal a success!
If the seal is damaged, it might be time for a seal replacement. This is usually an easy task. Just find the right gasket for your oven model and follow the instructions. With a little effort, you can have your oven running like new again! Remember, a properly sealed oven not only saves energy but also makes cooking more enjoyable—who wouldn’t want that? So, let’s get started on creating tasty meals!
Inspect the Heating Elements
When inspecting the heating elements of an oven, it’s important to look for any visual damage. A quick functionality test can also show if they are heating properly, while keeping them clean promotes better performance. Remember, a well-maintained heating element not only cooks food evenly but also helps prevent surprises like smoke during baking!
Visual Damage Assessment
Before diving into cooking adventures, it’s important to take a moment to inspect the heating elements of the oven, as these essential parts help make wonderful meals happen. A thorough visual damage assessment can reveal if the oven is ready for action or if it needs some TLC. Look out for the following signs:
- Exterior dents that might affect the heating efficiency.
- Finish discoloration on the elements, indicating wear and tear.
- Frayed wires that pose safety risks.
- Cracks or breaks in the heating element itself.
Element Functionality Test
Is the oven ready to heat things up? Before cooking your favorite meals, it’s important to perform an element functionality test to confirm everything is working right. First, check the heating elements for any visible damage. Then, carefully power cycle your oven. This means turning it off and on to see if the elements heat evenly. Remember to engage any safety interlocks to keep yourself safe during the inspection! Below is a simple checklist to help you remember the steps:
| Step | Action | Notes |
|---|---|---|
| Check Elements | Look for burns or cracks | Replace if damaged |
| Power Cycle | Turn off and on | Confirm even heating |
| Test Each Element | Use a thermometer | Verify proper temperature |
| Safety Interlocks | Engage them | Protect against accidents during testing |
With this checklist, your oven will be ready to heat things up!
Cleanliness and Maintenance Check
To keep an oven in excellent working condition, regular cleaning and maintenance of the heating elements is essential. A well-maintained oven not only cooks evenly but also helps with odor prevention. Here’s how to keep those heating elements sparkling:
- Unplug the Oven: Safety first! Always unplug your oven before cleaning.
- Wipe Down: Use a damp cloth to remove crumbs and spills from the heating elements.
- Inspect for Damage: Check for any cracks or signs of wear; these could lead to bigger problems.
- Create a Cleaning Schedule: Regular cleanings, perhaps once a month, can help maintain peak performance.
Clean the Interior and Exterior
Cleaning the interior and exterior of an oven is an essential task that keeps it running smoothly and safely. First, one should remove any loose debris, because who wants to cook in a messy oven? Then, using safe cleaners and wiping down surfaces can make a big difference, turning that well-used appliance into a gleaming kitchen companion.
Remove Loose Debris
Tackling the task of removing loose debris from the oven can feel like a small adventure, and it’s a great way to make sure that the kitchen stays sparkling clean! Keeping the oven clear of crumbs and debris helps prevent pest attraction, as well as reducing the risk of a fire hazard. A clean oven not only looks good but also functions better! Here are four easy steps to guide the process:
- Turn off the oven and let it cool completely.
- Remove oven racks and any large pieces of debris.
- Vacuum the interior to pick up loose crumbs and dust.
- Wipe down the surfaces with a clean cloth to finish up!
With these steps, the oven will be ready for a fresh start!
Use Safe Cleaners
A sparkling clean oven begins with the right cleaners! Using safe cleaners is key to making both the interior and exterior shine. It’s important to choose products with good chemical compatibility, so they don’t harm your oven’s surfaces. Some cleaners might mix like oil and water, causing a mess instead of a sparkle! Always remember skin protection; wearing gloves can keep your hands safe from harsh ingredients. Many natural options exist that are both effective and gentle. Vinegar and baking soda can work wonders! They’re fun to use and make cleaning a bit of a science experiment. With the right tools and mindset, anyone can achieve an oven that looks, feels, and smells fresh!
Wipe Down Surfaces
Wiping down surfaces can transform an oven from drab to dazzling! A simple clean-up can make a big difference. Using soft microfiber cloths helps avoid scratches while providing a fresh shine. Here’s a quick list to guide anyone through the process:
- Interior Walls: Remove grease and grime from the oven’s walls with a damp cloth.
- Racks: Take out the oven racks and clean them separately for better access.
- Control Panel: Wipe gently to avoid damaging buttons, using drying techniques to avoid water damage.
- Exterior Surface: Make the outer shell sparkle by wiping down the front and sides.
Taking these steps will not only enhance the oven’s appearance but make it a joy to use!
Test the Temperature Accuracy
Testing the temperature accuracy of an oven is an essential step to guarantee delicious meals come out just right. A well-calibrated oven makes cooking easier and more enjoyable. To test accuracy, one should use a simple method: place an oven-safe probe in the center of the oven. This is known as probe placement. After setting the oven to a standard temperature, like 350°F, wait for it to heat up, then check the probe’s reading.
If there’s a big difference, calibration methods can help! Many ovens have instructions for adjusting the temperature settings. Remember, a little miscalibration can lead to cookies that are burnt or cakes that are too gooey. Adjustments aren’t scary—they’re part of the cooking adventure! With a little patience and practice, anyone can conquer their oven’s quirks and create meals that are perfect every time. Happy cooking!
Examine the Oven Light Functionality
Have you ever wondered if your oven light is working properly? It’s an important feature that not only illuminates the food but can also help you avoid curious mishaps. Checking the oven light’s functionality is easy and only takes a little bit of time.
Here’s a simple checklist to guide you:
- Inspect the bulb: Look for any signs of breakage or blackening. If it looks worn, a bulb replacement might be necessary!
- Test the switch operation: Flip the switch on and off to see if it responds.
- Check for flickering: A flickering light could mean you need a new bulb or that the switch needs fixing.
- Visual inspection: Look inside the oven while it’s on to confirm the light shines brightly.
Assess the Control Panel and Settings
How do you make sure your oven is ready to cook delicious meals? First, it’s important to check the control panel and settings. Users should confirm that all buttons are working properly and respond when pressed. If it’s a smart oven, make sure that any required software updates are installed so that it functions smoothly.
Next, look for the child lock feature. This setting is vital for safety, especially if there are little ones around. Ensuring this lock is activated helps prevent accidental changes to the oven’s settings.
Finally, take a moment to read the user manual, if available. It’s like having a friendly guide right in your kitchen! Each button and setting has a purpose, and knowing them can improve your cooking experience. Remember, a well-prepared oven is the first step toward creating delightful meals!
Verify the Ventilation System
Checking the oven’s ventilation system is essential for safe and effective cooking. A well-functioning ventilation system guarantees that smoke and odors are removed, keeping the kitchen fresh and your cooking enjoyable. To verify that everything is in tip-top shape, follow these steps:
- Inspect the exhaust fan: Check for any blockages or grease buildup that could prevent it from working properly.
- Test the airflow: Turn on the fan and feel if there’s a strong breeze. You want it to be effective in moving air.
- Review the ductwork: Confirm it’s properly connected and free from any holes or leaks that might affect airflow measurement.
- Clean the filters: Dirty filters can restrict airflow and cause overheating. Keep them spotless for peak performance.
Frequently Asked Questions
How Often Should I Perform an Oven Inspection?
Experts recommend performing oven inspections at least twice a year, aligning with seasonal inspections. This inspection frequency helps guarantee ovens operate efficiently and safely, reducing the risk of malfunctions or hazards during high-usage periods.
What Tools Do I Need for an Oven Inspection?
For an effective oven inspection, one should utilize safety gloves to protect hands and an infrared thermometer to measure surface temperatures accurately. These tools guarantee both safety and efficiency during the inspection process.
Can I Fix Minor Issues Myself?
Yes, minor issues can be fixed by some individuals, given a proper skill assessment. Sourcing the necessary parts ahead of time enhances their ability to perform repairs efficiently and effectively, contributing to successful preservation of the oven’s functionality.
When Should I Consider Calling a Professional?
When gas odor is detected or electrical arcing occurs, it is vital to consult a professional. Statistics show that 70% of DIY repairs involving these symptoms lead to hazardous situations, underscoring the importance of expert assistance.
Are There Specific Cleaning Products I Should Avoid?
It is advisable to avoid caustic cleaners and abrasive scrubbers when cleaning an oven, as these can damage surfaces and components. Opting for gentle, non-abrasive products helps maintain the oven’s integrity and performance.
Conclusion
To sum up, keeping your oven in tip-top shape is as important as having a trusty Quill to pen down your favorite recipes. By checking the door seal, heating elements, and other essential parts, you can guarantee your oven runs smoothly and safely. So put on your apron, roll up your sleeves, and tackle that inspection checklist! With just a little effort, you’ll be ready to bake a batch of cookies that’ll make everyone say, “Yum!”
Explore This Topic
- Back to Cooking Appliances
- Back to appliance safety
Related guides in this cluster: