How to 10 Steps for a Deep Clean of Your Dryer Drum: Step-by-Step Guide
Cleaning your dryer drum is important to keep it running well and safe. First, gather your supplies. Next, unplug your dryer to avoid any shocks. Remove lint from the trap and clean the vent so air can flow freely. Then, gently wipe down the drum with a mild cleaner. Rinse and wipe again to remove any leftover residue. After checking for damage and reassembling, plug it back in. Establish a routine, and you’ll discover even more tips to keep your dryer happy!
Key Takeaways
- Always unplug the dryer before cleaning to ensure safety and prevent electrical hazards.
- Remove and clean the lint trap weekly to boost airflow and minimize fire risks.
- Use mild cleaning solutions like vinegar or baking soda to effectively clean the drum without causing damage.
- Inspect the drum for cracks, rust, or sharp edges before reassembling to maintain performance and prevent future issues.
- Establish a routine cleaning schedule every couple of months to keep the dryer running efficiently.
Gather Your Supplies
Gathering supplies is the first step in deep cleaning a dryer drum, and it can be quite an adventure! You’ll need a few basic items: a gentle cleaner, microfiber cloths, and a vacuum with a hose. When shopping, keep an eye out for any product expiration dates; using fresh supplies guarantees effectiveness. Don’t forget to compare brands—some work better than others! For instance, brand comparisons can help you find the best cleaner that’s not only safe for your dryer but also great at tackling tough stains. It’s like a treasure hunt for the perfect products! Remember, the right supplies lay the foundation for your success. As you gather everything, think of it as preparing for a fun project. With the right tools, you’ll be on your way to a sparkling clean dryer drum in no time. So, roll up those sleeves and let the cleaning adventure begin!
Unplug the Dryer
Before starting to clean the dryer drum, it is essential to unplug the dryer for safety. This simple action helps prevent electrical hazards, ensuring everyone stays safe during the cleaning process. Taking a moment to detach the appliance not only protects against accidents but also sets the stage for a successful deep clean!
Safety First Always
When tackling the task of deep cleaning a dryer drum, ensuring safety is the top priority. Before diving into the cleaning process, one must always unplug the dryer. This simple step is essential for emergency preparedness, keeping everyone safe from possible electrical shocks or accidents. If children are around, it’s especially important to emphasize child safety—an unplugged appliance is much less likely to cause curious hands harm. Remember, the goal is to create a safe environment for all. So, take a moment to breathe, confirm that the dryer is disconnected from the power source, and feel a sense of accomplishment. With safety first, the cleaning can be both enjoyable and worry-free, allowing the focus to shift to that sparkling clean dryer drum!
Preventing Electrical Hazards
To prevent any electrical hazards while cleaning the dryer drum, it’s essential to unplug the appliance. Many people overlook this simple step, but it can save lives! When the dryer is unplugged, it reduces the risk of arc faults, which can lead to fires. By unplugging, one also supports grounding practices, ensuring that electricity stays where it belongs. Remember, safety comes first! Imagine cleaning that drum without the worry of shocking surprises. It’s like giving your dryer a little vacation while you work. So, take a moment to unplug—your future self will thank you. Clean confidently, knowing you’re putting safety above all else. After all, a clean dryer is a happy dryer, and happy dryers make happy clothes!
Importance of Detachment
Detaching the dryer from its power source is an essential step that everyone should keep in mind. Unplugging the dryer not only enhances safety but also sets a clear boundary between cleaning tasks and electrical hazards. This simple action can provide mental clarity, allowing for a more focused and effective deep clean.
- Safety First: Avoid dangerous electrical shocks.
- Clear Focus: With the dryer unplugged, it’s easier to concentrate on cleaning every nook and cranny.
- Empowerment: Taking this step makes one feel in control of the situation.
Remove Lint From the Lint Trap
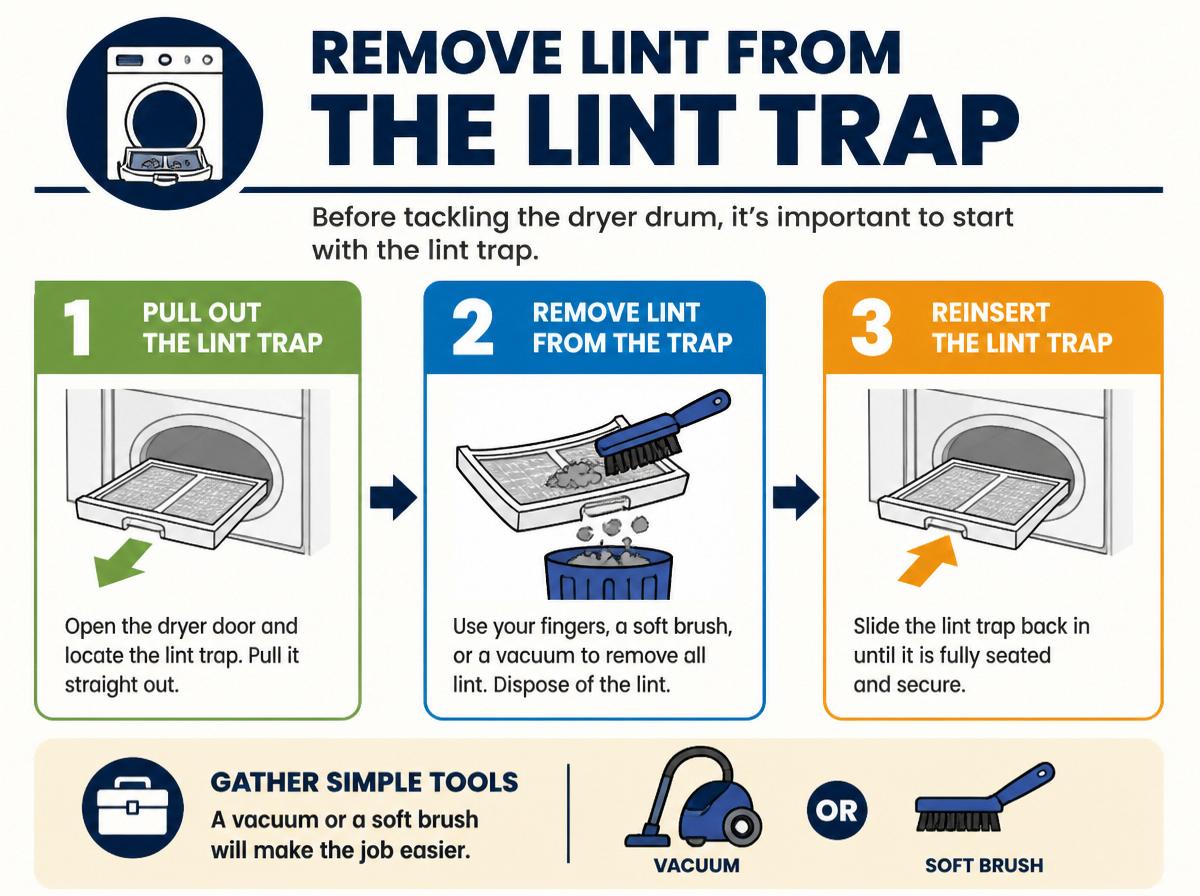
Before tackling the dryer drum, it’s important to start with the lint trap. Gathering a few simple tools, like a vacuum or a soft brush, will make the job easier and more effective. Cleaning the lint trap carefully not only helps your dryer work better but also keeps your home safe from potential fires, making this step super important!
Gather Necessary Tools
While having clean laundry is satisfying, it’s easy to forget about an important step in keeping the dryer running smoothly: removing lint from the lint trap. Gathering the right tools can make this task easier and even enjoyable. With a little preparation, the process becomes seamless. Here’s what you’ll need:
- A soft-bristle brush – This helps get lint out easily without damaging the lint trap.
- A vacuum with a hose attachment – It’s perfect for sucking up those sneaky lint bits hiding in corners.
- Compact kits for cleaning – These come with ergonomically designed tools, making it easier for anyone to tackle the job.
Having the right tools will empower you to keep your dryer in top shape!
Clean With Care
Cleaning the lint trap is a quick task that can have a big impact on how well a dryer works. By regularly removing lint, users can improve efficiency and reduce fire risks. This small action helps delicate fabrics dry safely.
Here’s a simple reminder of what to do:
| Task | Impact |
|---|---|
| Clean lint trap weekly | Prevents clogs and boosts airflow |
| Use eco-friendly products | Protects both fabrics and the planet |
| Check for trapped objects | Keeps items from damaging the dryer |
With little effort, one can maintain the dryer and extend its lifespan. So, take a moment to care for that lint trap, and your clothes will thank you, coming out fresher than ever!
Clean the Dryer Vent
Vent cleaning is an important step that shouldn’t be overlooked when deep cleaning a dryer. A clogged dryer vent can affect airflow efficiency, making the dryer work harder and less safely. If left uncleaned, these blocks can even lead to dangerous situations, including carbon monoxide buildup in the home.
Here are three key reasons to keep that vent clean:
- Fire Hazard: Lint build-up is flammable and can spark a fire!
- Energy Savings: A clean vent can help save money on energy bills!
- Longer Dryer Life: Less strain on the dryer means it can last longer.
Taking the time to clean the dryer vent will protect your home and make sure your dryer operates efficiently. So roll up those sleeves, grab a vacuum, and get to work—your dryer will thank you!
Wipe Down the Drum Interior
Wiping down the drum interior is a simple yet essential step in keeping a dryer in tip-top shape. A clean drum not only helps with stain removal but also plays a key role in odor neutralization. When lint, fabric softener, or detergent residue builds up, it can cause unpleasant smells that linger in clothes. To effectively wipe down the interior, a soft cloth or sponge is perfect for reaching all the corners and crevices.
For those stubborn spots, a little extra elbow grease may be needed, but don’t worry! Everyone has battled a sticky stain or two. A thorough wipe makes a big difference, ensuring clothes come out fresh and clean. Encourage yourself, knowing that maintaining your dryer is a small effort for a big reward. Once this task is complete, your dryer will be ready to tackle those laundry loads like a champ!
Use a Mild Cleaning Solution
Before diving into the deep cleaning process, it’s a good idea to gather a mild cleaning solution that can effectively tackle any lingering grime in the dryer drum. Using a solution with a proper pH balance guarantees safety for both the drum and our clothes, while also being tough on stubborn stains. Here are three great options for consideration:
- White vinegar: A natural, eco-friendly choice that deodorizes and cleans.
- Baking soda: A gentle abrasive that can lift grime without scratching the drum.
- Castile soap: A versatile soap that comes in various fragrance options, making cleaning smell delightful!
Choosing the right solution not only refreshes the dryer drum but also keeps clothes smelling fresh and clean. By selecting a mild cleaning solution, anyone can feel confident that they’re nurturing their dryer while achieving sparkling results. It’s a small step towards making laundry day more enjoyable!
Rinse and Wipe Again
Once the mild cleaning solution has worked its magic, it’s time to rinse and wipe again to confirm that all residue is gone. Start by taking a clean cloth and dampening it with plain water, ensuring it’s not too wet. Gently wipe the drum, checking for any leftover soap that might ruin future loads or cause streaks. This step is essential for streak prevention, helping the dryer drum shine and function well.
After wiping, inspect the drum for any moisture left behind. Too much moisture can lead to musty smells and could affect your clothes. A quick inspection now can save trouble later.
Once satisfied, dry the drum thoroughly with another clean cloth. With these simple steps, the dryer drum will be clean, fresh, and ready for its next load, bringing a smile to anyone’s laundry day!
Inspect the Drum for Damage
Before getting back to drying clothes, it’s important to give the drum a good inspection. Look closely for any cracks that might be hiding and check for rust that could cause problems later. Spotting these issues early can save time and hassle, so take a moment to make sure everything is in tip-top shape!
Check for Cracks
How can anyone make sure their dryer drum is in tip-top shape? Checking for cracks is essential. Over time, thermal fatigue can weaken the drum, leading to unexpected repairs. This can have warranty implications, as damage may void coverage.
Here’s a simple checklist to guide you:
- Look for visible cracks – Examine the drum closely for any signs of damage.
- Listen for unusual noises – Odd sounds can indicate a problem, alerting you to possible cracks.
- Feel for sharp edges – Run your hand along the drum to detect any rough spots that may signal wear and tear.
Regular checks will keep your dryer working well, saving you stress and money! Remember, a little care goes a long way in ensuring your laundry stays fresh and clean!
Look for Rust
When checking the dryer drum, it’s important not to overlook rust, which can be a sneaky enemy of clean laundry. Rust forms through rust chemistry when iron and oxygen meet in the presence of moisture, leading to corrosion patterns that can damage the drum. A quick visual inspection can reveal reddish-brown spots or flaking areas, signaling trouble ahead. If rust is found, it’s imperative to act fast! Sand the affected spots gently to remove the rust, and consider applying a rust-resistant paint for protection. Not only will this help keep clothes clean, but it also extends the life of the dryer. Remember, a little effort now can save big headaches later—a happy dryer makes for happy laundry days ahead!
Reassemble and Plug in the Dryer
After completing the deep cleaning of the dryer drum, it’s time to reassemble and plug in the dryer, which can feel like the final step in a fun treasure hunt. Making sure that the dryer is put back together correctly is rewarding.
- Check the panel alignment: Make sure everything fits snugly, like a jigsaw puzzle piece.
- Secure the connections: Tighten the bolts to the correct torque. This guarantees stability and safety; nobody wants a wobbly dryer!
- Plug it in: Feel that rush of excitement as power flows back into the machine!
Once everything is in place, step back and admire the work completed. It’s now ready for use, just like all the great adventures ahead. With a little patience and attention to detail, hard work surely pays off!
Establish a Regular Cleaning Routine
Regularly cleaning the dryer drum is something that many people often forget, but it can truly make a difference! Establishing a cleaning routine can turn this task into a simple habit. To do this, one might consider timing guidelines, like cleaning the drum every couple of months. Setting reminders on a calendar or using phone alerts can help.
Start small—make it a fun family activity! Kids can help by reading the instructions or passing cleaning supplies. This not only makes it easier but also teaches them about home care.
If this routine gets ingrained into their lives, it will become second nature. They’ll feel proud knowing they’re maintaining a clean appliance! Soon, they’ll notice fresher clothes and improved dryer efficiency, making it worth the effort. So, grab those cleaning supplies, and remember to enjoy the process—it’s easier than it sounds, and together, they can conquer this chore!
Frequently Asked Questions
How Often Should I Deep Clean My Dryer Drum?
It is advisable to deep clean the dryer drum at least twice a year as part of regular seasonal maintenance. This frequency can vary based on individual usage schedules, with heavier use requiring more frequent cleaning.
Can I Use Bleach to Clean the Dryer Drum?
Using bleach to clean the dryer drum is not advisable due to the risk of chemical residue and potential fume hazards. Many safer alternatives exist that effectively clean without compromising the dryer’s functionality or safety.
What if the Drum Has Rust Spots?
If the dryer drum has rust spots, rust removal methods can be attempted. However, significant damage may require drum replacement to guarantee peak performance and prevent further deterioration during drying cycles. Careful assessment is advisable.
Is It Necessary to Clean the Dryer Vent?
Cleaning the dryer vent is as essential as tending to a fire’s tinder. It enhances fire prevention and boosts energy efficiency, ensuring that the dryer operates efficiently and reducing the risk of dangerous malfunctions.
What Are Signs of a Dirty Dryer Drum?
Signs of a dirty dryer drum include a musty odor lingering on clothes and visible fabric discoloration after drying. These indicators suggest that accumulated lint, moisture, or detergent residues may be impacting cleaning effectiveness.
Conclusion
With a little effort, your dryer can shine like a new penny! Just like a gardener tending to their plants, regular cleaning helps your dryer thrive and prevents future troubles. Picture your laundry dancing in a fresh, clean drum, free from hidden lint and grime. By following these steps and making cleaning a habit, you’re not just maintaining your dryer—you’re nurturing your home. So roll up your sleeves, and give your dryer the care it deserves!
Explore This Topic
- Back to Dryer
- Back to appliance cleaning
Related guides in this cluster: