
Troubleshooting Common Dryer Thermal Fuse Problems and Solutions
The thermal fuse is a vital safety part in a dryer that prevents overheating. If the dryer stops working, runs without heating, or makes odd noises, the fuse might be blown. Testing is easy with a multimeter, and a reading of zero ohms indicates it’s time to replace the fuse. Regular maintenance, like cleaning lint filters, helps prevent future issues. Don’t worry, with a bit of care, you can become a pro at fixing your dryer! There’s more to learn about keeping your appliance in top shape.
Key Takeaways
- Check if the dryer stops working or runs without heating, indicating a possible blown thermal fuse.
- Test the thermal fuse with a multimeter on the ohms setting; a zero reading confirms a blown fuse.
- Inspect the thermal fuse for visible damage or wear and consider replacing it if necessary.
- Regularly clean lint filters and inspect vents to prevent clogs that can lead to thermal fuse failure.
- Schedule maintenance checks on moisture sensors and ventilation pathways to ensure optimal dryer performance.
Understanding the Role of the Thermal Fuse
When it comes to doing laundry, the thermal fuse is like a superhero for your dryer. This little gadget works quietly behind the scenes, ensuring that everything stays safe and sound. The thermal fuse functions by regulating heat, preventing the dryer from overheating. Just like a skilled guardian, it cuts off the power if things get too hot, saving your dryer from damage.
When the dryer runs, heat builds up, and that’s where this fuse shines. If the temperature rises above safe levels, the thermal fuse steps in to save the day. It’s important for everyone to remember that this small part plays a big role in keeping clothes dry and fresh. If your dryer suddenly stops working, it might be the thermal fuse doing its job. Understanding its purpose makes it easier to troubleshoot and feel empowered in your laundry adventures. So, keep calm and trust your dryer superhero!
Common Signs of a Blown Thermal Fuse
Although dryers are usually reliable, there are some clear signs that the thermal fuse may have blown. One major indicator is that the dryer may stop working altogether, leaving clothes damp and wrinkled. This can often happen after a bout of dryer overheating, which stresses the components. If the appliance refuses to start, or runs but doesn’t heat, it’s time to check for issues.
Another sign is an unusual noise while it operates; if clunking or buzzing occurs, that might signal a problem within the fuse location. If the dryer turns off suddenly during a cycle, it’s likely due to the blown thermal fuse protecting the appliance from further damage.
Monitoring these signs can help prevent headaches later. If these symptoms emerge, a thorough inspection is the next best step, guiding users toward a solution with confidence!
How to Test the Thermal Fuse
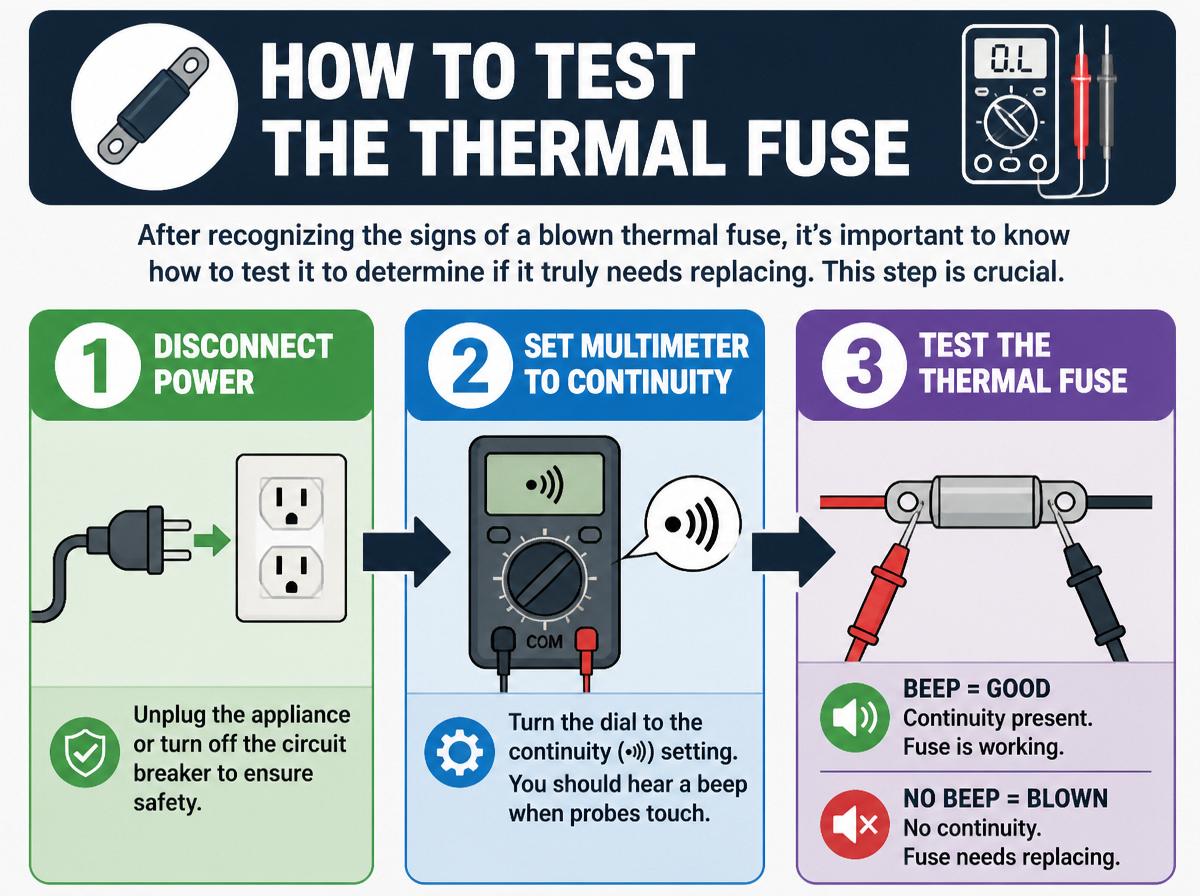
After recognizing the signs of a blown thermal fuse, it’s important to know how to test it to determine if it truly needs replacing. This step is crucial in troubleshooting techniques, allowing you to pinpoint the problem accurately. Here’s how to test the thermal fuse using simple testing equipment:
- Unplug the Dryer: Always confirm safety by disconnecting the power source to avoid any electrical shock.
- Locate the Thermal Fuse: Check your dryer’s manual to find the fuse’s location. It’s usually near the heating element.
- Use a Multimeter: Set the multimeter to the ohms setting. Touch the probes to the fuse terminals; a reading of zero indicates it’s blown and needs replacing.
Steps to Replace a Blown Thermal Fuse
Replacing a blown thermal fuse in a dryer can seem tricky, but it’s easier than it sounds! First, readers must locate the thermal fuse, which is usually found near the heating element or blower. Once it’s identified, installing the new fuse should be a breeze, providing a sigh of relief and the joy of a fully functioning dryer again!
Identify the Thermal Fuse
Here’s what to do:
- Locate the thermal fuse in your dryer.
- Check your user manual for thermal fuse types specific to your model.
- Examine the fuse for visible signs of damage.
With these steps, you’ll be one step closer to fixing your dryer!
Install New Thermal Fuse
Ready to bring your dryer back to life? Installing a new thermal fuse can help! First, verify the dryer is unplugged. Then, follow these simple steps for thermal fuse installation:
| Step | Details |
|---|---|
| 1. Locate Fuse | Find the thermal fuse area. |
| 2. Remove Fuse | Disconnect and take it out. |
| 3. Install New | Place the new fuse correctly. |
| 4. Reassemble | Put everything back together. |
Familiarize yourself with these fuse replacement tips. Using the right tools, like a screwdriver, can make the job smoother. Remember, take your time and don’t rush—your dryer will thank you! Soon enough, laundry day will be back on track. Happy repairing!
Preventing Future Thermal Fuse Failures
To keep dryers running smoothly and to prevent thermal fuse failures, regular maintenance checks are essential. This means cleaning lint filters and making sure ventilation pathways are clear, allowing hot air to flow freely. By taking these simple steps, users can help their dryers work efficiently and avoid unexpected breakdowns, which is a win-win for everyone!
Regular Maintenance Checks
Regular maintenance checks are essential for keeping dryers in tip-top shape and preventing pesky thermal fuse failures. A proactive approach can help catch issues before they become major problems. Here are three simple dryer inspection tips to incorporate into a maintenance schedule:
- Lint Filter Cleaning: Always remove lint after each use to avoid build-up, which can lead to overheating.
- Hose and Vent Inspection: Regularly check the vent hose and duct for any clogs or damages that could restrict airflow.
- Check Sensor Functionality: Verify moisture sensors are clean and functioning well to help regulate drying cycles properly.
Clear Ventilation Pathways
A clear path for air to flow is essential when it comes to keeping a dryer running smoothly and preventing thermal fuse failures. Ventilation issues often arise from lint buildup in vents or blockages caused by improper installation. Maintaining an open pathway guarantees hot air can escape, keeping temperatures in check. Regularly checking for airflow obstruction in ducts can save both time and money. Cleaning vent lines and door seals helps the dryer breathe easier! When the air moves freely, dryers work more efficiently and reduce stress on their thermal fuses. So, remember, a little effort in clearing those pathways can go a long way. Happy drying! Your appliance will thank you with reliable performance.
Other Potential Dryer Issues to Consider
While fixing dryer issues can feel like solving a tricky puzzle, it’s important to remember that the thermal fuse isn’t the only culprit in a malfunctioning machine. Other problems can pop up too, leaving you scratching your head. Here are three potential issues to contemplate:
- Drum Issues: If the drum isn’t turning or moving awkwardly, it might have a jammed belt or damaged rollers, causing your dryer to feel more like a fancy clothes basket.
- Control Panel Problems: Sometimes, the buttons just won’t respond, which could signal a power issue or faulty electronics.
- Vent Blockage: A clogged vent can make the dryer work overtime, leading to overheating and possible fuse failure.
When to Call a Professional
Sometimes, knowing when to call a professional can be just as important as trying to fix the problem yourself. If a dryer continually trips the thermal fuse, it might be time for professional assistance. While many simple issues can be tackled at home, some signs indicate when to DIY and when to seek help. For instance, if strange noises or burning smells accompany abnormal functioning, these red flags shouldn’t be ignored. Additionally, if previous fixes haven’t worked, a professional can diagnose hidden issues you might not see. It’s perfectly okay to feel unsure—after all, saving money shouldn’t mean risking safety. Understanding when to call for expert help can save time and frustration. Remember, you’re not alone! By recognizing your limits, you can confidently tackle dryer repairs and know just when to bring in the pros. In the end, safety comes first, and that’s something to smile about.
Frequently Asked Questions
Can I Bypass the Thermal Fuse Temporarily?
Bypassing the thermal fuse is possible for temporary solutions; however, this practice poses safety risks and potential damage to the dryer. It is advised to address the underlying issues instead of relying on temporary fixes.
Does the Thermal Fuse Affect Dryer Heating?
The thermal fuse greatly impacts drying efficiency; if it fails, the dryer won’t heat properly. Regular fuse replacement guarantees peak performance and prevents further issues, maintaining the appliance’s effective operation and prolonging its lifespan.
How Long Should a Thermal Fuse Last?
The lifetime expectancy of a thermal fuse often raises concerns. Typically, it can last several years, contingent upon proper thermal fuse maintenance. However, unexpected failures can occur, leaving users in a state of uncertainty regarding their dryer’s performance.
What Causes a Thermal Fuse to Blow?
A thermal fuse blows primarily due to overheating issues, often resulting from clogged vents or inadequate dryer maintenance. Regularly cleaning the vent and ensuring proper airflow can markedly reduce the likelihood of this malfunction.
Are There Different Types of Thermal Fuses?
Like stars in a night sky, various types of thermal fuses exist. Identification involves recognizing distinct models, while proper thermal fuse installation guarantees ideal safety and functionality in appliances, preventing overheating and potential hazards.
Conclusion
To sum up, fixing a blown thermal fuse in your dryer can feel like solving a puzzle. Just like finding that elusive last piece, it takes patience, attention, and a little courage. By understanding the steps to test and replace the fuse, you empower yourself to tackle this common issue. Remember, just as a straightened laundry line brings sunshine to a cloudy day, a working dryer brings warmth to your home. You’ve got this—happy DIY-ing!
Explore This Topic
- Back to Dryer
- Back to common issues
Related guides in this cluster: